Acuity Scheduling
Getting Started with Acuity Scheduling
The Acuity Scheduling modules allow you to monitor, publish or update posts, photos and videos in your Acuity Scheduling account.
Prerequisites
- An Acuity Scheduling account
In order to use Acuity Scheduling with Integromat, it is necessary to have an Acuity Scheduling account. If you do not have one, you can create an Acuity Scheduling account at acuityscheduling.com.
Connecting Acuity Scheduling to Integromat
To connect your Acuity Scheduling account to Integromat follow the general instructions for Connecting to services.
After you click the Continue button, Integromat will redirect you to the Acuity Scheduling website where you will be prompted to grant Integromat access to your account.
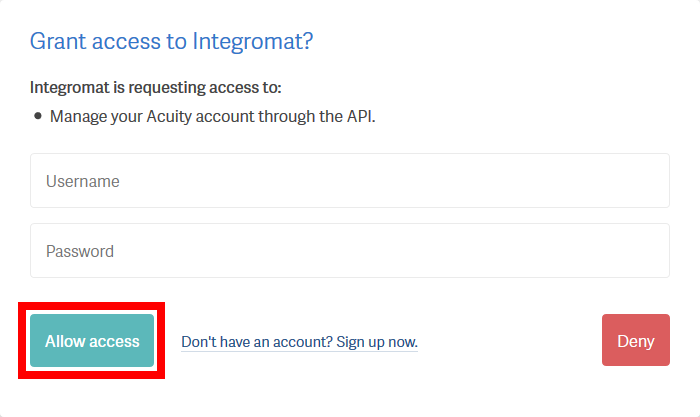
Confirm the dialog by clicking the Allow access button.
Appointment
Watch Appointments
Triggers when an appointment is scheduled, rescheduled, changed, or canceled.
| Webhook name |
Enter a name for the webhook. |
| Connection | Establish a connection to your Acuity Scheduling account |
| Event Type | Select the type of event that triggers the module. |
List Appointment Types
Returns a list of appointment types.
| Connection | Establish a connection to your Acuity Scheduling account. |
| Retrieve Deleted Appointment Types |
Select the Yes option to include deleted appointment types in the response. |
| Limit | Set the maximum number of results that Integromat will work with during one cycle. |
Get Appointment
Retrieves details for an appointment.
| Connection | Establish a connection to your Acuity Scheduling account. |
| Appointment ID | Select the name of the appointment or map the appointment ID you want to retrieve details about. |
| Past Form Answers | Select the Yes option to include previous answers given in the intake forms of that appointment. |
Create Appointment
Creates an appointment.
| Connection | Establish a connection to your Acuity Scheduling account. |
| Date and Time | Enter the date and time for the appointment in the format YYYY-MM-DD
HH:mm
|
| Appointment Type ID | Select or map the appointment type you want to create. |
| First Name | Enter the client's first name. |
| Last Name | Enter the client's last name. |
| Enter the client's email address. | |
| Calendar ID | Select the calendar you want to add the appointment to. |
| Phone | Enter the client's phone number, may be required in account settings. |
| Time Zone | Select the client's time zone. |
| Intake Form Fields | Select the desired form field and enter the value. You can map the intake form using the List Intake Forms module. |
| Certificate Code | Select the package or coupon certificate code. |
| Addon ID | Select the ID of the addon(s) to be included in the scheduled appointment. |
| Notes | Enter private notes about the appointment. |
| No Email | If this option is enabled no confirmation email or SMS will be sent when creating the appointment. |
List Appointments
Retrieves a list of appointments currently scheduled for you based on defined filter settings.
| Connection | Establish a connection to your Acuity Scheduling account. |
| Limit | Set the maximum number of appointments that Integromat will return during one cycle. |
| Appointments Date and After | Enter the date from when you want to filter appointments. Use the format YYYY-MM-DD
HH:mm. |
| Appointments Date and Before | Enter the date you want to filter appointments to. Use the format YYYY-MM-DD
HH:mm. |
| Calendar ID | Select the calendar you want to list the appointments from. |
| Appointment Type ID | Returns only appointments of the selected type. |
| Canceled Appointments |
Show all appointments Don't show canceled appointments Show canceled appointments |
| First Name | Filter appointments by the client's first name. |
| Last Name | Filter appointments by the client's last name. |
| Phone Number | Filter by the client phone number. |
| Addon ID | Enter the ID of the addon included in the scheduled appointment. |
| Exclude Forms | Intake forms will not be returned in the module response. Response will be faster if intake forms are excluded. |
| Appointments That Allows Clients to Cancel | If this option is enabled, appointments that allow clients to cancel are also returned. |
| Appointments That Allows Clients to Reschedule | If this option is enabled, appointments that allow clients to reschedule are also returned. |
| ASC or DESC |
Define the direction of the result order. Type ASC to ascending order. |
Update Appointment
Updates appointment details from a white-list of updatable attributes.
| Connection | Establish a connection to your Acuity Scheduling account. |
| Administrator |
If the Yes option is selected, then two other fields appear: Certificate |
| Appointment ID | Select the appointment you want to update. |
| First Name | Updates the client's first name. |
| Last Name | Updates the client's last name. |
| Updates the client's email address. | |
| Phone | Updates the client's phone number. |
Reschedule Appointment
Reschedules an appointment.
| Connection | Establish a connection to your Acuity Scheduling account. |
| Appointment ID | Select the appointment you want to reschedule. |
| New Date and Time | Enter the date and time for rescheduling the appointment in the format YYYY-MM-DD
HH:mm. |
| Calendar ID | Select the calendar that contains the appointment you want to reschedule. If left empty we'll leave the appointment on the same calendar. |
| Time Zone | Select the time zone for the rescheduled appointment. |
| No Email | If the Yes option is selected then sending the rescheduling e-mail and SMS when rescheduling the appointment is skipped. |
Cancel Appointment
Cancels an appointment.
| Connection | Establish a connection to your Acuity Scheduling account. |
| Appointment ID | Select the appointment you want to cancel. |
| Cancel Message | Enter a message to send with the cancellation notifications. |
| No Show Appointment | Specify whether the appointment was a no show or not. |
| Skip Sending the Cancellation Email | Skips sending the cancellation e-mail and SMS when canceling the appointment. |
List Appointment Addons
Gets a full list of addons. Addons can add time and duration to an appointment before it is booked.
| Connection | Establish a connection to your Acuity Scheduling account. |
| Limit the Results | Set the maximum number of addons that Integromat will return during one cycle. |
Client
List Clients
Retrieves a list of clients.
| Connection | Establish a connection to your Acuity Scheduling account. |
| Limit the Results | Set the maximum number of clients that Integromat will return during one cycle. |
| Search Clients | Enter the term you want to filter the result by. |
Create Client
Creates a new client.
| Connection | Establish a connection to your Acuity Scheduling account. |
| First Name | Enter the new client's first name. |
| Last Name | Enter the new client's last name. |
| Phone number | Enter the new client's phone number. |
| Email address | Enter the new client's email address. |
| Notes | Enter notes for the new client. |
Update Client
Updates a client within your client list.
| Connection | Establish a connection to your Acuity Scheduling account. |
| Last Name | Select the last name of the client you want to update. |
| First Name | Select the first name of the client you want to update. |
| Phone number | Enter the new phone number. |
| Email address | Enter the new email address. |
| Notes | Enter notes for the client. |
Delete Client
Deletes an existing client from your client list.
| Connection | Establish a connection to your Acuity Scheduling account. |
| First Name | Select the first name of the client you want to delete. |
| Last Name | Select the last name of the client you want to delete. |
| Phone Number | Enter the phone number of the client you want to delete. |
Certificate
Add Certificate Code
Create a package or coupon certificate.
| Connection | Establish a connection to your Acuity Scheduling account. |
| Product ID/Coupon ID | Select the product or coupon you want to create a certificate code for. |
| Certificate Code | Enter the desired code for the coupon or product. If left empty the code will be generated automatically. |
| The e-mail address to assign a package code to. |
List Certificate Codes
| Connection | Establish a connection to your Acuity Scheduling account. |
| Limit the Results | Set the maximum number of codes that Integromat will return during one cycle. |
| Product ID | Select or map the product you want to retrieve certificate codes for. |
| Order ID | Select or map the order you want to retrieve certificate codes for. |
| Appointment Type ID | Select or map the appointment type you want to retrieve certificate codes for. |
| Enter the email address you want to retrieve certificate codes for. Combine this with appointment type to suggest certificates to a client! |
Delete Certificate Code
Deletes a certificate code.
| Connection | Establish a connection to your Acuity Scheduling account. |
| Certificate Code | Select the certificate code you want to delete. |
Check Certificate
Checks that a certificate code is valid for a particular appointment type. Use this to validate a certificate code before setting it for an appointment.
| Connection | Establish a connection to your Acuity Scheduling account. |
| Certificate Code | Enter or map the code you want to check. |
| Appointment Type ID | Select the appointment type you want to check. |
| Email address | An optional email address to check if the certificate is valid for (e.g. for single-use coupons). |
Order
Watch Orders
Triggers when an order is completed.
| Webhook name | Enter the webhook name. |
| Connection | Establish a connection to your Acuity Scheduling account. |
| Event Type | Select the type of event that triggers the module. |
List Orders
Retrieves a list of orders from the online store with the most recent first. Status can be delivered, paid, or unpaid. The title is a semi-colon separated list of the product names ordered.
| Connection | Establish a connection to your Acuity Scheduling account. |
| Limit of Results | Set the maximum number of orders Integromat will return during one cycle. |
Get Order
Retrieves details about a single order.
| Connection | Establish a connection to your Acuity Scheduling account. |
| Order ID | Select the order you want to retrieve information about. |
Block Off Time
Add Block Off Time
Creates a block off time in your calendar.
| Connection | Establish a connection to your Acuity Scheduling account. |
| Starting Date and Time | Start date and time to block off in YYYY-MM-DD
HH:mm format. |
| Ending Date and Time | End date and time to block off in YYYY-MM-DD
HH:mm format. |
| Calendar ID | Select the calendar where you want to create a block off time. |
| Notes | Enter the text note that is added to the blocked off time. |
List Block Off Times
Retrieves a list of blocks for the authenticated user.
| Connection | Establish a connection to your Acuity Scheduling account. |
| Calendar ID | Select the calendar you want to retrieve blocked off times from. |
| Maximum results | Set the maximum number of blocked off times Integromat will return during one cycle. |
| Minimum Date | Retrieves only appointments from this date and after. Use YYYY-MM-DD
HH:mm format. |
| Maximum Date | Retrieves only appointments from this date and before. Use YYYY-MM-DD
HH:mm format. |
Get Block Off Time
Retrieves details for a specified block off time.
| Connection | Establish a connection to your Acuity Scheduling account. |
| Blocked Off Time ID | Select the blocked off time you want to retrieve details about. |
Delete Block Off Time
Deletes a specified block off time.
| Connection | Establish a connection to your Acuity Scheduling account. |
| Blocked Off Time ID | Select the blocked off time you want to retrieve details about. |
Availability
List Available Classes
Retrieves available classes for a defined filter.
| Connection | Establish a connection to your Acuity Scheduling account. |
| Limit the results | Set the maximum number of classes Integromat will return during one cycle. |
| Month | Specify the month you want to list available classes for. Use YYYY-MM-DD
HH:mm format. |
| Appointment Type ID | Select the appointment type you want to retrieve. |
| Calendar ID | Select the calendar you want to retrieve available classes from. |
| Minimum Date | Enter the earliest date to return classes for. This will be over-ridden by month. Use YYYY-MM-DD
HH:mm format. |
| Maximum Date | Enter the latest date to return classes for. This will be over-ridden by month. Use YYYY-MM-DD
HH:mm format. |
| Classes including Unavailable | Select the Yes option to list all classes, including those that are no longer available. |
| Classes including Private | Select the Yes option to list all classes, including those marked as private. |
Check Available Times
Retrieves available times for a date and appointment type.
| Connection | Establish a connection to your Acuity Scheduling account. |
| Date and Time | Enter date and time to validate. Use YYYY-MM-DD
HH:mm format. |
| Appointment Type ID | Select the appointment type to check availability for. |
| Calendar ID | Select the calendar you want to check for available times. |
List Available Dates
Returns dates with availability for a month and an appointment type.
| Connection | Establish a connection to your Acuity Scheduling account. |
| Month | Enter the month you want to check for available dates. |
| Appointment Type ID | Select the appointment type to check availability for. |
| Limit the Results | Set the maximum number of dates Integromat will return during one cycle. |
| Calendar ID | Select the calendar you want to check for available dates. |
| Addon IDs | Addon to use when calculating availability for this appointment type. Addons must be associated with the appointment type. |
| Time Zone | Select timezone for availability in time conversions. |
List Available Times
Returns available times for a date and appointment type.
| Connection | Establish a connection to your Acuity Scheduling account. |
| Date | Specify the date you want to list available times from. Use YYYY-MM-DD
HH:mm format. |
| Appointment Type ID | Enter the appointment type to check availability for. |
| Limit the Results | Set the maximum number of available times Integromat will return during one cycle. |
| Calendar ID | Select the calendar you want to check for available times. |
| Addon IDs | Addon IDs to use when calculating availability for this appointment type. Addons must be associated with the appointment type. |
| Time Zone | Select timezone for availability in time conversions. |
Other
List Payments
Retrieves a list of payment transactions for a particular appointment.
| Connection | Establish a connection to your Acuity Scheduling account. |
| Appointment ID | Select the appointment you want to retrieve the list of transactions for. |
| Limit the Results | Set the maximum number of payments Integromat will return during one cycle. |
List Intake Forms
Retrieves intake forms.
| Connection | Establish a connection to your Acuity Scheduling account. |
| Limit the Results | Set the maximum number of intake forms Integromat will return during one cycle. |
List Labels
Retrieves a list of labels.
| Connection | Establish a connection to your Acuity Scheduling account. |
| Limit the Results | Set the maximum number of labels Integromat will return during one cycle. |
List Package Products
Retrieves a list of products and packages.
| Connection | Establish a connection to your Acuity Scheduling account. |
| Limit the Results | Set the maximum number of products Integromat will return during one cycle. |
| Retrieve Deleted Products | If the Yes option is selected then also deleted products will be retrieved. |
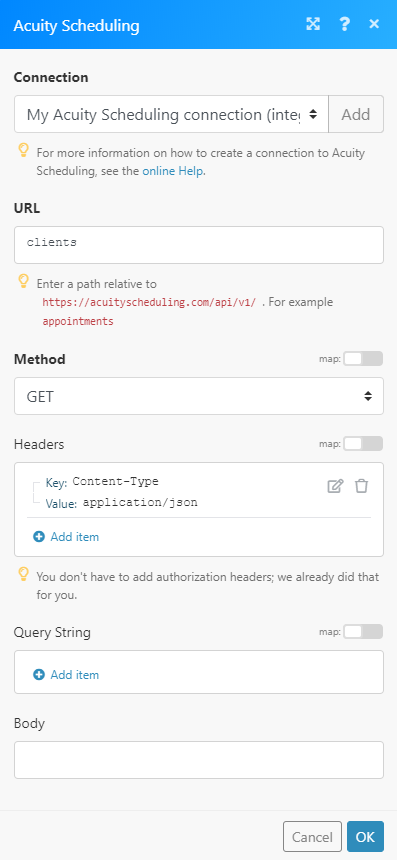
Make an API Call
Allows you to perform a custom API call.
| Connection | Establish a connection to your Acuity Scheduling account. |
| URL |
Enter a path relative to https://acuityscheduling.com/api/v1/. E.g. For the list of available endpoints, refer to the Acuity Scheduling API Reference.
|
| Method |
Select the HTTP method you want to use: GET POST PUT PATCH DELETE |
| Headers | Enter the desired request headers. You don't have to add authorization headers; we already did that for you. |
| Query String | Enter the request query string. |
| Body | Enter the body content for your API call. |
Example of Use - List Clients
The following API call returns all clients:
Matches of the search can be found in the module's Output under Bundle > Body.
In our example, 5 clients were returned:


