Beamer
The Beamer modules allow you to watch, create, update, search, and delete the posts in your Beamer account.
Getting Started with Beamer
Prerequisites
- A Beamer account
In order to use Beamer with Integromat, it is necessary to have a Beamer account. If you do not have one, you can create a Beamer account at app.getbeamer.com/signup.
Connecting to Beamer to Integromat
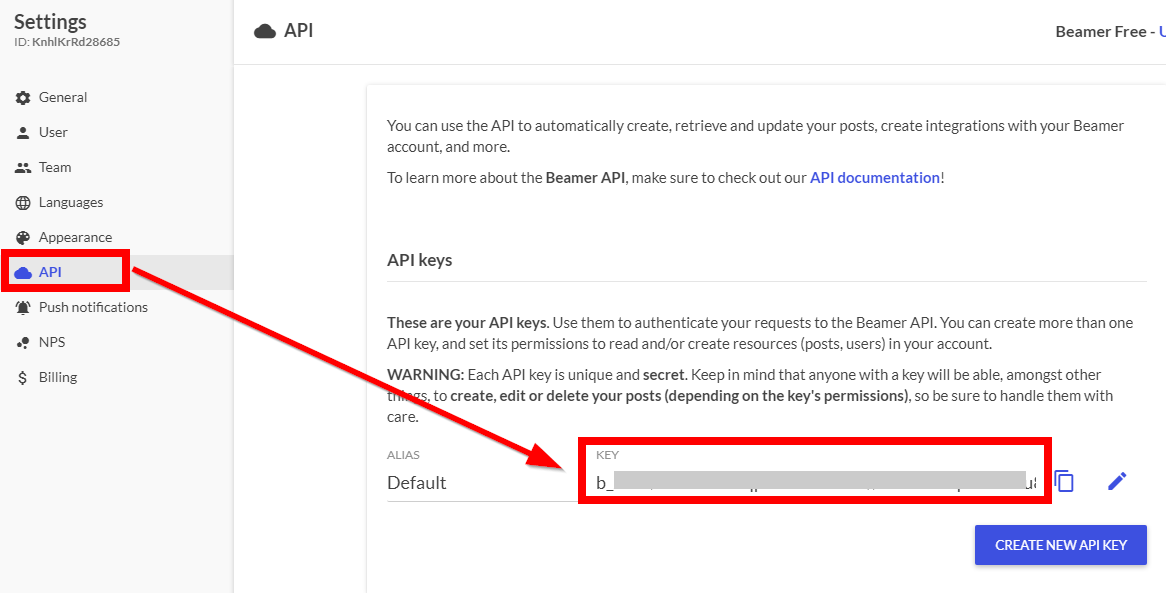
To connect your Beamer account to Integromat you need to obtain the API Key from your Beamer account and insert it in the Create a connection dialog in the Integromat module.
1. Log in to your Beamer account.
2. Click Settings > API.
3. Copy the API key to your clipboard.
4. Go to Integromat and open the Beamer module's Create a connection dialog.
5. In the Connection name field, enter a name for the connection.
6. In the API Key field, enter the API key copied in step 3, and click Continue.
The connection has been established.
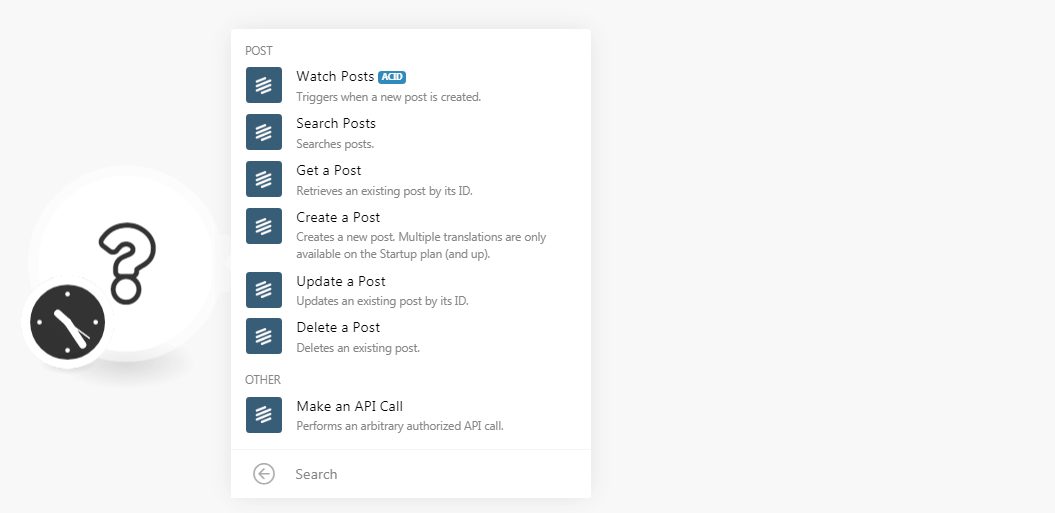
Post
Watch Posts
Triggers when a new post is created.
| Connection | Establish a connection to your Beamer account. |
| Limit | Set the maximum number of posts Integromat should return during one scenario execution cycle. |
Search Posts
Search Posts.
| Connection | Establish a connection to your Beamer account. |
| Date From | Enter a date to search the posts created on or after the specified date. |
| Date To | Enter a date to search the posts created on or before the specified date. |
| Language | Select the language to search the posts in the specified language. |
| Category | Select the category to search the posts of the specified category. |
| Published | Select whether you want to search the published posts. |
| Archived | Select whether you want to search the archived posts. |
| User First Name | Enter the user's first name whose posts you want to search. |
| User Last Name | Enter the user's last name whose posts you want to search. |
| User Email | Enter the user's email address whose posts you want to search. |
| Expired | Select whether you want to search the expired posts. |
| Filter By User ID | Select whether you want to search only single-user posts. Available only on the enterprise plan. |
| Filter | Enter the filter name to search the posts based on the specified segmentation filter. Available only on the pro plan (and up). |
| User ID | Select the User ID to search the post related to the selected user. |
Get a Post
Retrieves an existing post by its ID.
| Connection | Establish a connection to your Beamer account. |
| Post ID | Select the Post ID whose details you want to retrieve. |
Create a Post
Creates a new post. Multiple translations are only available on the Startup plan ( and up).
| Connection | Establish a connection to your Beamer account. |
| Title | Add a title for the post. You can add multiple titles to the post. |
| Content | Add the content for the post. You can add multiple contents to the post. |
| Category | Select the category for the post:
|
| Publish | Select the checkbox to publish this post or save it as a draft. |
| Archive | Select the checkbox to archive this post. |
| Show in Widget | Select the checkbox for this post to show up in the embedded feed. |
| Show in Standalone | Select the checkbox for this post to show up in the standalone feed. |
| Boosted Announcement | Select the boosted announcement type for the post. For example, Top-bar, Pop-up. |
| Link URL | Enter the URL address where users will be redirected to if they click the header of the post or the link shown at the bottom of it. |
| Link Text | Enter the link text shown in the link of this post. |
| User Email | Enter the email address of the user publishing this post. |
| Link in New Window | Select the checkbox to open the post in the new window when clicked. |
| Pinned | Select the checkbox to pin the post. |
| Date | Enter the date on which the post is published in ISO-8601 format. For example, 2021-12-31T00:00:00Z. |
| Due Date | Enter the date on which the post expires in ISO-8601 format. For example, 2021-12-31T00:00:00Z. |
| Language | Select the language for the post. |
| Filter | Enter the filter name to search the posts based on the specified segmentation filter. Available only on the pro plan (and up). |
| Filter User ID | Select the User ID to filter the post related to the selected user. Available only for the enterprise plan. |
| Filter URL | Enter the URL address where this post is available. Available only on the pro plan (and up). |
| Enable Feedback | Select the checkbox to enable the user feedback option for the post. Available only on the pro plan (and up). |
| Enable Reactions | Select the checkbox to enable the reaction for the post. Available only on the pro plan (and up). |
| Enable Social Share | Select the checkbox to enable the social media share option for the users to share this post. Available only on the pro plan (and up). |
| Auto Open | Select the checkbox to have the post automatically open the Beamer's sidebar the first time the user gets it. (This option is deprecated now). Available only on the pro plan (and up). |
| Send Push Notifications | Select the checkbox to send a notification to all the subscribers about the post. Available only on the pro plan (and up). |
Update a Post
Updates an existing post by its ID.
| Connection | Establish a connection to your Beamer account. |
| Post ID | Select the Post ID whose details you want to update. |
| Title | Add a title for the post. You can add multiple titles to the post. |
| Content | Add the content for the post. You can add multiple contents to the post. |
| Category | Select the category for the post:
|
| Publish | Select the checkbox to publish this post or save it as a draft. |
| Archive | Select the checkbox to archive this post. |
| Show in Widget | Select the checkbox for this post to show up in the embedded feed. |
| Show in Standalone | Select the checkbox for this post to show up in the standalone feed. |
| Boosted Announcement | Select the boosted announcement type for the post. For example, Top-bar, Pop-up. |
| Link URL | Enter the URL address where users will be redirected to if they click the header of the post or the link shown at the bottom of it. |
| Link Text | Enter the link text shown in the link of this post. |
| User Email | Enter the email address of the user publishing this post. |
| Link in New Window | Select the checkbox to open the post in the new window when clicked. |
| Pinned | Select the checkbox to pin the post. |
| Date | Enter the date on which the post is published in ISO-8601 format. For example, 2021-12-31T00:00:00Z. |
| Due Date | Enter the date on which the post expires in ISO-8601 format. For example, 2021-12-31T00:00:00Z. |
| Language | Select the language for the post. |
| Filter | Enter the filter name to search the posts based on the specified segmentation filter. Available only on the pro plan (and up). |
| Filter User ID | Select the User ID to filter the post related to the selected user. Available only for the enterprise plan. |
| Filter URL | Enter the URL address where this post is available. Available only on the pro plan (and up). |
| Enable Feedback | Select the checkbox to enable the user feedback option for the post. Available only on the pro plan (and up). |
| Enable Reactions | Select the checkbox to enable the reaction for the post. Available only on the pro plan (and up). |
| Enable Social Share | Select the checkbox to enable the social media share option for the users to share this post. Available only on the pro plan (and up). |
| Auto Open | Select the checkbox to have the post automatically open the Beamer's sidebar the first time the user gets it. (This option is deprecated now). |
| Send Push Notifications | Select the checkbox to send a notification to all the subscribers about the post. Available only on the pro plan (and up). |
Delete a Post
Deletes an existing post.
| Connection | Establish a connection to your Beamer account. |
| Post ID | Select the Post ID you want to delete. |
Other
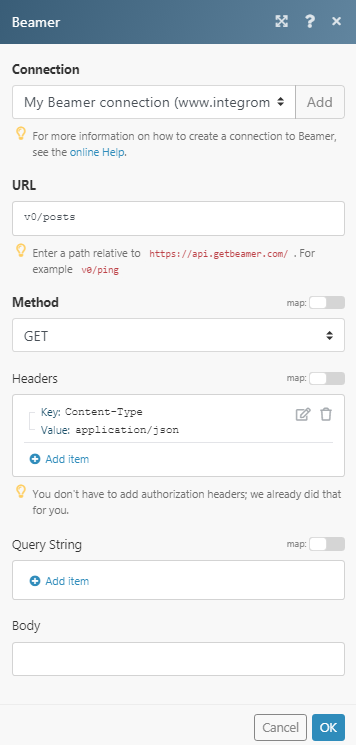
Make an API Call
Performs an arbitrary authorized API call.
| Connection | Establish a connection to your Beamer account. |
| URL |
Enter a path relative to For the list of available endpoints, refer to the Beamer API Documentation.
|
| Method |
Select the HTTP method you want to use: GET POST PUT PATCH DELETE |
| Headers | Enter the desired request headers. You don't have to add authorization headers; we already did that for you. |
| Query String | Enter the request query string. |
| Body | Enter the body content for your API call. |
Example of Use - List Posts
The following API call returns all the posts from your Beamer account:
URL:v0/posts
Method:GET
Matches of the search can be found in the module's Output under Bundle > Body.
In our example, 2 posts were returned:


