Beeminder
The Beeminder modules allow you to create, update, list, and delete the datapoints in your Beeminder account.
Getting Started with Beeminder
Prerequisites
- A Beeminder account
In order to use Beeminder with Integromat, it is necessary to have a Beeminder account. You can create a Beeminder account at beeminder.com/users/sign_up.
Connecting to Beeminder to Integromat
To connect your Beeminder account to Integromat you need to obtain the API Key from your Beeminder account and insert it in the Create a connection dialog in the Integromat module.
1. Log in to your Beeminder account.
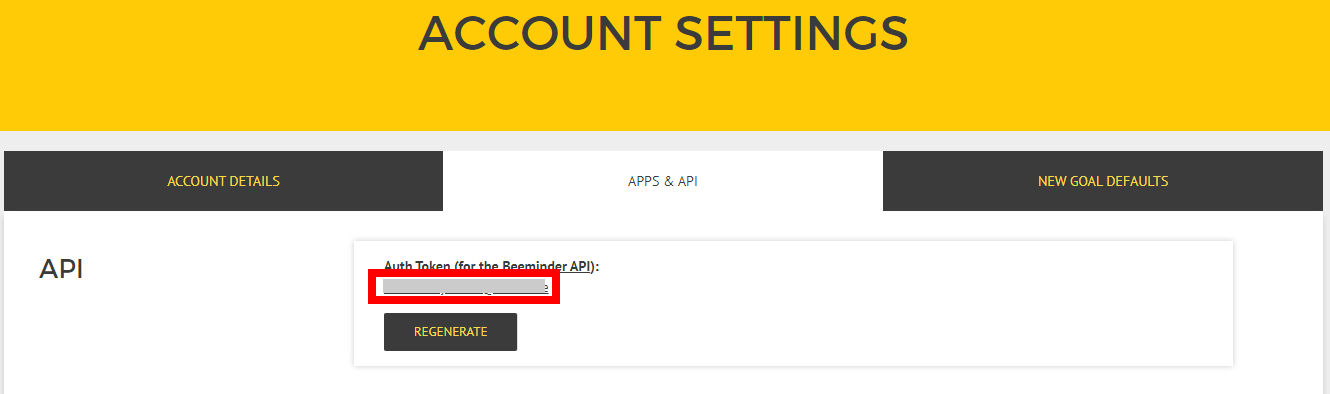
2. Click Your Profile Icon > ACCOUNT SETTINGS > APPS & API.
3. Copy the Auth Token to your clipboard.
4. Go to Integromat and open the Beeminder module's Create a connection dialog.
5. In the Connection name field, enter a name for the connection.
6. In the Auth Token field, enter the Auth token copied in step 3, and click Continue.
The connection has been established.
Datapoints
List Datapoints
Returns a list of datapoints objects.
| Connection | Establish a connection to your Beeminder account. |
| Goal | Select the goal whose datapoints you want to list. |
| Sort by | Select the option to sort the datapoints:
|
| Limit | Set the maximum number of datapoints Integromat should return during one scenario execution cycle. |
Create a Datapoint
Adds a new datapoint to a user's goal.
| Connection | Establish a connection to your Beeminder account. |
| Goal | Select the goal for which you want to create the datapoint. |
| Value | Enter the datapoint value. For example, your weight on the day indicated by the timestamp. |
| Timestamp | Enter the time when the datapoint is created. By default, it considers the time you are creating the datapoint. See the list of supported date and time formats. |
| Daystamp (date) | Enter the date for the datapoint value. If you include both timestamp and daystamp, then the timestamp takes precedence. See the list of supported date and time formats. |
| Comment | Enter any additional information about the datapoint. |
| Request ID | Enter the Request ID for the datapoint. You can use the same Request ID for different goals without being considered a duplicate. |
Update a Datapoint
Updates the information of a specified datapoint.
| Connection | Establish a connection to your Beeminder account. |
| Goal | Select the goal for which you want to create the datapoint. |
| Datapoint ID | Select the Datapoint ID whose details you want to update. |
| Value | Enter the datapoint value. For example, your weight on the day indicated by the timestamp. |
| Timestamp | Enter the time when the datapoint is created. By default, it considers the time you are creating the datapoint. See the list of supported date and time formats. |
| Daystamp (date) | Enter the date for the datapoint value. If you include both timestamp and daystamp, then the timestamp takes precedence. See the list of supported date and time formats. |
| Comment | Enter any additional information about the datapoint. |
| Request ID | Enter the Request ID for the datapoint. You can use the same Request ID for different goals without being considered a duplicate. |
Delete a Datapoint
Deletes a specified datapoint.
| Connection | Establish a connection to your Beeminder account. |
| Goal | Select the goal whose datapoint you want to delete. |
| Datapoint ID | Select the Datapoint ID you want to delete. |
Other
Make an API Call
Performs an arbitrary authorized API call.
| Connection | Establish a connection to your Beeminder account. |
| URL |
Enter a path relative to For the list of available endpoints, refer to the Beeminder API Documentation.
|
| Method |
Select the HTTP method you want to use: GET POST PUT PATCH DELETE |
| Headers | Enter the desired request headers. You don't have to add authorization headers; we already did that for you. |
| Query String | Enter the request query string. |
| Body | Enter the body content for your API call. |
Example of Use - List Goals
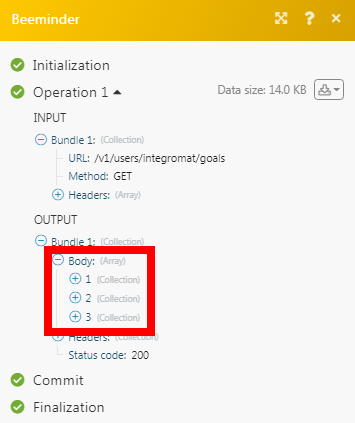
The following API call returns all the goals from your Beeminder account:
URL:/v1/users/integromat/goals
Method:GET
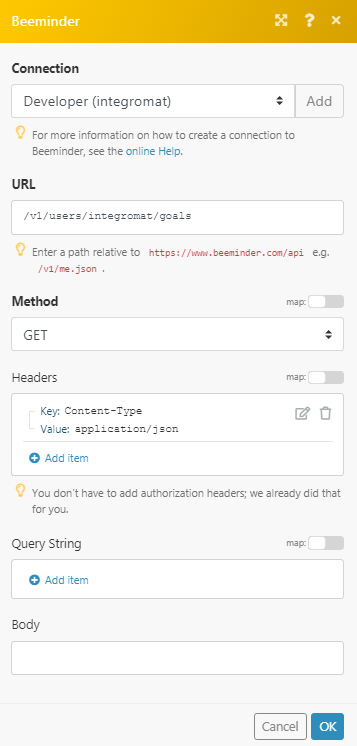
Matches of the search can be found in the module's Output under Bundle > Body.
In our example, 3 goals were returned: