Google Cloud Pub/Sub
The Google Cloud Pub/Sub modules enable you to monitor and publish messages or create, update, retrieve, and delete topics and subscriptions in your Google Cloud Pub/Sub.
Getting Started with Google Cloud Pub/Sub
Prerequisites
- A Google account
- A project created in the Google Cloud Console
In order to use Google Cloud Pub/Sub with Integromat, it is necessary to have a Google account. If you do not have one, you can create a Google Cloud Pub/Sub account at accounts.google.com.
Connecting Google Cloud Pub/Sub to Integromat
To connect your Google Cloud Pub/Sub account to Integromat, you'll need to obtain the project's Client ID and Client Secret in the Google Cloud Console.
1. Sign in to Google Cloud console using your Google credentials.
2. Click Select a project > NEW PROJECT. Enter the desired project name and click the CREATE button.
3. Select the project you have created.
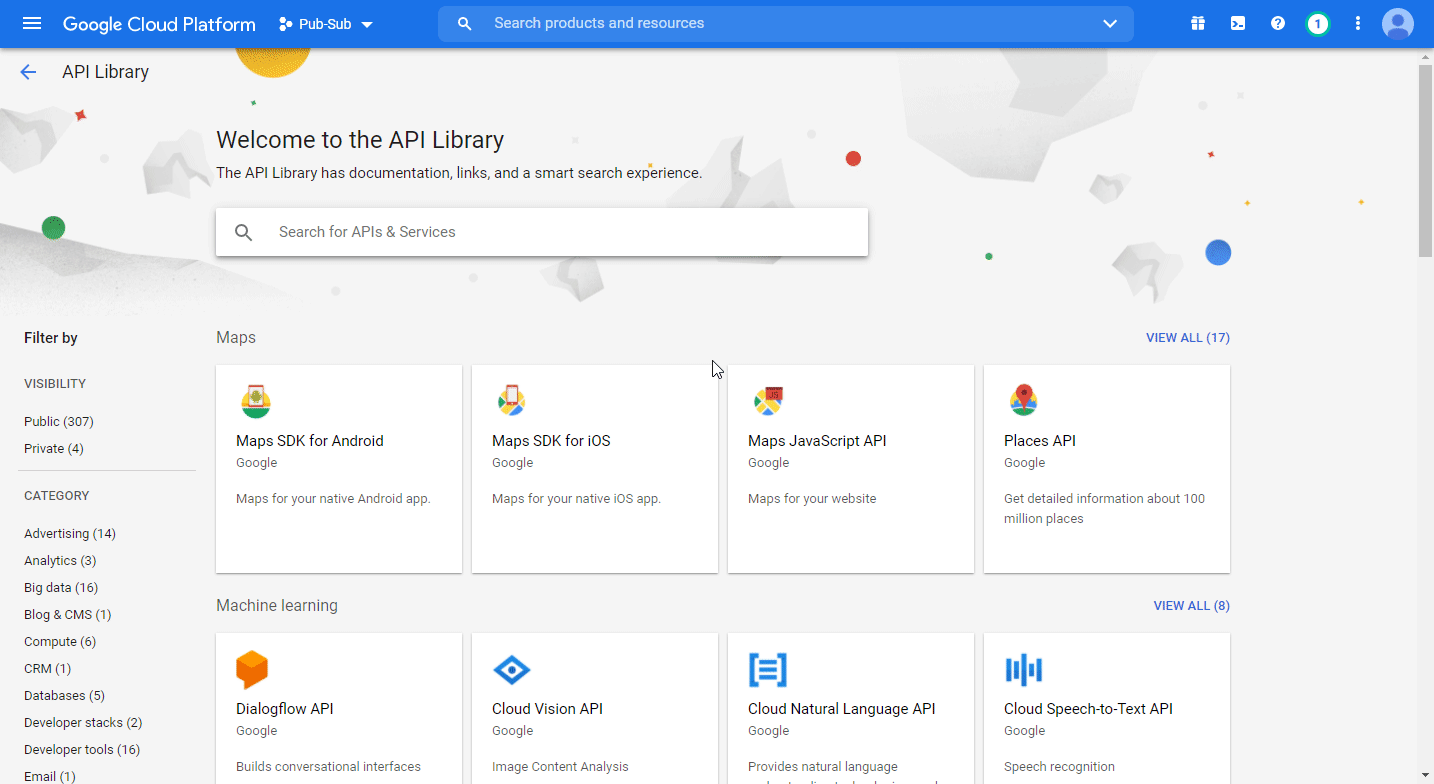
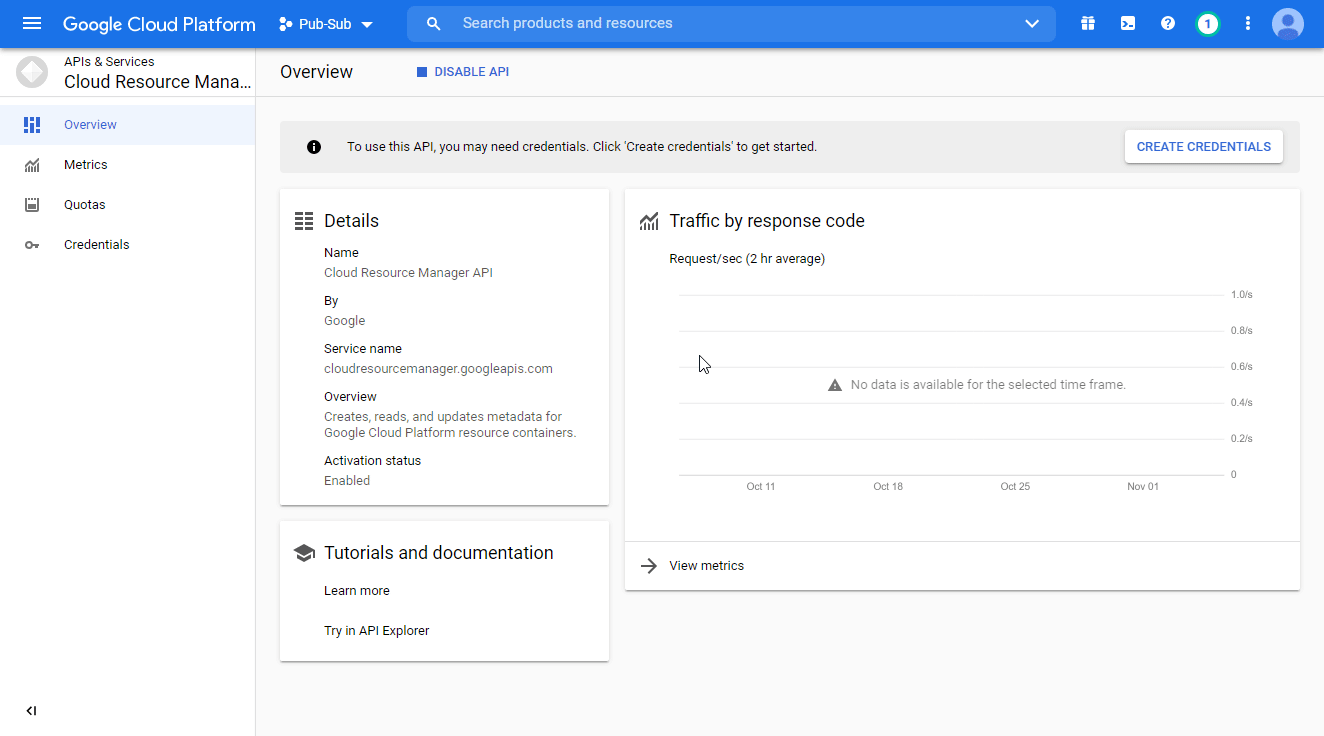
4. Go to APIs & Services > Library.
5. Search and enable the following required APIs:
- Cloud Resource Manager API
The desired service option should display as you type. Click on the API/service you want to connect to Integromat.
6. Click the ENABLE button to enable the selected API.
7. Open APIs & Services > Library, and search and enable the two remaining required APIs (see step 5 above).
8. Open Big Data > Pub/Sub. This will enable the rest of the required APIs in your project.

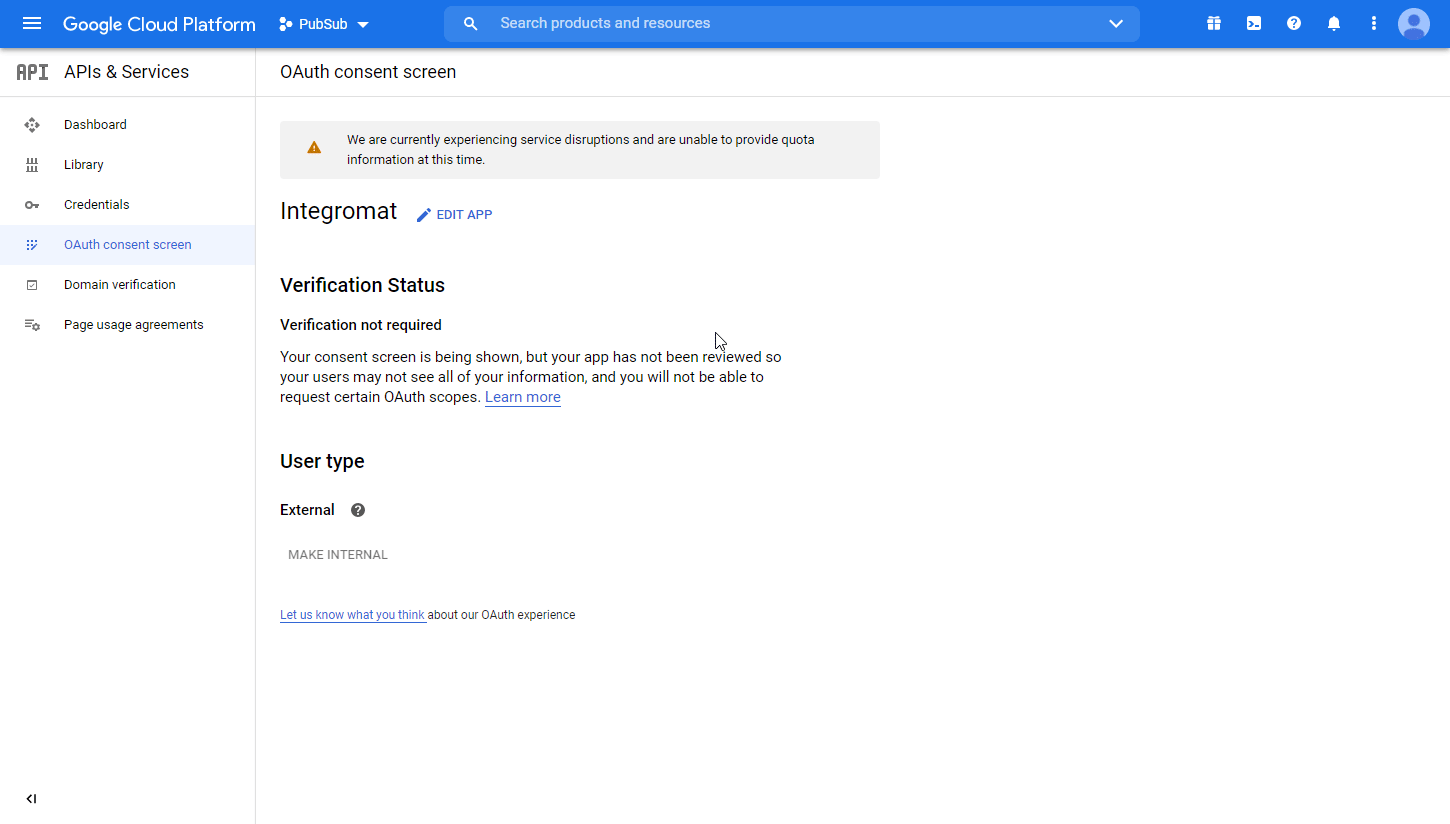
9. Navigate to APIs & Services > OAuth consent screen.
10. Choose the External option, and click the CREATE button.
11. Fill the required fields as follows and then click the Save and Continue button:
| App name | Enter the name of the app asking for consent. For example |
| Authorized domains | integromat.com |
12. You don't have to set anything in the Scopes and Optional info sections. Click Save and Continue.
13. Navigate to Credentials. Click on the +CREATE CREDENTIALS, and select the OAuth Client ID option.
14. Fill in the required fields as follows, and then click the CREATE button to create the application:
| Application type | Web application |
| Name | e.g. Integromat |
| Authorized redirect URIs |
|

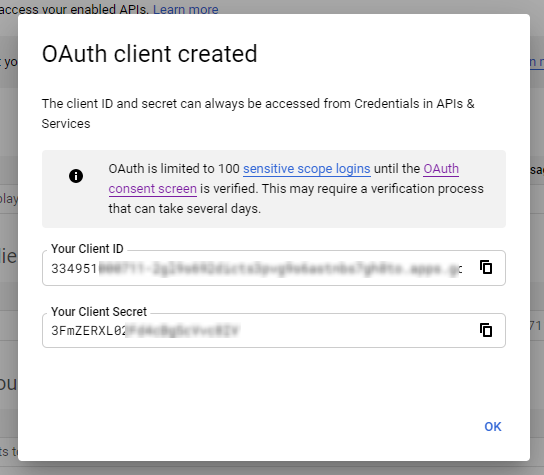
15. A dialog containing the app's Client ID and Client Secret is displayed. Save them to a safe place for later use.
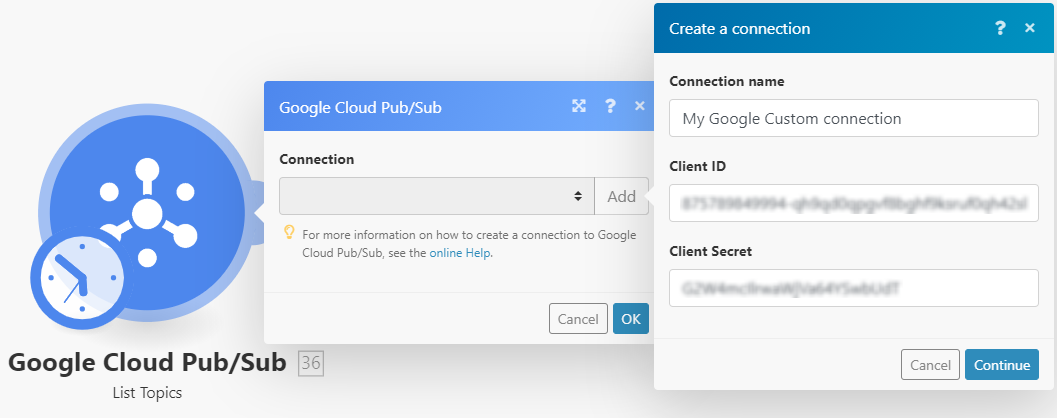
16. Go to Integromat, open the Create a connection dialog of the desired Google Cloud Pub/Sub module, enter the Client ID and Client Secret from step 15 above to the respective fields, and click Continue.
17. Sign in with your Google account.
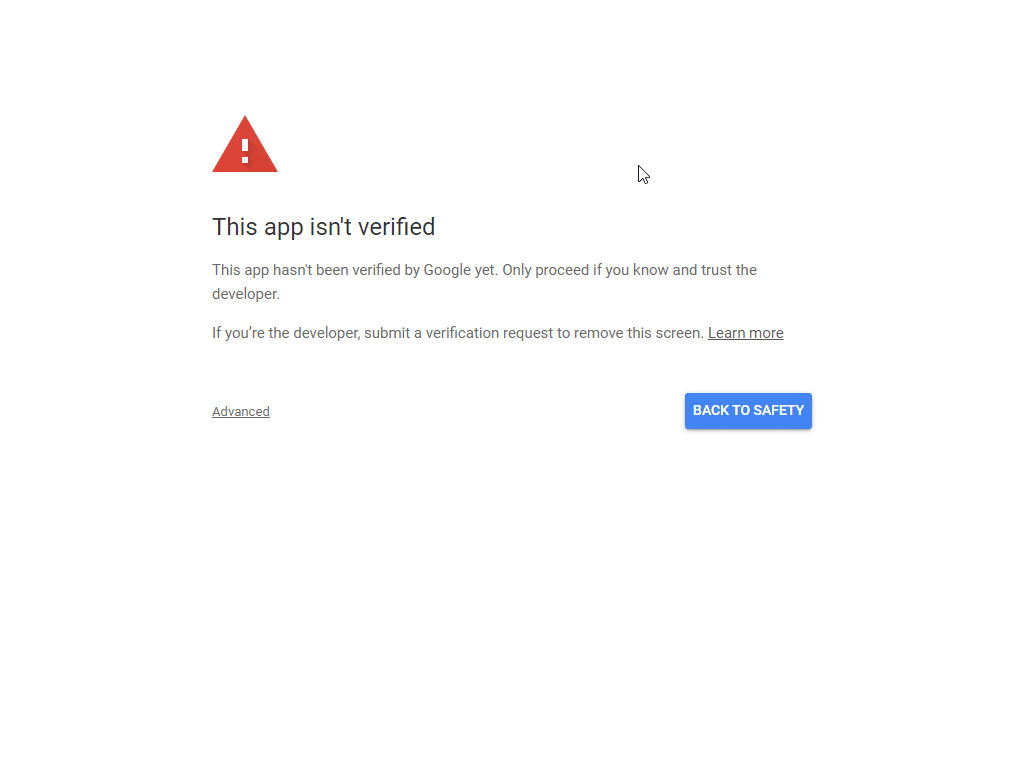
18. This app isn't verified window may appear.
19. Click on the Advanced link, and then on the Go to Integromat (unsafe) link to allow access using your custom OAuth client.
20. Click Allow to grant Integromat permission.

21. Click the Allow button to confirm your choices.

The connection to your Google Cloud Pub/Sub has been established.
Message
Watch Messages
Triggers when a message is published for the specified topic.
| Webhook name | Enter the name for the webhook. |
| Connection | Establish a connection to your Pub/Sub. |
| Project | Select the project that contains the topic you want to watch for published messages. |
| Topic Name | Select the topic you want to watch for published messages. |
| Subscription Filter | Set the filter according to the filter syntax. If the filter is set, only messages that match this filter are returned. |
| Message Retention Duration | Enter the duration in seconds. Specify how long to retain unacknowledged messages in the subscription's backlog, from the moment a message is published. Minimum 10 minutes, maximum 7 days. The default is 7 days. |
| Order Messages with an Ordering Key | If enabled, messages published with the same |
| Enable Dead Lettering | Check to enable a dead letter policy, which specifies the conditions for dead lettering messages. |
| Retry after Exponential Backoff Delay | Check to enable a policy that specifies how Pub/Sub retries message delivery. Uncheck to retry immediately. Retry delay will be exponential based on provided minimum and maximum backoffs. https://en.wikipedia.org/wiki/Exponential_backoff. Set the minimum and maximum backoff (in seconds). |
| Labels | Specify labels. See Creating and managing labels. An object containing a list of |
Publish Messages
Publishes a message to the specified topic.
| Connection | Establish a connection to your Pub/Sub. | ||||
| Topic Name | Enter the topic path in the following format: Or use the Search button to browse the desired topic. | ||||
| Messages | Either message or attribute will be required to publish.
|
Topic
List Topics
Returns a list of topics in the specified project.
| Connection | Establish a connection to your Pub/Sub. |
| Project | Select or map the ID of the project you want to retrieve topics from. |
| Limit | Set the maximum number of topics Integromat will return during one execution cycle. |
List Topic Subscriptions
Returns a list of topic subscriptions.
| Connection | Establish a connection to your Pub/Sub. |
| Topic Name | Enter the topic path in the following format: Or use the Search button to browse the desired topic you want to list subscriptions for. |
| Limit | Set the maximum number of subscriptions Integromat will return during one execution cycle. |
Create a Subscription
Creates a new subscription to a specified topic.
| Connection | Establish a connection to your Pub/Sub. |
| Subscription ID | Specify the unique resource name. |
| Project | Select the project or map the ID of the project that contains the topic you want to create a subscription for. |
| Topic Name | Select the topic or map the ID of the topic you want to create a subscription for. |
| Enable Push Delivery | Check this option to use Push delivery instead of Pull delivery. |
| Enable Subscription Expiration | Check to enable a policy that specifies the conditions for this subscription's expiration. A subscription is considered active as long as any connected subscriber is successfully consuming messages from the subscription or is issuing operations on the subscription. |
| Time To Live | Specify the "time-to-live" duration for an associated resource in seconds. The resource expires if it is not active for a period of Indicate the duration in seconds with up to nine fractional digits, terminated by ' |
| Acknowledgement Deadline in Seconds | Enter the approximate amount of time (on a best-effort basis) Pub/Sub waits for the subscriber to acknowledge receipt before resending the message. In the interval after the message is delivered and before it is acknowledged, it is considered to be outstanding. During that time period, the message will not be redelivered (on a best-effort basis). |
| Subscription Filter | Set the filter according the filter syntax. If the filter is set, only messages that match this filter are returned. |
| Message Retention Duration | Enter the duration in seconds. Define how long to retain unacknowledged messages in the subscription's backlog, from the moment a message is published. Minimum 10 minutes, maximum 7 days. The default is 7 days. |
| Retain Acknowledged Messages | If enabled, messages are not expunged from the subscription's backlog, even if they are acknowledged, until they fall out of the |
| Order Messages with an Ordering Key | If enabled, messages published with the same |
| Enabled Dead Lettering | Check to enable a dead letter policy, the policy that specifies the conditions for dead lettering messages. |
| Retry after Exponential Backoff Delay | Check to enable a policy that specifies how Pub/Sub retries message delivery. Uncheck to retry immediately. Retry delay will be exponential based on provided minimum and maximum backoffs. https://en.wikipedia.org/wiki/Exponential_backoff. Set the minimum and maximum backoff (in seconds). |
| Labels | Specify labels. See Creating and managing labels. An object containing a list of |
Update a Subscription
Updates an existing subscription.
| Connection | Establish a connection to your Pub/Sub. |
| Subscription Name | Enter the path to the subscription you want to update in the following format: |
Please find the descriptions of the fields in the Create a Subscription section above.
Delete a Subscription
Deletes a subscription. All messages retained in the subscription are immediately dropped.
After a subscription is deleted, a new one may be created with the same name, but the new one has no association with the old subscription or its topic unless the same topic is specified.
| Connection | Establish a connection to your Pub/Sub. |
| Subscription Name | Enter the path to the subscription you want to delete in the following format: |
Other
Make an API Call
Allows you to perform a custom API call.
| Connection | Establish a connection to your Pub/Sub. |
| URL | Enter a path relative to For the list of available endpoints, refer to the Pub/Sub API Documentation. |
| Method | Select the HTTP method you want to use: GET POST PUT PATCH DELETE |
| Headers | Enter the desired request headers. You don't have to add authorization headers; we've already added those for you. |
| Query String | Enter the request query string. |
| Body | Enter the body content for your API call. |
Example of Use - List Snapshots
The following API call returns all snapshots in the specified topic:
URL:/v1/projects/{project}/topics/{topic}/snapshots/
Method:GET
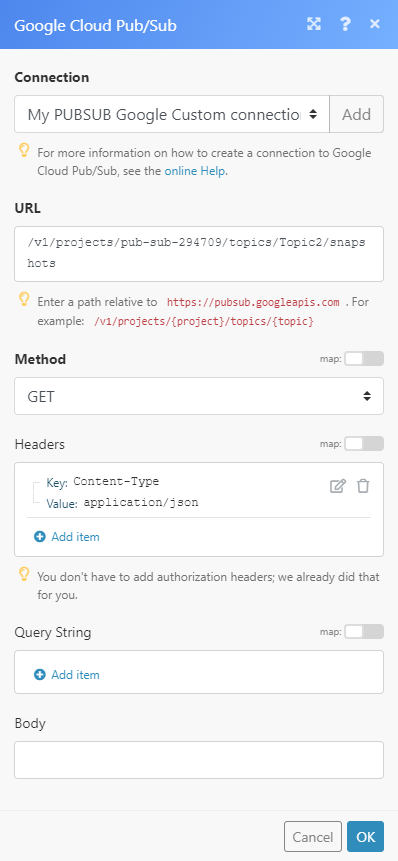
The result can be found in the module's Output under Bundle > Body > snapshots.
In our example, 3 snapshots were returned:


