Mautic
The Mautic modules enable you to monitor events, search, retrieve, create, update or delete contacts and companies in your Mautic account.
Getting Started with Mautic
Prerequisites
- A Mautic account
- A Mautic domain
In order to use Mautic with Integromat, it is necessary to have a Mautic account. If you do not have one, you can create a Mautic account at www.mautic.org/user/login.
Connecting Mautic to Integromat
To connect your Mautic account to Integromat you need to enable the API in your Mautic account and obtain your Domain, Client ID and Client Secret.
Enabling API
1. Log in to your Mautic account.
2. Go to Settings > Configuration.
3. Open API Settings and switch API enabled? option to Yes and save the dialog by clicking the Apply or Save & Close button.
Retrieving API Credentials
1. Log in to your Mautic account.
2. Go to Settings > API Credentials.
3. Click the +New button.
-_-mautic.png)
4. Fill the dialog fields as follows:
| Authorization Protocol | OAuth 2 |
| Name | Enter the desired name, for example: Integromat |
| Redirect URI | https://www.integromat.com/oauth/cb/mautic |
5. Click the Save & Close button.
6. Find the Client ID (Public Key) and Client Secret in the API Credentials page.
-_-mautic.png)
7. Go to Integromat and open the Mautic module's Create a connection dialog.
8. Enter the Client ID and Client Secret you have retrieved in step 7 to the respective fields and click the Continue button to establish the connection.
9. After you click the Continue button, Integromat will redirect you to the Mautic website where you will be prompted to grant Integromat access to your account.
Confirm the dialog by clicking the Accept button.
The connection has been established. You can proceed with setting up the module.
Troubleshooting
Unable to Connect
Try to clean the Mautic cache. To ensure that the Mautic API is operating correctly, you need to perform a cache cleanup after API activation. To do this, execute the following command at the server console:
sudo su daemon -s /bin/bash -c "/opt/bitnami/php/bin/php /opt/bitnami/apps/mautic/htdocs/app/console cache:clear --env=prod"
(Reference: https://docs.bitnami.com/oci/apps/mautic/administration/clean-cache/)
Event
Watch Events
Triggers when a specified event occurs in your account.
| Webhook Name | Enter the name for the webhook. E.g. Form Submitted. |
| Connection | Establish a connection to your Mautic account. |
| Event | Select the event that will trigger the Watch Events module. |
| Webhook Name | Enter the webhook name that will be displayed in the Mautic account in the Settings > Webhooks section. |
| Description | Enter the description of the webhook. |
Contact
Search Contacts
Searches for the specified contact.
| Connection | Establish a connection to your Mautic account. |
| Search Contacts | Enter the search term you want to search contacts for. |
| Limit | Set the maximum number of contacts Integromat will return during one execution cycle. |
Get a Contact
Retrieves contact details.
| Connection | Establish a connection to your Mautic account. |
| Contacts ID | Enter (map) or select the contact you want to retrieve details about. |
Create/Update a Contact
Creates a new contact.
| Connection | Establish a connection to your Mautic account. |
| Owner | Enter or select the ID of a Mautic user to assign this contact to. |
| Title | Enter the contact's title. |
| First Name | Enter the first name of the contact. |
| Last Name | Enter the last name of the contact. |
| Primary Company | Enter the contact's company. |
| Position | Enter the contact’s position title. |
| Enter the valid email of the contact. | |
| Mobile | Enter the mobile phone number. |
| Phone | Enter the phone number. |
| Points | Contact’s current number of points. |
| Fax | Enter the fax number. |
| Address Line 1 | Enter the contact's address. |
| Address Line 2 | Enter the contact's address. |
| City | Enter the city of the contact. |
| State | Enter the state of the contact if needed. |
| ZIP Code | Enter the ZIP Code. |
| Country | Enter the contact's country. |
| Preferred Locale | Enter the language locale in the following format:[language designator]_[region designator]e.g. en_US
|
| Date Last Active | Date/time for when the contact was last recorded as active. The list of supported date and time formats. |
| Attribution Date | Enter the attribution date. The list of supported date and time formats. |
| Attribution | Set the attribution. |
| Social Media | Enter desired social media profiles. |
| Tags | Add tags to the contact. |
Update a Contact
Updates an existing contact.
| Connection | Establish a connection to your Mautic account. |
| Contact ID | Enter or select the ID of the contact you want to update. |
Please find the descriptions of the fields in the Create/Update a Contact section above.
Delete a Contact
Deletes a contact.
| Connection | Establish a connection to your Mautic account. |
| Contact ID | Enter or select the ID of the contact you want to delete. |
Company
List Companies
Retrieves companies in your Mautic account.
| Connection | Establish a connection to your Mautic account. |
| Limit | Set the maximum number of companies Integromat will return during one execution cycle. |
Get a Company
Retrieves company details.
| Connection | Establish a connection to your Mautic account. |
| Company | Enter or select the company you want to retrieve details about. |
Create/Update a Company
Creates a new company.
| Connection | Establish a connection to your Mautic account. |
| Company Name | Enter the name of the company. |
| Address 1 | Enter the company address. |
| Address 2 | Enter the second line of the company address. |
| Company Email | Enter the email address of the company. |
| Phone | Enter the company's phone number. |
| City | Enter the city of the company. |
| State | Enter the state of the company. |
| ZIP Code | Enter the company's ZIP code. |
| Country | Enter the country of the company. |
| Website | Enter the company's website URL. |
| Number of Employees | Enter the number of company employees. |
| Fax | Enter the fax number of the company. |
| Annual Revenue | Enter the company's annual revenue. |
| Industry | Select the industry of the company. |
| Description | Enter the description of the company. |
Update a Company
Updates an existing company.
| Connection | Establish a connection to your Mautic account. |
| Company ID | Enter (map) or select the ID of the company you want to update. |
Please find the descriptions of the fields in the Create/Update a Company section above.
Delete a Company
Deletes a company.
| Connection | Establish a connection to your Mautic account. |
| Company | Enter or select the ID of the company you want to delete. |
Make an API Call
Allows you to perform a custom API call.
| Connection | Establish a connection to your Mautic account. |
| URL |
Enter a path relative to For the list of available endpoints, refer to the Mautic API Documentation.
|
| Method |
Select the HTTP method you want to use: GET POST PUT PATCH DELETE |
| Headers | Enter the desired request headers. You don't have to add authorization headers; we already did that for you. |
| Query String | Enter the request query string. |
| Body | Enter the body content for your API call. |
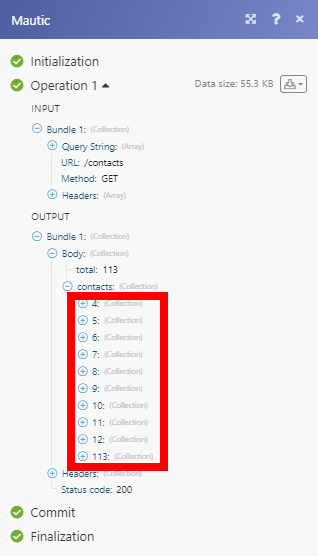
Example of Use - List Contacts
The following API call returns the first 10 contacts in your Mautic account:
URL:
/contacts
Method:
GET
Query String:
Key: limit
Value: 10
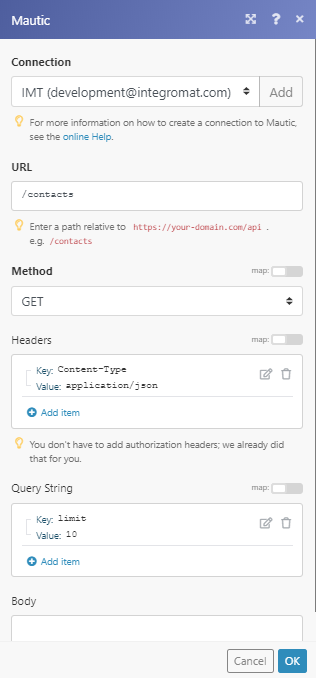
The result can be found in the module's Output under Bundle > Body > contacts.
In our example, 10 contacts were returned: