Microsoft 365 Excel
The Microsoft 365 Excel modules enable you to monitor workbooks and rows, or retrieve, add, update, or delete worksheets, rows, and tables in your Microsoft 365 Excel account.
Getting Started with Microsoft 365 Excel
Prerequisites
- A Microsoft 365 Excel account
In order to use Microsoft 365 Excel with Integromat, it is necessary to have a Microsoft 365 account. If you do not have one, you can create a Microsoft 365 account at office.com.
Connecting Microsoft 365 Excel to Integromat
1. Go to Integromat and open the Microsoft 365 Excel module's Create a connection dialog.
2. Enter a name for the connection to the Connection name field and click Continue.
When you click the Continue button, Integromat will redirect you to the Microsoft 365 Excel website where you will be prompted to sign in.
After you sign in, the connection is established and you can continue with setting up the module.
See the Permission information for various user accounts.
Workbook
Watch Workbooks
Retrieves workbook details when a new workbook is created.
| Connection | Establish a connection to your Microsoft 365 Excel. |
| Folder | Select the folder you want to watch for new workbooks. If no folder is selected, all folders will be watched. |
| Filter | Set the filter. You can, for example, return only workbooks with the specified name. |
| Limit | Set the maximum number of workbooks Integromat will return during one execution cycle. |
Search Workbooks
Retrieves workbooks in your account based on filter settings.
| Connection | Establish a connection to your Microsoft 365 Excel. |
| Folder | Select the folder you want to retrieve workbooks from. If no folder is selected, workbooks from all folders will be retrieved. |
| Filter | Set the filter. You can, for example, return only workbooks with the specified name or last modified date. |
| Limit | Set the maximum number of workbooks Integromat will return during one execution cycle. |
Download a Workbook
Downloads the specified workbook as an XLSX file.
| Connection | Establish a connection to your Microsoft 365 Excel. |
| Download a Workbook | Select whether you want to select the workbook from the menu or enter (map) the ID of the workbook manually. |
| Workbook | Select the workbook from the menu or enter (map) the ID of the workbook manually. |
Worksheet
Watch Worksheet Rows
Retrieves row details when a new row is added to the specified worksheet.
| Connection | Establish a connection to your Microsoft 365 account. |
| Workbook | Select the workbook you want to use. |
| Worksheet | Select the Excel sheet you want to watch for new rows. |
| Limit | Set the maximum number of rows Integromat will return during one execution cycle. |
Choose where to start
Here you can define which rows will be processed.
| Since specific ID | Enter the row number where the process will start from. |
| All | This option will process all rows in the worksheet. |
| Choose manually | Select the row from the menu. |
Examples of use
Be inspired by our Microsoft 365 Excel predefined templates we have prepared for you.
List Worksheets
Retrieves a list of worksheets in the specified workbook.
| Connection | Establish a connection to your Microsoft 365 account. |
| Workbook | Select the workbook you want to retrieve worksheets from. |
| Limit | Set the maximum number of worksheets Integromat will return during one execution cycle. |
List Worksheet Rows
Retrieves rows in the specified worksheet.
| Connection | Establish a connection to your Microsoft 365 account. |
| Workbook | Select the workbook you want to use. |
| Worksheet | Select the worksheet you want to retrieve rows from. |
| Limit | Set the maximum number of rows Integromat will return during one execution cycle. |
Add a Worksheet
Creates a new worksheet in the specified workbook.
| Connection | Establish a connection to your Microsoft 365 account. |
| Workbook | Select the workbook where you want to add a new worksheet. |
| Name | Enter the name for the new worksheet. |
Add a Worksheet Row
Adds a new row to the specified worksheet.
| Connection | Establish a connection to your Microsoft 365 account. |
| Workbook | Select the workbook you want to use. |
| Worksheet | Select the worksheet where you want to add rows to. |
| Type of Values Being Entered | Select the type of value to be entered into the worksheet. If you use a formula, Excel will try to evaluate the specified expression, e.g.:=SUM(A1:A10). The names of functions in a formula are in English, whereas in a formula local, the function names are in the language of your Excel application, e.g.=SUM(A1, 1.5) (in English) vs =SUMME(A1; 1,5) (in German). |
| Rows | Add values or formulas to the desired rows. |
Update a Worksheet Row
Updates an existing row in the specified worksheet.
| Connection | Establish a connection to your Microsoft 365 account. |
| Workbook | Select the workbook you want to use. |
| Worksheet | Select the worksheet you want to update the rows for. |
| Type of Values Being Entered | Select the type of value to be entered into the worksheet. If you use a formula, Excel will try to evaluate the specified expression, e.g.:=SUM(A1:A10). The names of functions in a formula are in English, whereas in a formula local, the function names are in the language of your Excel application, e.g.=SUM(A1, 1.5) (in English) vs =SUMME(A1; 1,5) (in German). |
| Row ID | Select the number of the row to update. |
| Row | Add values or formulas to the row that you want to update. |
Delete a Worksheet Row
Deletes a row in the specified worksheet.
| Connection | Establish a connection to your Microsoft 365 account. |
| Workbook | Select the workbook you want to use. |
| Worksheet | Select the worksheet you want to delete the row from. |
| Row ID | Enter (map) or select the number of the row you want to delete. |
Table
The table here refers to the embedded table element in the Workbook. Not the entire table (workbook/worksheet).

Watch Table Rows
Retrieves table details when a new row is added to the specified table.
| Connection | Establish a connection to your Microsoft 365 account. |
| Workbook | Select the workbook you want to use. |
| Worksheet | Select the worksheet where you want to watch table rows at. |
| Table | Select the table you want to watch for new rows. |
| Limit | Set the maximum number of rows Integromat will return during one execution cycle. |
List Tables
Returns details of all tables in the specified worksheet.
| Connection | Establish a connection to your Microsoft 365 account. |
| Workbook | Select the workbook you want to use. |
| Worksheet | Select the worksheet you want to list tables from. |
| Limit | Set the maximum number of tables Integromat will return during one execution cycle. |
List Table Rows
Retrieves rows in the specified table.
| Connection | Establish a connection to your Microsoft 365 account. |
| Workbook | Select the workbook you want to use. |
| Worksheet | Select the worksheet that contains the table you want to list table rows from. |
| Table | Select the table you want to list table rows from. |
| Limit | Set the maximum number of rows Integromat will return during one execution cycle. |
Get a Table
Retrieves details.
| Connection | Establish a connection to your Microsoft 365 account. |
| Get a Table | Select whether you want to select the table from the menu or enter (map) the ID of the workbook and table manually. |
| Workbook | Select or map the workbook you want to use. |
| Worksheet | Select the worksheet that contains the table you want to retrieve details for. |
| Table | Select or map the ID of the table you want to retrieve details for. |
Add a Table
Creates a new table in the specified worksheet.
| Connection | Establish a connection to your Microsoft 365 account. |
| Workbook | Select or map the workbook you want to use. |
| Worksheet | Select the Excel sheet you want to add a table to. |
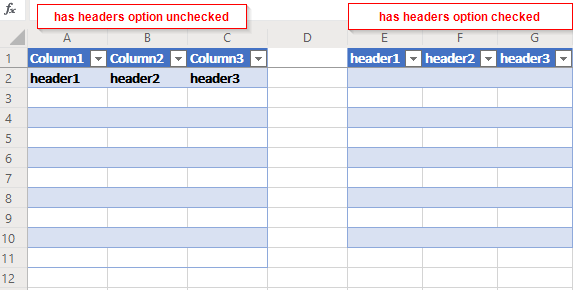
| Has Headers | If this checkbox is checked then the first defined row will be used as the table headers.
|
| Address | Set the size of the table. E. g. |
Add a Table Row
Adds a row to the table element in your worksheet.
| Connection | Establish a connection to your Microsoft 365 account. |
| Workbook | Select the workbook you want to use. |
| Worksheet | Select the worksheet containing the table you want to add a row to. |
| Table | Select the table you want to add a row to. |
| Row | Enter the values of the new row cells. |
| Row ID | To add a row to a specific position of the table, enter the row number to this field. The new row will be added after the specified row number. |
Update a Table
Updates an existing table.
| Connection | Establish a connection to your Microsoft 365 account. |
| Update a Table | Select whether you want to select the workbook, worksheet and table from the menu or enter (map) the ID of the workbook and table manually. |
| Workbook | Select the workbook you want to use. |
| Worksheet | Select the worksheet containing the table you want to update. |
| Table | Select the table you want to update |
| Name | Enter the new name of the table. |
| Show Headers | Select the Yes option to make the headers visible. |
| Show Totals | Select the Yes option to make the total row is visible. |
| Style | Select the table style. |
Delete a Table
Deletes a table.
| Connection | Establish a connection to your Microsoft 365 account. |
| Delete a Table | Select whether you want to select the workbook, worksheet and table from the menu or enter (map) the ID of the workbook and table manually. |
| Workbook | Select the workbook you want to use. |
| Worksheet | Select the worksheet containing the table you want to delete. |
| Table | Select the table you want to delete. |
Other
Retrieve Data
Retrieves data from the defined worksheet range.
| Connection | Establish a connection to your Microsoft 365 account. |
| Workbook | Select the workbook you want to use. |
| Worksheet | Select the Excel sheet containing the data you want to retrieve. |
| Range | Specify the area of the sheet you want to retrieve data from. E.g. A1:D10(case sensitive) |
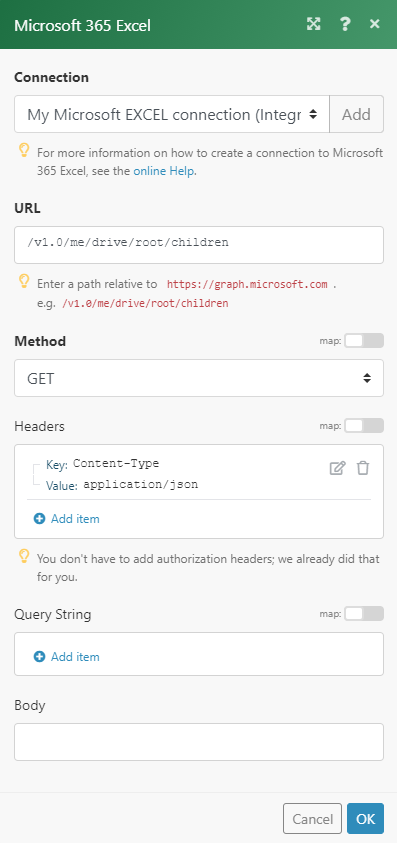
Make an API Call
Allows you to perform a custom API call.
| Connection | Establish a connection to your Microsoft 365 account. |
| URL | Enter a path relative to For the list of available endpoints, refer to the Microsoft Graph REST API Documentation. |
| Method | Select the HTTP method you want to use: GET POST PUT PATCH DELETE |
| Headers | Enter the desired request headers. You don't have to add authorization headers; we added those for you. |
| Query String | Enter the request query string. |
| Body | Enter the body content for your API call. |
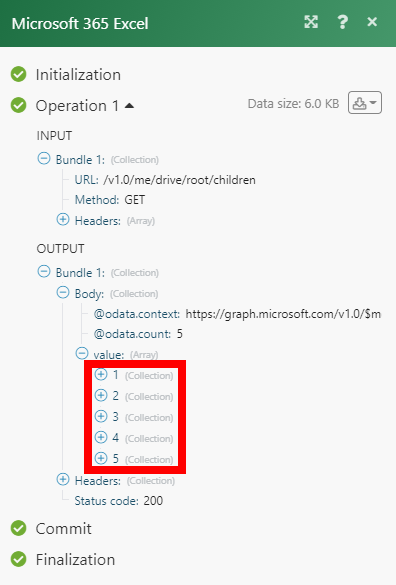
Example of Use - List Contents of Root Folder
The following API call returns all folders and files in the root of the drive in your Microsoft 365 Excel:
URL:/v1.0/me/drive/root/children
Method:GET
The result can be found in the module's Output under Bundle > Body > value.
In our example, 5 children were returned:
Permissions Information for Microsoft 365 Excel
- Add a Table - Files.ReadWrite, Files.Read.All
- Add a Table Row - Files.ReadWrite, Files.Read.All
- Add a Worksheet - Files.ReadWrite, Files.Read.All
- Add a Worksheet Row - Files.ReadWrite, Files.Read.All
- Add/Update a Worksheet Row (Advanced) - Files.ReadWrite
- Delete a Table - Files.ReadWrite, Files.Read.All
- Delete a Worksheet Row - Files.ReadWrite, Files.Read.All
- Download a Workbook - Files.ReadWrite, Files.Read.All
- Get a Table - Files.ReadWrite, Files.Read.All
- List Table Rows - Files.ReadWrite, Files.Read.All
- List Tables - Files.ReadWrite, Files.Read.All
- List Worksheet Rows - Files.ReadWrite, Files.Read.All
- List Worksheets - Files.ReadWrite, Files.Read.All
- Retrieve Data - Files.ReadWrite, Files.Read.All
- Search Workbooks - Files.Read.All
- Update a Table - Files.ReadWrite, Files.Read.All
- Update a Worksheet Row - Files.ReadWrite, Files.Read.All
- Watch Workbooks - Files.Read.All
- Watch Worksheet Rows - Files.ReadWrite, Files.Read.All


