Opsgenie
The Opsgenie modules enable you to create, retrieve, delete alerts, or add tags and notes in your Opsgenie account.
Getting Started with Opsgenie
Prerequisites
- An Opsgenie account
- A team created in your Opsgenie account
In order to use Opsgenie with Integromat, it is necessary to have an Opsgenie account. If you do not have one, you can create an Opsgenie account at Opsgenie.
Connecting Opsgenie to Integromat
To connect your Opsgenie account to Integromat you need to retrieve the API Key from your Opsgenie account.
1. Log in to your Opsgenie account.
2. Go to Teams and select the team you want to use with Integromat, or click Add team (![]() ) and create a new team.
) and create a new team.
3. Open Integrations and click the Add integration button (![]() ).
).
4. Go to the API tile and click the Add button.
5. Copy the provided API Key and save the dialog by clicking the Save Integration.
6. Go to Integromat and open the Opsgenie module's Create a connection dialog.
7. Enter the API Key you have copied in step 5 to the respective field, select a region, and click the Continue button to establish the connection.
The connection has been established. You can proceed with setting up the module.
Alert
Create Alert
Creates a new alert.
| Connection | Establish a connection to your Opsgenie account. | ||||||||
| Message | Enter the alert text content. Max 130 characters. | ||||||||
| Alias | Enter the user-defined identifier for the alert. There can be only one "Open" alert with the same alias. | ||||||||
| Description | Enter the detailed description of the alert. Max 15 000 characters. | ||||||||
| Responders |
Add recipients of the alert notification.
|
||||||||
| Visible To |
Specify teams and users that the alert will become visible to without sending any notification.
|
||||||||
| Actions |
Add custom actions that will be available for the alert, e.g. restart. Max 10 actions.
|
||||||||
| Tags | Add tags to the alert. Max 20 tags. | ||||||||
| Details | Enter key-value pairs to use as custom properties of the alert. | ||||||||
| Entity | Enter the name of the entity the alert is related to, e.g. application, server, etc. | ||||||||
| Priority | Select or map the alert priority level. | ||||||||
| Source | Specify where the alert is coming from. | ||||||||
| User | Enter the display name of the request owner. | ||||||||
| Note | Enter the additional note that will be added while creating the alert. |
Get an Alert
Retrieves alert details.
| Connection | Establish a connection to your Opsgenie account. |
| Identifier Type | Select whether you want to specify an alert by the Alert ID, Tiny ID, or Alias ID. |
| Alert ID / Tiny ID / Alias ID | Enter (map) the ID of the alert you want to retrieve. |
Delete Alert
Deletes an alert.
| Connection | Establish a connection to your Opsgenie account. |
| Identifier Type | Select whether you want to specify an alert by the Alert ID or Tiny ID. |
| Alert ID / Tiny ID | Enter (map) or select the ID of the alert you want to retrieve. |
| Source | Enter the display name of the request source. |
Add Note to Alert
Adds a note to an alert.
| Connection | Establish a connection to your Opsgenie account. |
| Identifier Type | Select whether you want to specify an alert by the Alert ID, Tiny ID, or Alias ID. |
| Alert ID / Tiny ID / Alias ID | Enter (map) or select the ID of the alert you want to add a note to. |
| Note | Enter the content of the note you want to add to the alert. |
| Source | Specify the custom source of the note. |
| User | Enter the display name of the request owner. |
Add Tags to Alert
Adds tags to an alert.
| Connection | Establish a connection to your Opsgenie account. |
| Identifier Type | Select whether you want to specify an alert by the Alert ID, Tiny ID, or Alias ID. |
| Alert ID / Tiny ID / Alias ID | Enter (map) or select the ID of the alert you want to add tags to. |
| Tags | Enter tags you want to add to the alert. |
| Source | Specify the custom source for the note. |
| User | Enter the display name of the request owner. |
| Note | Enter the note to the alert. |
Other
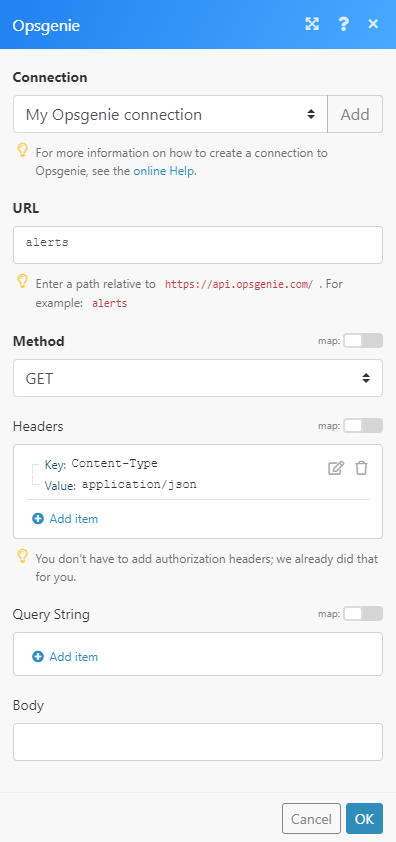
Make an API Call
Allows you to perform a custom API call.
| Connection | Establish a connection to your Opsgenie account. |
| URL |
Enter a path relative to For the list of available endpoints, refer to the Opsgenie REST API Documentation.
|
| Method |
Select the HTTP method you want to use: GET POST PUT PATCH DELETE |
| Headers | Enter the desired request headers. You don't have to add authorization headers; we already did that for you. |
| Query String | Enter the request query string. |
| Body | Enter the body content for your API call. |
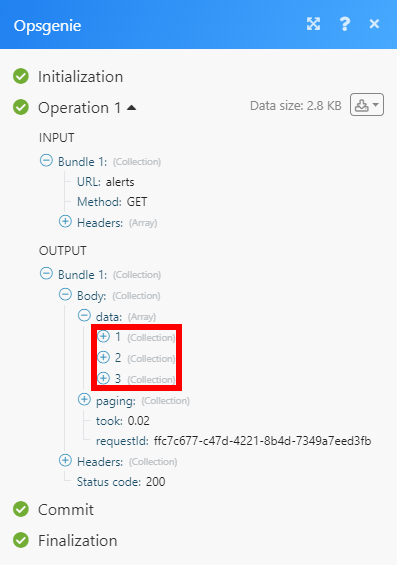
Example of Use - List Alerts
The following API call returns all alerts in your Opsgenie account:
URL:alerts
Method:
GET
The result can be found in the module's Output under Bundle > Body > data.
In our example, 3 alerts were returned: