Pipefy
Getting Started with Pipefy
The Pipefy modules allow you to monitor new, moved, done, overdue, late, and expired cards or create, update, list, or delete cards and tables in your Pipefy account.
Prerequisites
- A Pipefy account
In order to use Pipefy with Integromat, it is necessary to have a Pipefy account. If you do not have one, you can create a Pipefy account at app.pipefy.com/registrations/new.
Connecting Pipefy to Integromat
To connect your Pipefy account to Integromat you need to obtain the API Key from your Pipefy account and insert to the Integromat module.
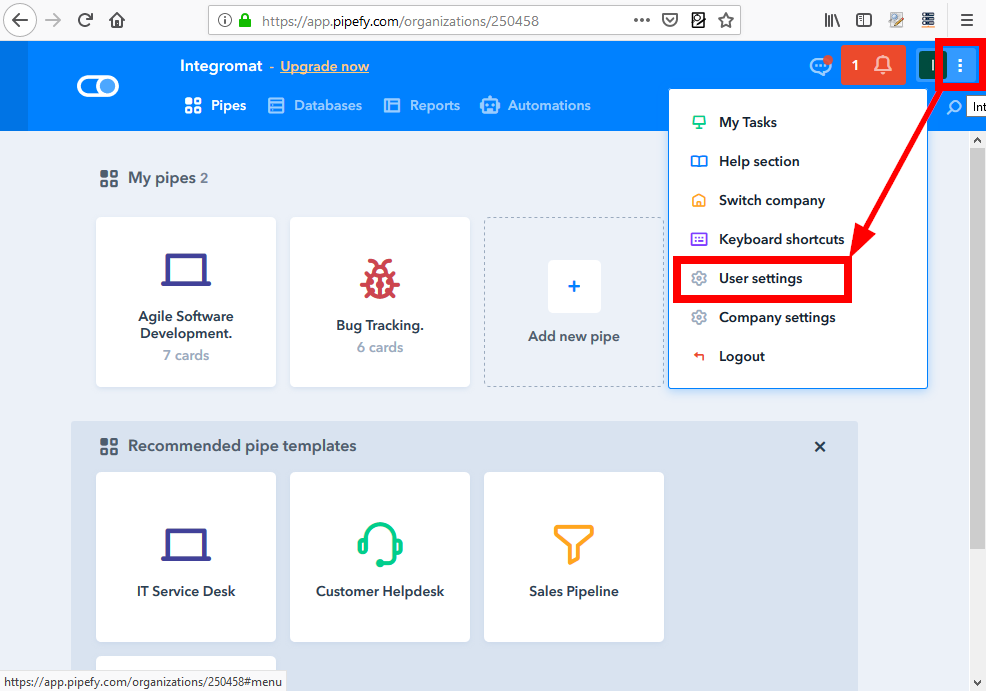
1. Open your Pipefy User settings.
2. Go to the Personal access tokens tab and click the Generate new token button.

3. Copy the generated token.
4. Insert the token to the API Key field in the Create a connection dialog.
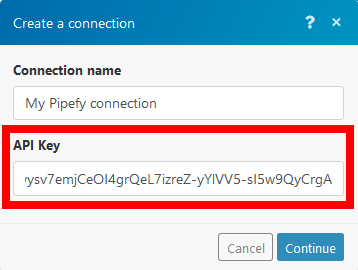
The connection is now established.
Triggers
Watch New Cards
Triggers when a new card is created.
| Webhook name | Enter the name for the webhook. |
| Connection | Establish a connection to your Pipefy account. |
| Pipe ID | Select the pipe you want to watch for new cards. |
Watch Moved Cards
Triggers when a card is moved in a selected pipe.
| Webhook name | Enter the name for the webhook. |
| Connection | Establish a connection to your Pipefy account. |
| Pipe ID | Select the pipe you want to monitor for moved cards. |
Watch Done Cards
Triggers when a card is moved into the Done phase.
| Webhook name | Enter the name for the webhook. |
| Connection | Establish a connection to your Pipefy account. |
| Pipe ID | Select the pipe you want to monitor for done cards. |
Watch Overdue Cards
Triggers when a card's overdue date and time is passed.
| Webhook name | Enter the name for the webhook. |
| Connection | Establish a connection to your Pipefy account. |
| Pipe ID | Select the pipe you want to monitor for cards that passed the overdue date and time. |
Watch Late Card
Triggers when a card remains in the phase longer than specified in the late alert setting.
| Webhook name | Enter the name for the webhook. |
| Connection | Establish a connection to your Pipefy account. |
| Pipe ID | Select the pipe you want to monitor for cards that are late. |
Watch Expired Cards
Triggers when a card remains in the pipe longer than specified in the Pipe settings.
| Webhook name | Enter the name for the webhook. |
| Connection | Establish a connection to your Pipefy account. |
| Pipe ID | Select the pipe you want to monitor for expired cards. |
Pipes
Create a Card
Creates a new card in a selected pipe.
| Connection | Establish a connection to your Pipefy account. |
| Pipe ID | Select the pipe you want to create a new card in. |
| Main Fields |
Add fields for the card you want to create. Value of the entered field must be in the respective format. Available field types. E.g. when the |
| Additional fields |
Use this for additional custom fields. You can use this, for example, for adding the checkbox field type, as described below. |
| Assignees |
Enter the users assigned to this card. |
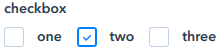
Creating Card with Additional Field
Example
A card that contains a checkbox with the second option selected.
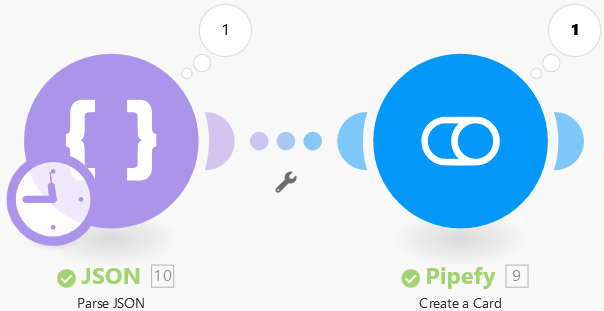
In order to create a card that contains the checkbox field type, it is necessary to use JSON > Parse JSON module.
1. Open the JSON > Parse JSON module.
2. Enter the desired JSON string.
sample JSON string that adds a checkbox "checkbox" and selects the option "two":
{
 "fields": [{
 "field_id": "checkbox",
 "field_value": ["two"]

}]
}
3. Link the Parse JSON module with the Create a Card module.
4. Open the Create a Card module and map the module that contains the JSON string for selecting the checkbox option.
5. The card that contains the selected checkbox has been created.
Delete a Card
Deletes a card.
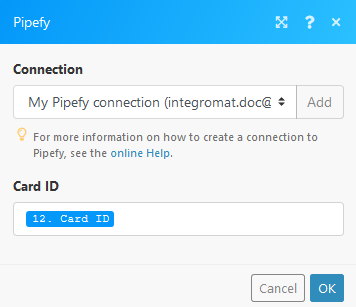
| Connection | Establish a connection to your Pipefy account. |
| Card ID | Enter (map) the ID of the card you want to delete. |
Get a Card Info
Retrieves information about a selected card.
| Connection | Establish a connection to your Pipefy account. |
| Card ID | Enter (map) the ID of the card you want to retrieve information about. |
List Cards
Retrieves cards from a selected pipe.
| Connection | Establish a connection to your Pipefy account. |
| Pipe ID | Select the pipe you want to list cards from. |
| Card name | You can filter returned cards by an entered term. |
| Order | Select the ordering of the returned cards. |
| Limit | Set the maximum number of results that Integromat will return during one cycle. |
Move a Card to Phase
Moves a card to a desired phase.
| Connection | Establish a connection to your Pipefy account. |
| Mode | Select whether you want to map the Card ID and Phase ID or select Organization, Pipe, Card, and Phase manually. |
Update a Card Field
| Connection | Establish a connection to your Pipefy account. |
| Mode | Select whether you want to enter or map the Card ID and Field name or select Organization, Pipe, Card and Field manually. |
| New value | Enter the new value for the card field you want to update. |
Tables
Create a Table
Creates a table.
| Connection | Establish a connection to your Pipefy account. |
| Name | Enter a name for the new table. |
| Organization ID |
Select the organization you want to create a table for. |
| Description | Enter the description of the new table. |
| Authorization |
Read/Write Read |
| Public |
If this option is enabled, all team members will have access to this table. Otherwise, only invited users will have access to this table. |
Create a Table Record
Creates a record in a selected table.
| Connection | Establish a connection to your Pipefy account. |
| Table ID | Select the table you want to create a new record in. |
| Fields |
Field ID Value |
| Title | Enter the title for the new table record. |
| Due date | Enter the date and time. List of supported date and time formats. |
Delete a Table Record
Deletes a record from a table.
| Connection | Establish a connection to your Pipefy account. |
| Record ID | Enter (map) the ID of the record you want to delete. |
Get a Table Record
Retrieves details about a record from a table.
| Connection | Establish a connection to your Pipefy account. |
| Record ID | Enter (map) the ID of the record you want to retrieve information about. |
List Table Records
Returns a list of records from a selected table.
| Connection | Establish a connection to your Pipefy account. |
| Table ID | Select or map the table you want to list records from. |
| Order | Select the ordering of the returned records. |
| Limit | Set the maximum number of records that Integromat will return during one cycle. |
Update a Table Record
Updates a record in a table.
| Connection | Establish a connection to your Pipefy account. |
| Record ID | Enter (map) the ID of the record you want to update. |
| Table ID |
Select the table that contains the record you want to update. |
| Fields | Select the field and enter its new value. |
Other
Make an API Call
Allows you to perform a custom API call.
| Connection | Establish a connection to your Pipefy account. |
|
Please enter complete GraphQL query. E.g. For the list of available endpoints, refer to the Pipefy GraphQL Queries documentation.
|
|
| Method |
Select the HTTP method you want to use: GET POST PUT PATCH DELETE |
| Headers | Enter the desired request headers. You don't have to add authorization headers; we already did that for you. |
| Query String | Enter the request query string. |
| Body | Enter the body content for your API call. |
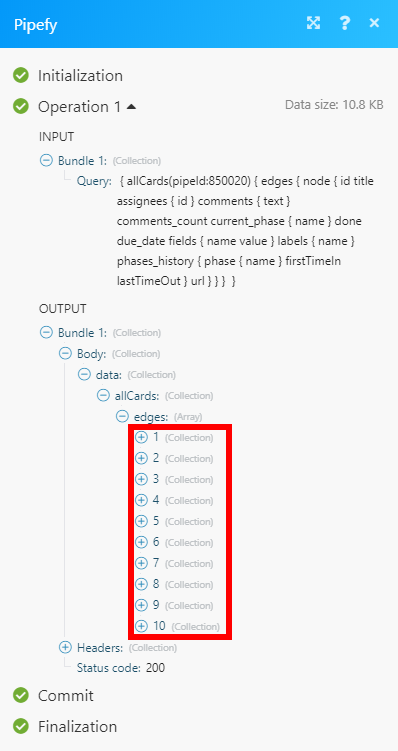
Example of Use - List all cards in the specified pipe
The following API call returns all cards in the pipe with the Pipe ID 850020:

Matches of the search can be found in the module's Output under Bundle > Body > data > allCards > edges.
In our example, 10 cards were returned: