Platformly
Getting Started with Platformly
The Platformly modules allow you to monitor, add, update, and retrieve contacts or add and remove tags in your Platformly account.
Prerequisites
- A Platformly account
In order to use Platformly with Integromat, it is necessary to have a Platformly account. If you do not have one, you can create a Platformly account at www.platform.ly.
Connecting Platformly to Integromat
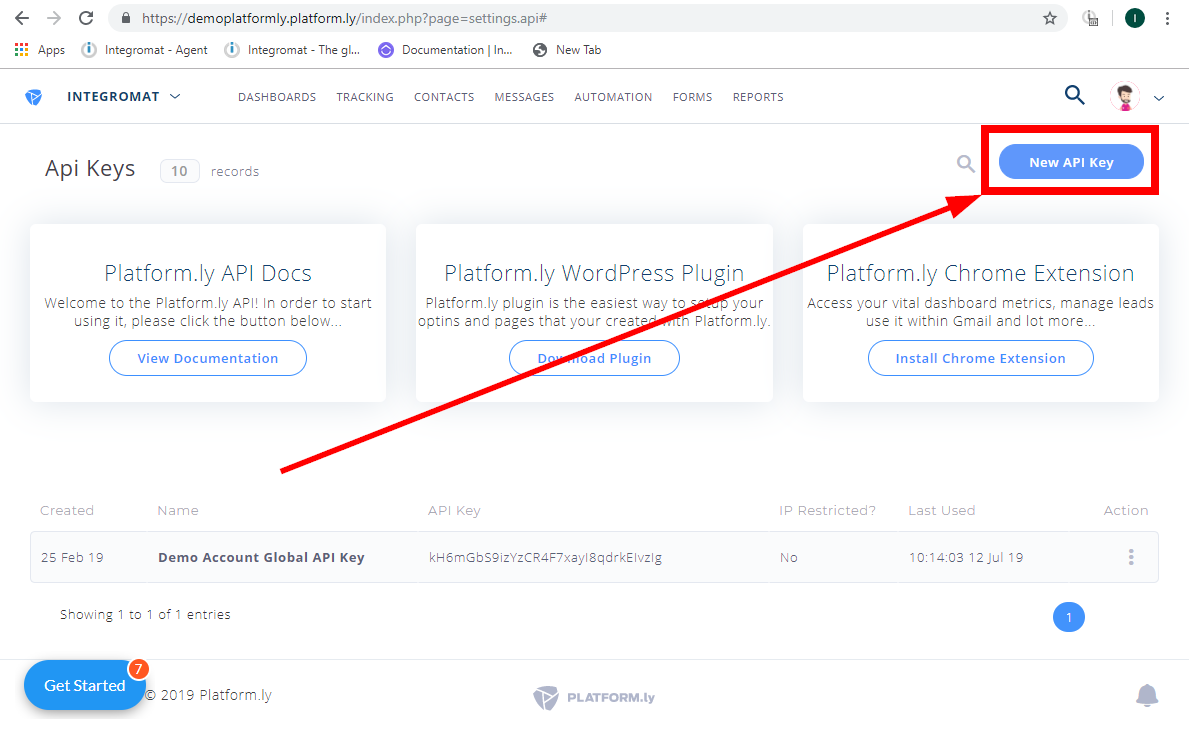
To connect your Platformly account to Integromat you need to add a new API Key to your Platformly account and insert the created API Key to the Integromat Platformly module connection dialog.
1. Log in to your Platformly account and open the API Docs & Keys settings.
2. Click on the New API Key button.
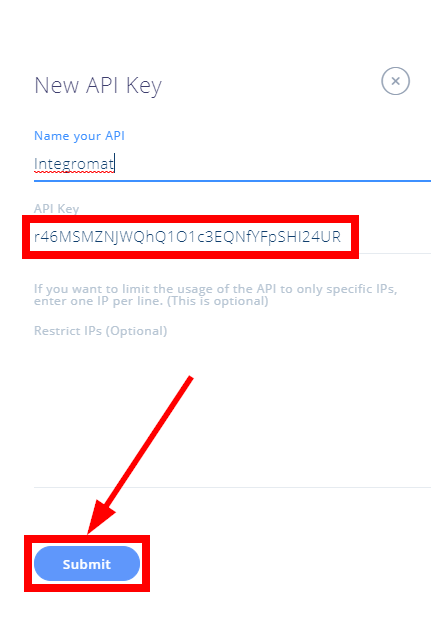
3. Enter the name for the API Key, copy the provided API Key and click on the Submit button.
4. Go to Integromat and open the Create a connection dialog in the desired module.
Enter the API Key into the respective field.
After you click the Continue button you can proceed to set up the Platformly module.
Triggers
Watch Contacts
Triggers when a new contact is added or updated.
| Connection | Establish a connection to your Platformly account. |
| Limit |
Set the maximum number of contacts Integromat will return during one execution cycle.
|
| Project ID | Select the project that you want to monitor for new or updated contacts. |
Actions
Add a Contact
Creates a new contact in your account.
| Connection | Establish a connection to your Platformly account. |
| Project ID | Select the project you want to add the new contact to. |
| Tag | Select the tag you want to assign to the new contact. |
| Custom Fields | Add custom fields to the contact, represented by the selected key and entered value. |
| Segment | Assign the contact to the segment. |
| Enter the contact's email. | |
| Full name | If First name and Last name are not provided this field can be used to provide the full name of the contact. |
| First name | Enter the first name of the contact. |
| Last name | Enter the last name of the contact. |
| Company | Enter the contact's company. |
| Address | Enter the address details of the contact. |
| City | Enter the city for the contact. |
| ZIP | Enter the ZIP code. |
| Country | Enter the contact's country |
| Fax | Enter the contact's fax number. |
| SMS Number | Enter the contact's SMS number. |
| Phone | Enter the contact's phone number. |
| Birthday | Enter the contact's birthday date. The list of supported date formats. |
| Website | Enter the contact's website. |
| Date | This is the First Seen date. The list of supported date formats. |
Update a Contact
Updates a specified contact.
| Connection | Establish a connection to your Platformly account. |
| Project ID | Select the project that contains the contact you want to update. |
| Enter the email of the contact you want to update. |
Find the descriptions of the fields in the Add a Contact section above.
Add a Tag
Adds a tag to a contact.
| Connection | Establish a connection to your Platformly account. |
| Project ID | Select the project that contains the contact you want to assign a tag to. |
| Tag | Select the tag you want to add to the contact. |
| Email/Contact ID | Enter or map the email or contact ID of the contact you want to add the tag to. |
Remove a Tag
Removes a tag from a contact.
| Connection | Establish a connection to your Platformly account. |
| Project ID | Select the project that contains the contact you want to remove a tag from. |
| Tag | Select the tag you want to remove from the contact. |
| Email/Contact ID | Enter or map the email or contact ID of the contact you want to remove the tag from. |
Remove All Tags
Removes all tags from a contact.
| Connection | Establish a connection to your Platformly account. |
| Email/Contact ID | Enter or map the email or contact ID of the contact you want to remove all tags from. |
Add a Note
Add a note to a contact.
| Connection | Establish a connection to your Platformly account. |
| Note | Add the text content of the note. |
| Email/Contact ID | Enter or map the email or contact ID of the contact you want to add the note to. |
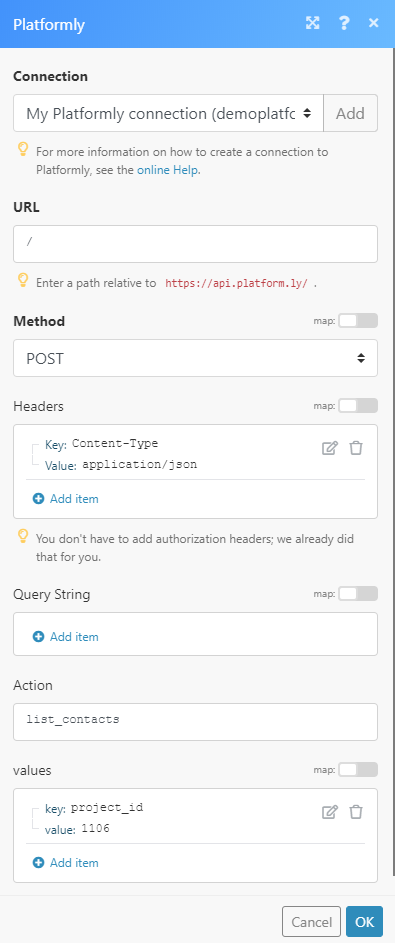
Make an API Call
Allows you to perform a custom API call.
| Connection | Establish a connection to your Platformly account. |
| URL |
Enter a path relative to For the list of available endpoints, refer to the Platform.ly API documentation.
|
| Method |
Select the HTTP method you want to use: GET POST Platform.ly use the POST method for all endpoints.
PUT PATCH DELETE |
| Headers | Enter the desired request headers. You don't have to add authorization headers; we already did that for you. |
| Query String | Enter the request query string. |
| Action |
Select the action you want to perform. The action name can be found in the API documentation.
|
| Values |
Enter the required parameters for the action of your API call. E.g. Project ID (as |
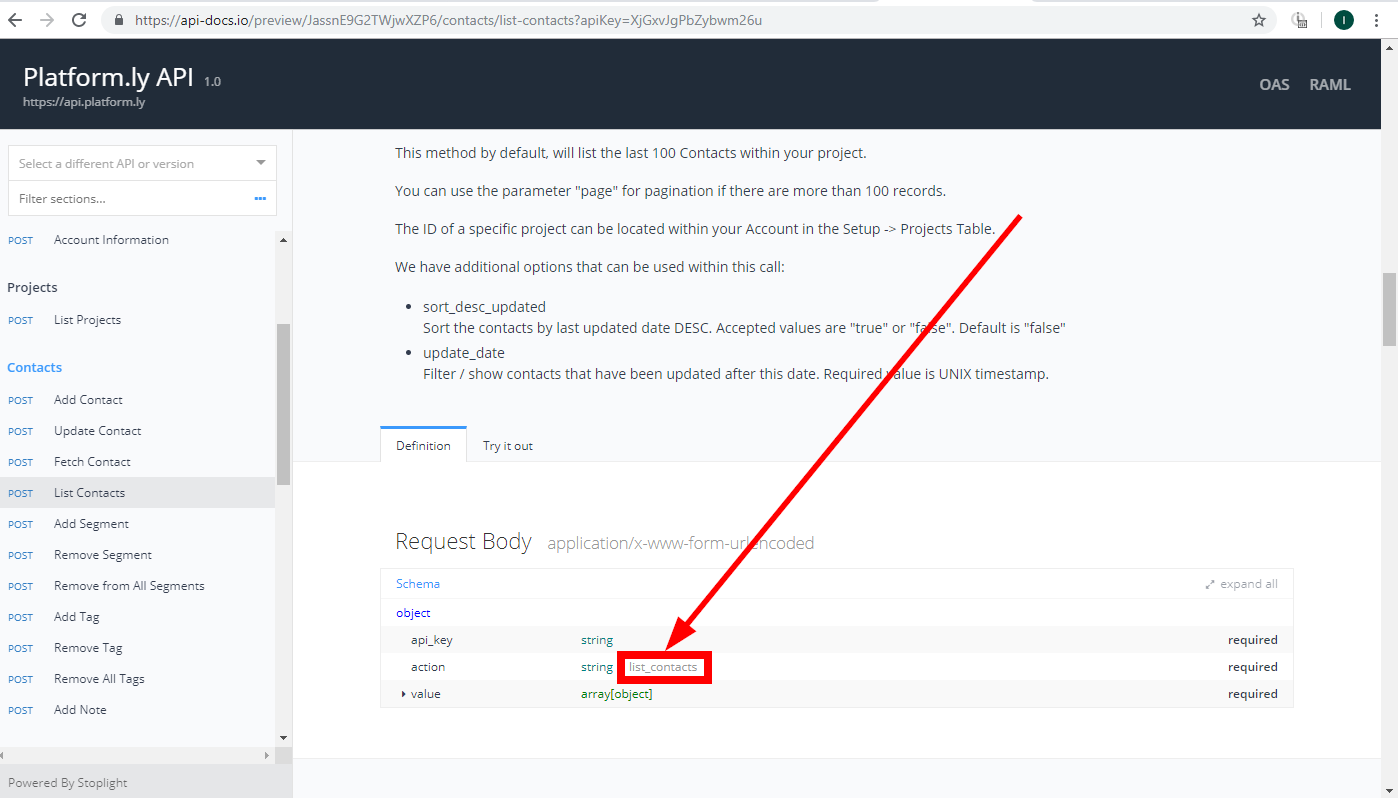
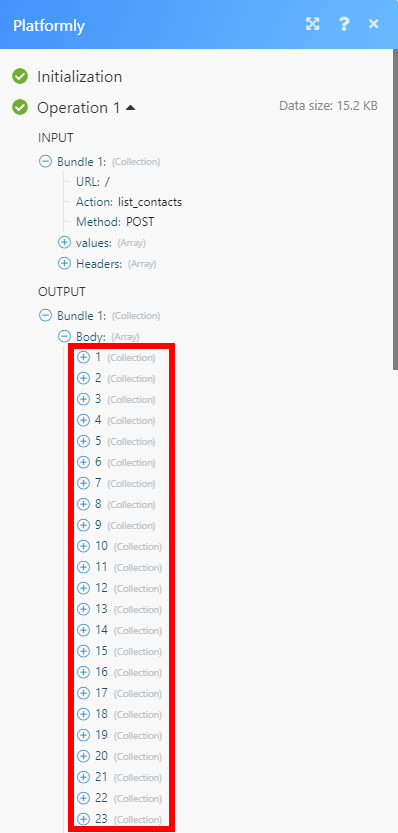
Example of Use - List Contacts
The following API call returns all contacts from the project:
Matches of the search can be found in the module Output under Bundle > Body.
In our example, 23 contacts were returned:
Searches
Get a Contact
Retrieve details of a specified contact.
| Connection | Establish a connection to your Platformly account. |
| Email/Contact ID | Enter or map the email or contact ID of the contact you want to retrieve details about. |
List Contacts
Retrieves the last 100 contacts within a specified project.
| Connection | Establish a connection to your Platformly account. |
| Project ID | Select the project that contains the contacts you want to list. |
| Date | Enter a date to filter contacts by the last update date. The list of supported date formats. |
| Sort Order | Select whether you want to sort results in descending or ascending order. |
| Limit | Set the maximum number of contacts Integromat will return during one execution cycle. |


