SendPulse
The SendPulse modules allow you to add, retrieve, and search contacts or list, retrieve, and send emails in your SendPulse account.
Getting Started with SendPulse
Prerequisites
- A SendPulse account
In order to use SendPulse with Integromat, it is necessary to have a SendPulse account. If you do not have one, you can create a SendPulse account at sendpulse.com/register.
Connecting SendPulse to Integromat
To connect your SendPulse account to Integromat you need to enable the REST API first.
1. Log in to your SendPulse account.
2. Click on your profile icon in the top-right corner and select the Account settings option.
3. Click on the API tab, turn the Activate Rest API button on, and click the Save button.
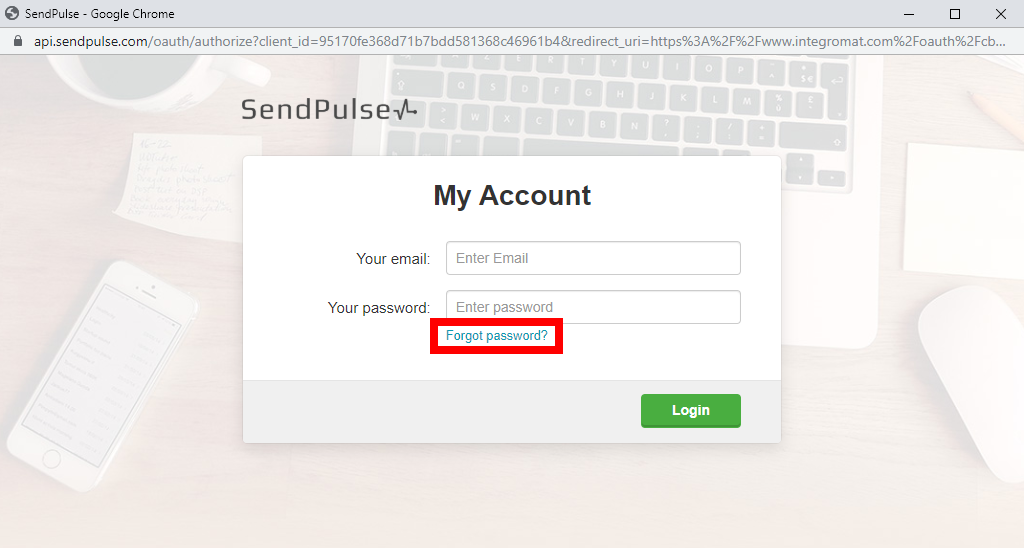
4. Go to Integromat and open the SendPulse module's Create a connection dialog.
5. After you click the Continue button, Integromat will redirect
you to the SendPulse website.
6. Enter your credentials and click the Login button to establish the connection.
Add a Contact
Adds an email address to the mailing list.
| Connection | Establish a connection to your SendPulse account. |
| Option | Select whether you want to add Single opt-in or Double opt-in (requires a user to confirm the email). |
| List ID | Select the mailing list you want to add a new email address to. |
| Emails | Add emails and specify the variables (e.g. Name or Phone) that will be added together with the email address to the mailing list. |
| Confirmation | The parameter required by the SendPulse service for double opt-in contacts. Please do not change. |
| Sender Email | Specify the sender email for the confirmation email. |
List Contacts
Retrieves all contacts from the specified mailing list.
| Connection | Establish a connection to your SendPulse account. |
| List ID | Select the mailing list you want to retrieve contacts from. |
| Limit | Set the maximum number of contacts Integromat will return during one execution cycle. |
Search a Contact by Variable
Retrieves all contacts in the mailing list by the specified value of a variable.
| Connection | Establish a connection to your SendPulse account. |
| List ID | Select the mailing list you want to search for the specified value. |
| Variable | Select or map the variable you want to specify the value for. |
| Value | Enter the variable you want to search the mailing list for. |
| Limit | Set the maximum number of contacts Integromat will return during one execution cycle. |
Search a Contact by Email
Retrieves a contact with the specified email address.
| Connection | Establish a connection to your SendPulse account. |
| List ID | Select the mailing list you want to search for the specified value. |
| Enter the email address you want to search the mailing list for. | |
| Limit | Set the maximum number of contacts Integromat will return during one execution cycle. |
Get a Contact
Retrieves contact details.
| Connection | Establish a connection to your SendPulse account. |
| Enter the email address you want to retrieve details about. |
Unsubscribe a Contact
Deletes an email address from the mailing list.
| Connection | Establish a connection to your SendPulse account. |
| List ID | Select the mailing list you want to remove the email address from. |
| Emails | Enter email addresses you want to delete from the mailing list. |
Email/SMTP
List Campaigns
Retrieves information about campaigns in your account.
| Connection | Establish a connection to your SendPulse account. |
| Limit | Set the maximum number of campaigns Integromat will return during one execution cycle. |
Get a Campaign
Retrieves campaign details.
| Connection | Establish a connection to your SendPulse account. |
| Campaign ID | Enter (map ID) or select the campaign you want to retrieve information about. |
Send an Email
Sends Email.
| Connection | Establish a connection to your SendPulse account. |
| From |
Name Email |
| To | Enter the recipient's email address and name. |
| Subject | Enter the subject of the email. |
| Html | Enter the html-formatted version of the email. |
| Text | Enter the text version of the email. |
Send an Email from Template
Sends an email using the selected template.
| Connection | Establish a connection to your SendPulse account. |
| Template ID | Select or map the template you want to use for the email. |
| From |
Name Email |
| To | Enter the recipient's email address and name. |
| Subject | Enter the subject of the email. |
| Variables | Enter variables' names and values (e.g. phone, name, code, etc.) |
Create a Template
Allows you to create a template using the html code.
| Connection | Establish a connection to your SendPulse account. |
| Name | Enter the name for the new template.
If not specified, the name will be displayed as Template yyyy-MM-dd HH:mm:ss.
|
| HTML | Enter the html formatted template. Use the curly brackets {{}} to define a variable. E.g. Hello {{name}}!
|
List Bounces
Returns all bounces for the last 24 hours.
| Connection | Establish a connection to your SendPulse account. |
| Day | Enter the day you want to get information about in the YYYY-MM-DD format. E.g. 2019-10-18 14:34:00. You can get bounces only for the last 24 hours starting from this moment. Example: today is - 2019-04-28 14:34:00, you will get entries from 2019-04-27 14:34:00 till 2019-04-28 14:34:00 |
| Limit | Set the maximum number of bounces Integromat will return during one execution cycle |
Push
List Website Subscriptions
Retrieves a list of web push subscribers for a certain website.
| Connection | Establish a connection to your SendPulse account. |
| Website ID | Enter or select the ID of the website you want to retrieve push subscriptions for. |
| Limit | Set the maximum number of subscribers Integromat will return during one execution cycle |
| Day From | Enter the date you want to filter subscribers from. E.g. 2019-08-13
14:27:11
|
| Day to | Enter the date you want to filter subscribers to. E.g. 2020-08-13
14:27:11
|
Get a Website
Retrieves website details.
| Connection | Establish a connection to your SendPulse account. |
| Website ID | Enter (map ID) or select the website you want to retrieve information about. |
Activate/deactivate a website subscriber
Sets the subscriber as activated or deactivated.
| Connection | Establish a connection to your SendPulse account. |
| Subscriber ID | Enter (map) the ID of the website subscriber. |
| State | Set subscriber as activated or deactivated (disabled). |
Create a Push Campaign
Creates a new push campaign.
| Connection | Establish a connection to your SendPulse account. |
| Title | Enter the name of the new push campaign. |
| Website ID | Enter (map) the ID of the website you want to create a push campaign for. |
| Body | Enter the content for the push notification. |
| Ttl | "time to live". Enter the push notification lifetime in seconds. |
| Link | Enter the web push navigation link; if it’s not specified, the website URL will be used. |
| Lang | Enter the language code to filter subscribers by language. E.g. en. |
| Browser | Enter the browser name to filter subscribers by the browser; this parameter can take multiple values separated by commas (e.g. – Chrome, Safari) |
| Region | Enter the country code to filter subscribers by the country. E.g. UK. |
| URL | |
| Subscription from | Use "YYYY-MM-DD" format to specify the start date of the interval to filter subscribers by the date they were added to the list. |
| Subscription to | Use "YYYY-MM-DD" format to specify the end date of the interval to filter subscribers by the date they were added to the list. |
| Filter | Add up to 10 filters for 1 campaign. |
| Stretch time | Enter the timespan (in seconds) during which the campaign must be completed. If not specified, the default time (5 hours) applies. |
| Send date | Enter the date in YYYY-MM-DD hh:mm:ss to schedule a campaign for a specific date and time. E.g. 2020-09-11 16:19:10. |
| Buttons | Insert buttons in the campaign, maximum two buttons. |
| Image | Enter the name and data of the image that is inserted into the web-push notification. It can be mapped from the previous module (e.g. Dropbox > Get a file). The image must be in JPG, PNG, GIF format and within 200KB. |
| Icon | Enter the name and data of the image that is inserted into the web-push notification. It can be mapped from the previous module (e.g. Dropbox > Get a file). The image must be in JPG, PNG, GIF format and within 200KB. |
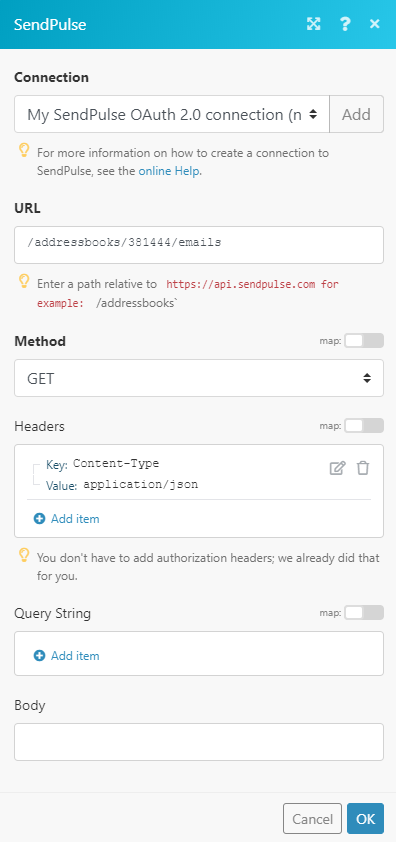
Make an API Call
Allows you to perform a custom API call.
| Connection | Establish a connection to your SendPulse account. |
| URL |
Enter a path relative to For the list of available endpoints, refer to the SendPulse API Documentation.
|
| Method |
Select the HTTP method you want to use: GET POST PUT PATCH DELETE |
| Headers | Enter the desired request headers. You don't have to add authorization headers; we already did that for you. |
| Query String | Enter the request query string. |
| Body | Enter the body content for your API call. |
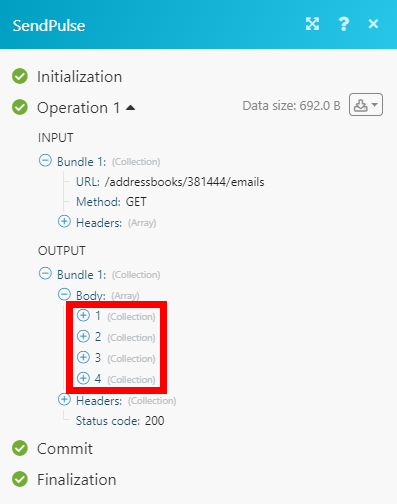
Example of Use - List Contacts From the Mailing List
The following API call returns the list of all contacts in the specified mailing list:
Matches of the search can be found in the module's Output under Bundle > Body.
In our example, 4 contacts were returned: