Thankster
The Thankster modules allow you to watch the addresses and send cards to your contacts in your Thankster account.
Getting Started with Thankster
Prerequisites
- A Thankster account
In order to use Thankster with Integromat, it is necessary to have a Thankster account. If you do not have one, you can create a Thankster account at thankster.com.
Connecting Thankster to Integromat
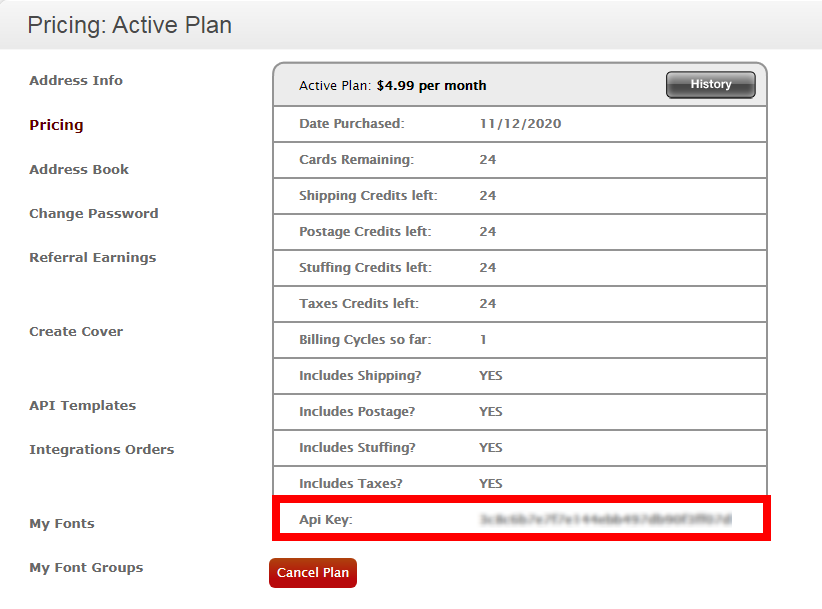
To connect your Thankster account to Integromat you need to obtain the API Key from your Thankster account and insert it in the Create a connection dialog in the Integromat module.
1. Log in to your Thankster account and open your Dashboard.
2. Click Your Profile Name > My Account > Pricing > Generate.

3. Copy the API Key to your clipboard.
4. Go to Integromat and open the Thankster module's Create a connection dialog.
5. In the Connection name field, enter a name for the connection.
6. In the API Key field, enter the API key copied in step 3.
7. In the Email Address field, enter the email address used for creating your Thankster's account, and click Continue.
The connection has been established.
Addresses
Watch New Addresses
Triggers when a new address is created.
| Connection | Establish a connection to your Thankster account. |
| Limit | Set the maximum number of addresses Integromat should return during one scenario execution cycle. |
Cards
Send Cards
Send handwritten cards.
| Connection | Establish a connection to your Thankster account. |
| Select a Thankster Project | Select the project from which the style and fonts are applied to the card you want to send. |
| Sender Firstname | Enter the card sender's first name. |
| Sender Lastname | Enter the card sender's last name. |
| Sender Company Name | Enter the card sender's company name. |
| Sender Address 1 | Enter the card sender's street address. |
| Sender Address 2 | Enter the card sender's street address. |
| Sender City | Enter the card sender's city name. |
| Sender State | Enter the card sender's state name. |
| Sender Zip | Enter the card sender's area zip code. |
| Sender Country | Enter the card sender's two-character country name. |
| Receiver Firstname | Enter the recipient's first name. |
| Receiver Lastname | Enter the recipient's last name. |
| Receiver Company Name | Enter the recipient's company name. |
| Receiver Address 1 | Enter the recipient's street address. |
| Receiver Address 2 | Enter the recipient's street address. |
| Receiver City | Enter the recipient's city name. |
| Receiver State | Enter the recipient's state name. |
| Receiver Zip | Enter the recipient's zip code. |
| Receiver Country | Enter the recipient's two-character country name. |
| Main Inside Message | Enter the message you want to write on the main side of the card. If no message is provided, it will take the message from your Thankster project. Right side if portrait card, bottom, if landscape. A Maximum of 150 characters is allowed. |
| Secondary Inside Message |
Enter the message you want to write on the other side of the card. If no message is provided, it will take the message from your Thankster project. Right side if portrait card, bottom, if landscape. A Maximum of 150 characters is allowed. |
| Image URL - Main Inside Page | Enter the URL address of the image that appears on the main side of the card. The image format must be PNG or JPG. |
| Image URL - Secondary Inside Page | Enter the URL address of the image that appears on the other side of the card. The image format must be PNG or JPG. |
| Image URL - Front Cover | Enter the URL address of the image that appears on the front cover of the card. Ensure that the image is at least 1224x1584 pixels and has that aspect ratio to avoid stretching or pixelated. |
| Image URL - Back Cover | Enter the URL address of the image that appears on the other side of the card. Ensure that the image is at least 1224x1584 pixels and has that aspect ratio to avoid stretching or pixelated. |
| Sender Image |
(Optional) Enter the URL address of the sender's image. The recommended image size is 300x120 pixels or that aspect ratio to avoid stretching or pixelation. The image appears on top of the text and it will be downsized preserving the aspect ratio to fit the boundaries if necessary. |
| Recipient Image |
(Optional) Enter the URL address of the recipient's image. The recommended image size is 300x120 pixels or that aspect ratio to avoid stretching or pixelation. The image appears on top of the text and it will be downsized preserving the aspect ratio to fit the boundaries if necessary. |
Other
Make an API Call
Performs an arbitrary authorized API call.
| Connection | Establish a connection to your Thankster account. |
| URL |
Enter a path relative to For the list of available endpoints, refer to the Thankster API Documentation.
|
| Method |
Select the HTTP method you want to use: GET POST PUT PATCH DELETE |
| Headers | Enter the desired request headers. You don't have to add authorization headers; we already did that for you. |
| Query String | Enter the request query string. |
| Body | Enter the body content for your API call. |
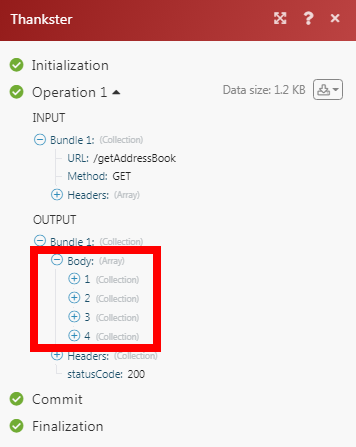
Example of Use - Get Address Book
The following API call returns all the addresses from your Thankster account:
URL:/getAddressBook
Method:GET

Matches of the search can be found in the module's Output under Bundle > Body.
In our example, 4 addresses were returned: