Wrike
Getting Started with Wrike
The Wrike modules allow you to monitor, modify, create or delete tasks, attachments, comments, folders, projects and retrieve lists in your Wrike account.
Prerequisites
- A Wrike account
In order to use Wrike with Integromat, it is necessary to have a Wrike account. If you do not have one, you can create a Wrike account at wrike.com.
Connecting Wrike to Integromat
To connect your Wrike account to Integromat follow the general instructions for Connecting to services.
After you click the Continue button, Integromat will redirect you to the Wrike website where you will be prompted to grant Integromat access to your account.

Confirm the dialog by clicking the Accept button.
Events
Watch Events
Triggers when the selected action is performed.
| Webhook name | Enter the name for the webhook. E.g. Created Task Webhook
|
| Connection | Establish a connection to your Wrike account. |
| Folder ID |
Select the folder you want to watch for performed actions. If no folder is selected, all account folders will be monitored for the events.
|
| Events | Select one or more events that will trigger the module. |
Tasks
Watch Tasks
Triggers when a task is created or updated.
| Connection | Establish a connection to your Wrike account. |
| Folder ID |
Select the folder you want to watch for performed actions. If no folder is selected, all account folders will be monitored for the events.
|
| Limit | Set the maximum number of tasks Integromat will return during one cycle. |
Find Tasks
Searches tasks based on the specified filter.
| Connection | Establish a connection to your Wrike account. |
| Limit |
Set the maximum number of results Integromat will return during one cycle. |
| Title | Enter a title you want to filter the results by. |
| Include subtasks | Select Yes if you want to search also in subtasks. |
| Status | Enter the task status you want to filter the results by. |
| Importance | Enter the task importance you want to filter the results by. |
| Authors | Enter authors of the task you want to filter the results by. |
| Responsibles | Enter responsible contacts for the task you want to filter the results by. |
| Descendants | Select Yes if you want to search also in sub-folders. |
| Sort field | Select the field you want to sort by the result. |
| Sort order | Select ascending sort order or descending sort order of the results. |
| Task type | Select the task type you want to filter the results by. |
Get Task(s)
Retrieves details about single or multiple tasks.
| Connection | Establish a connection to your Wrike account. |
| Task ID |
Enter (map) the ID of the task you want to retrieve details about. |
List Tasks from a Folder
Gets tasks from the selected folder based on the specified filter.
| Folder ID | Select or map the folder you want to retrieve tasks from. |
Find the descriptions of the other fields in the Find Tasks section.
Create a Task
Creates a task in the specified folder.
| Connection | Establish a connection to your Wrike account. |
| Folder ID |
Select a folder you want to create the task in. |
| Additional Parent Projects/Folders |
Select parent folders/projects for newly created task. |
| Title | Enter the title of the new task. |
| Description | Enter the description for the task. |
| Status | Enter the task status of the new task. |
| Importance | Select the importance of the task. |
| Dates |
Task dates. If not specified, a backlogged task is created. Backlog Milestone Planned |
| Work on weekends | If this option is enabled then weekends are included in the task scheduling. |
| Share task with | Specify the users you want to share the new task with. |
| Responsibles | Select the users that are responsible for the task. |
| Supertasks | Add the task as a subtask to selected tasks. |
| Followers | Add specified users as task followers. |
| Follow task | Enable this option if you want to follow the task. |
| Metadata | Enter the key-value metadata to the new task. |
| Custom fields |
Add a custom field to the task. The custom field must be already created. Follow these instructions to create a custom field. |
| Custom status ID |
Enter (map) the ID of the custom status. Cannot be set when the Status field is filled.
|
Modify a Task
Updates a selected task.
| Connection | Establish a connection to your Wrike account. |
| Task ID |
Select or map the task you want to update. |
Find the descriptions of the other fields in the Create a Task section.
Delete a Task
Deletes a selected task.
| Connection | Establish a connection to your Wrike account. |
| Task ID |
Select or map the task you want to delete. |
Folders
Create a Folder
Creates a folder in the selected parent folder.
| Connection | Establish a connection to your Wrike account. |
| Folder ID |
Select a folder you want to create the new folder in. |
| Title | Enter the title of the new folder. |
| Description | Enter the description of the folder. |
| Share task with | Specify the users you want share the new folder with. |
| Metadata | Enter the key-value metadata to the new folder. |
| Custom fields |
Add a custom field to the folder. The custom field must be already created. Follow these instructions to create a custom field. |
| Custom columns |
Add custom fields associated with the folder. |
| Project |
Project settings in order to create a project. Owners Status Start date End date |
Delete a Folder
Moves a folder and all sub-folders and tasks to the Recycle Bin unless they have parents outside of deletion scope.
| Connection | Establish a connection to your Wrike account. |
| Folder ID |
Select or map the folder you want to delete. |
Timelogs
Create a Timelog
Creates a timelog record for the selected task.
| Connection | Establish a connection to your Wrike account. |
| Task ID |
Select the task you want to track the timelog for. |
| Comment | Enter the timelog record comment. |
| Hours | Time to log in hours (0-24). |
| Tracked Date | Enter the date you want to register time. Format yyyy-MM-dd. |
| Plain text |
Retrieves Comment text as plain text, HTML otherwise. |
| Category ID | Select the category of the timelog record. |
Other
Make an API Call
Allows you to perform a custom API call.
| Connection | Establish a connection to your Wrike account. |
| URL |
Enter a path relative to For the list of available endpoints, refer to the Wrike API documentation.
|
| Method |
Select the HTTP method you want to use: GET POST PUT PATCH DELETE |
| Headers | Enter the desired request headers. You don't have to add authorization headers; we already did that for you. |
| Query String | Enter the request query string. |
| Body | Enter the body content for your API call. |
| Search Criteria | Set the search criteria. Required when the GET method is used without ID. |
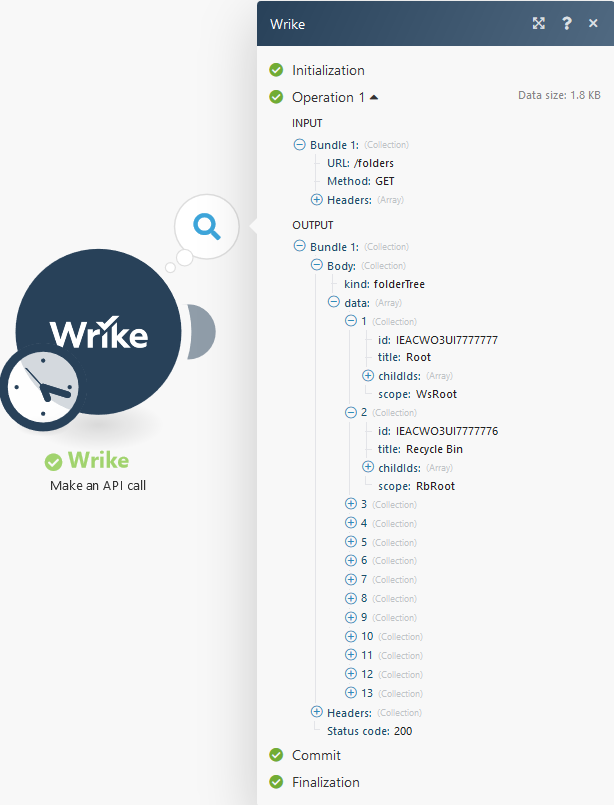
Example of Use - List Folders
The following API call returns all folders:
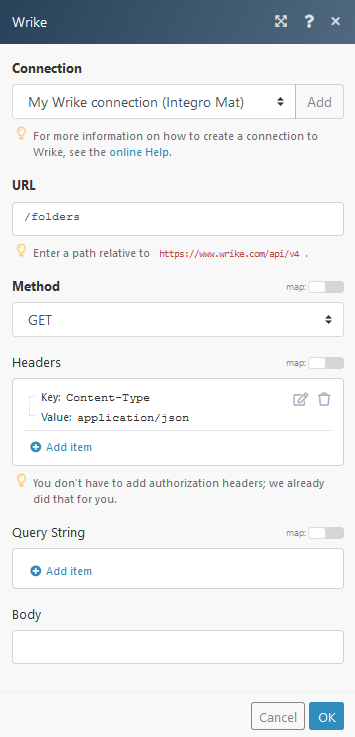
Matches of the search can be found in the module Output under Bundle > Body > data.
Webhooks
If you stop using an instant trigger, Integromat will automatically start to reject new incoming messages from the service. After three unsuccessful delivery attempts, the service itself will stop sending new notifications. So if you have a webhook that you have not used for a long time, it may happen that Wrike deactivates it and you will have to create a new one.
Troubleshooting
Errors encountering with multiple scenarios running simultaneously
If you have multiple active scenarios using the same connection and running simultaneously, it may happen that some of those scenarios stop unexpectedly. The reason for that is Wrike uses a refresh-token based OAuth 2 connection. If this connection is shared by multiple scenarios and is about to expire, one of the scenarios will ask Wrike to refresh the expiring token. Wrike then returns a new access-token, but in turn also instantly invalidates the previous one, which can still be used in any other currently running scenario. The running scenario tries to access Wrike with the old access-token, and it gets refused. That's how this error occurs. But, there's an easy fix for this problem - use a unique connection for each Wrike scenario. Then one scenario won't be affected by another.


