Xero
The Xero modules allow you to watch, create, update, list, and/or delete accounts, bank transfers, bank transactions, change history, contacts, contact groups, credit notes, employees, files, invoices, items, journal manuals, notes, payments, purchase orders, and tax rates in your Xero account.
Prerequisites
- A Xero account
In order to use Xero with Integromat, it is necessary to have a Xero account. If you do not have one, you can create a Xero account at https://www.xero.com/signup/.
Connecting Xero to Integromat
1. Go to Integromat and open the Xero module's Create a connection dialog.
2. In the Connection name field, enter a name for the connection.
3. In the Company name field, enter the company name if you have more than one company.
4. Click Continue.

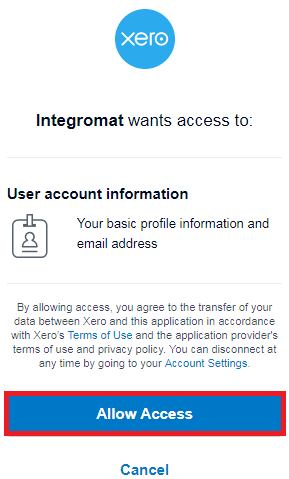
5. Confirm the dialogue box by clicking the Allow Access button.
4. Confirm the dialogue box by clicking the Connect button.

The connection has been established.
Invoices
Watch Invoices
Triggers when an invoice is added or updated.
| Connection | Establish a connection to your Xero account. |
| Filter | Enter the location where you want to watch the invoices. For example, Type=="BANK" |
Search for Invoices
Searches for an invoice.
| Connection | Establish a connection to your Xero account. |
| Search by | Select the option to search the invoices:
|
| Maximum number of returned accounts | The maximum number of invoices Integromat should return during one scenario execution cycle. |
Get an Invoice
Returns information about an invoice with a given ID.
| Connection | Establish a connection to your Xero account. |
| Invoice ID | Enter the Invoice ID whose details you want to retrieve. |
Create an Invoice
Creates a new invoice.
| Connection | Establish a connection to your Xero account. |
| Type | Select the type of invoice you want to create:
|
| Contact ID | Enter or Search the Contact ID to whom you want to attach the invoice. |
| Line Items | Add the line items: Description Enter the details of the item. Quantity Enter the number of items. Unit amount Enter the number of items. Item Select the item. Account Code Select the category to which the item belongs. Tax Code Select the tax code applicable for the item:
Tax Amount Enter the amount of tax for the item. Line Amount Enter the item amount after the discount. Discount Rate Enter the discount rate of the item. Discount Amount Enter the discount amount for the item. Tracking Add the tracking name of the item. |
| Date | Enter the date the invoice is issued. |
| Due date | Enter the date the invoice is due. |
| Line amount type | Enter the amount excluding taxes. |
| Invoice number | Enter the invoice number. |
| Reference | Enter the reference number. This is applicable only for sale invoices. |
| Branding Theme | Select the branding theme for the invoice. |
| URL | Enter the URL to the source document of the invoice. |
| Currency code | Select the currency code applicable to the invoice. |
| Currency rate | Enter the currency conversion rate. |
| Status | Select the status of the invoice:
|
| Sent to Contact | Select the Yes if the invoice in the Xero app should be marked as "sent". This can be set only on invoices that have been approved. |
| Expected Payment Date | Enter the date when the payment for the invoice is expected. This is available only on sales invoices. |
| Planned payment date | Enter the date when the payment for the invoice is planned. This is available only on bills. |
Update an Invoice
Updates an invoice by ID.
| Connection | Establish a connection to your Xero account. |
| Invoice ID | Enter the Invoice ID you want to update. |
| Type | Select the type of invoice you want to create:
|
| Contact ID | Enter or Search the Contact ID to whom you want to attach the invoice. |
| Line Items | Add the line items: Description Enter the details of the item. Quantity Enter the number of items. Unit amount Enter the number of items. Item Select the item. Account Code Select the category to which the item belongs. Tax Code Select the tax code applicable for the item:
Tax Amount Enter the amount of tax for the item. Line Amount Enter the item amount after the discount. Discount Rate Enter the discount rate of the item. Discount Amount Enter the discount amount for the item. Tracking Add the tracking name of the item. |
| Date | Enter the date the invoice is issued. |
| Due date | Enter the date the invoice is due. |
| Line amount type | Enter the amount excluding taxes. |
| Invoice number | Enter the invoice number. |
| Reference | Enter the reference number. This is applicable only for sale invoices. |
| Branding Theme | Select the branding theme for the invoice. |
| URL | Enter the URL to the source document of the invoice. |
| Currency code | Select the currency code applicable to the invoice. |
| Currency rate | Enter the currency conversion rate. |
| Status | Select the status of the invoice:
|
| Send to contact | Select Yesif you want to send this invoice to a contact:
|
| Expected Payment Date | Enter the date when the payment for the invoice is expected. This is available only on sales invoices. |
| Planned Payment Date | Enter the date when the payment for the invoice is planned. This is available only on bills. |
Get an Invoice URL
Retrieves a Xero online invoice URL.
| Connection | Establish a connection to your Xero account. |
| Invoice ID | Enter the Invoice ID whose URL you want to retrieve. |
Send an Invoice via Email
The email will be sent to the primary email address of the contact on the invoice. The invoice must be of Type ACCREC and a valid Status for sending (SUBMITTED, AUTHORISED, or PAID).
| Connection | Establish a connection to your Xero account. |
| Invoice ID | Enter the Invoice ID whose details you want to send via email. |
Bank Transactions
Watch Bank Transactions
Triggers when bank transactions are added or updated.
| Connection | Establish a connection to your Xero account. |
| Filter | Enter the location where you want to watch the invoices. For example, Type=="BANK" |
Get a Bank Transaction
Returns information about a transaction with a specified ID.
| Connection | Establish a connection to your Xero account. |
| Bank Transaction ID | Enter the Bank Transaction ID whose details you want to retrieve. |
Create a Bank Transaction
Creates a new bank transaction.
| Connection | Establish a connection to your Xero account. |
| Type | Select the type of bank transaction you want to create:
|
| Contact ID | Enter the Contact ID who is performing the bank transaction. |
| Line items | Add the line items: Description Enter the details of the item. Quantity Enter the number of items. Unit amount Enter the number of items. Item Select the item. Account Code Select the category to which the item belongs. Tax Code Select the tax code applicable for the item:
Tax Amount Enter the amount of tax for the item. Line Amount Enter the item amount after the discount. Discount Rate Enter the discount rate of the item. Discount Amount Enter the discount amount for the item. Tracking Add the tracking name of the item. |
| Bank Account | Select the bank account whose transaction you are performing. |
| Is Reconciled | Select if this transaction is reconciled. |
| Date | Enter the date of the transaction. |
| Reference | Enter the transaction reference number. |
| Currency Code | Select the currency code in which you are performing the transaction. |
| Currency Rate | Enter the applicable currency conversion rate. |
| URL | Enter the URL to the source document. |
| Line Amount Type | Select the line amount type:
|
Bank Transfers
Watch Bank Transfers
Triggers when a new bank transfer is created.
| Connection | Establish a connection to your Xero account. |
| Filter | Enter the location where you want to watch the invoices. For example, Type=="BANK" |
Create a Bank Transfer
Transfers a specified amount from one account to another.
| Connection | Establish a connection to your Xero account. |
| From bank account | Select the bank account from which you want to transfer. |
| To bank account | Select the bank account to which you want to transfer. |
| Amount | Enter the amount you want to transfer. |
| Date | Enter the date of the transfer. |
Contacts
Watch Contacts
Triggers when a contact is created or updated.
| Connection | Establish a connection to your Xero account. |
| Filter | Enter the location where you want to watch the invoices. For example, Type=="BANK" |
Search for Contacts
Searches for a contact by name or email.
| Connection | Establish a connection to your Xero account. |
| Search by | Select the option to search the contacts:
|
| Maximum number of returned accounts | The maximum number of contacts Integromat should return during one scenario execution cycle. |
Get a Contact
Retrieves contact information by ID.
| Connection | Establish a connection to your Xero account. |
| Contact ID | Enter the contact ID whose details you want to retrieve. |
Create a Contact
Creates a new contact.
| Connection | Establish a connection to your Xero account. |
| Name | Enter the name of the contact you want to create. |
| Contact number | Enter the phone number of the contact. |
| Account number | Enter the account number of the contact. |
| First name | Enter the first name. |
| Last name | Enter the last name. |
| Enter the email address of the contact. | |
| Skype | Enter the Skype ID of the contact. |
| Contact persons | Add the contact persons: First name Enter the first name of the contact person. Last name Enter the last name of the contact person. Enter the email address of the contact person. Include in emails Select Yes if you want to include the contact person in your emails:
|
| Bank account details | Enter the bank account details of the contact. |
| Tax number | Enter the tax number. |
| Accounts receivable tax type | Select the accounts receivable tax type for the contact:
|
| Accounts payable tax type | Select the accounts payable tax type for the contact:
|
| Addresses | Add the address of the contact: Type Select the type of address:
Address line 1 Enter the street address. Address line 2 Enter the street address. Address line 3 Enter the street address. Address line 4 Enter the street address. City Enter the city name. Region Enter the area name. Postal Code Enter the postal code of the area. Country Enter the country name. Attention to Enter the name to whom you are addressing. |
| Phones | Add the phone numbers of the contact: Type Select the type of phone number.
Number Enter the phone number. Area Code Enter the area code. Country Code Enter the country code. |
| Default Currency | Select the applicable currency for the contact. |
| Xero Network Key | Enter the Xero Network Key to store the contact. |
| Sales default account | Select the sales category of the contact. |
| Purchases default account | Select the purchasing category of the contact. |
| Payment terms | Select the payment terms applicable for the contact:
|
Update a Contact
Updates a contact by ID.
| Connection | Establish a connection to your Xero account. |
| Contact ID | Enter the Contact ID you want to update. |
| Name | Enter the name of the contact. |
| Contact number | Enter the phone number of the contact. |
| Account number | Enter the account number of the contact. |
| First name | Enter the first name of the contact. |
| Last name | Enter the last name of the contact. |
| Enter the email address of the contact. | |
| Skype | Enter the Skype ID of the contact. |
| Contact persons | Add the contact persons: First name Enter the first name of the contact person. Last name Enter the last name of the contact person. Enter the email address of the contact person. Include in emails Select Yes if you want to include the contact person in your emails:
|
| Bank account details | Enter the bank account details of the contact. |
| Tax number | Enter the tax number of the contact. |
| Accounts receivable tax type | Select the accounts receivable tax type for the contact:
|
| Accounts payable tax type | Select the accounts payable tax type for the contact:
|
| Addresses | Add the address of the contact: Type Select the type of address:
Address line 1 Enter the street address. Address line 2 Enter the street address. Address line 3 Enter the street address. Address line 4 Enter the street address. City Enter the city name. Region Enter the area name. Postal Code Enter the postal code of the area. Country Enter the country name. Attention to Enter the name to whom you are addressing. |
| Phones | Add the phone numbers of the contact: Type Select the type of phone number.
Number Enter the phone number. Area Code Enter the area code Country Code Enter the country code. |
| Default currency | Select the applicable currency for the contact. |
| Xero network key | Enter the Xero Network Key to store the contact. |
| Sales default account | Select the sales category of the contact. |
| Purchases default account | Select the purchasing category of the contact. |
| Payment terms | Select the payment terms applicable for the contact:
|
Archive a Contact
Archive a contact with a given ID.
| Connection | Establish a connection to your Xero account. |
| Contact ID | Enter the Contact ID you want to archive. |
Credit Notes
Watch Credit Notes
Triggers when a credit note is added or updated.
| Connection | Establish a connection to your Xero account. |
| Filter | Enter the location where you want to watch the invoices. For example, Type=="BANK" |
Get a Credit Note
Returns information about a credit note with a specified ID.
| Connection | Establish a connection to your Xero account. |
| Credit Note ID | Enter the Credit Note ID whose details you want to retrieve. |
Create a Credit Note
Creates a new credit note.
| Connection | Establish a connection to your Xero account. |
| Type | Select the type of credit note you are creating:
|
| Contact ID | Enter the Contact ID whose credit notes you are creating. |
| Line items | Add the line items: Description Enter the details of the item. Quantity Enter the number of items. Unit amount Enter the number of items. Item Select the item. Account Code Select the category to which the item belongs. Tax Code Select the tax code applicable for the item:
Tax Amount Enter the amount of tax for the item. Line Amount Enter the item amount after the discount. Discount Rate Enter the discount rate of the item. Discount Amount Enter the discount amount for the item. Tracking Add the tracking name of the item. |
| Status | Select the status of the credit note:
|
| Line Amount Type | Select the line amount type of the credit note:
|
| Date | Enter the date when the credit note is issued. |
| Currency Rate | Enter the currency conversion rate. |
| Currency Code | Select the currency code applicable for the credit note. |
| Credit Note Number | Enter the credit note number. |
| Reference | Enter the reference number of the credit note. |
| Branding Theme | Select the branding theme for the credit note. |
Manual Journals
Watch Manual Journals
Triggers when a manual journal is created or updated.
| Connection | Establish a connection to your Xero account. |
| Filter | Enter the location where you want to watch the invoices. For example, Type=="BANK" |
Search for manual Journals
Searches for a manual journal.
| Connection | Establish a connection to your Xero account. |
| Search by | Select the option to search the manual journals:
|
| Maximum number of returned accounts | The maximum number of manual journals Integromat should return during one scenario execution cycle. |
Get a Manual Journal
Returns information about a manual journal.
| Connection | Establish a connection to your Xero account. |
| Manual Journal ID | Enter the Manual Journal ID whose details you want to retrieve. |
Create a Manual Journal
Creates a manual journal.
| Connection | Establish a connection to your Xero account. |
| Narration | Enter the description of the journal. |
| Journal lines | Add the journal lines: Line amount Enter the amount after the discount. Accounts Select the category applicable to the journal. Description Enter the details of the journal. Tax type Select the tax type for the journal:
Tracking Add the tracking name for the journal. |
| Date | Enter the journal posting date. |
| Line amount type | Select the line amount type:
|
| Status | Select the status of the journal:
|
| URL | Enter the URL link of the source document. |
| Show on cash basis reports | Select Yesif you want to show the journal based on cash basis report:
|
Items
Create an Item
Creates a new item.
| Connection | Establish a connection to your Xero account. |
| Code | Enter the item code. |
| Account | Enter the account for which you are creating the item. |
| Name | Enter the name of the item. |
| Is sold | Select if the item is available for sales transactions. |
| Is purchased | Select if the item is available for purchase transactions. |
| Description | Enter sales details of the item. |
| Purchase description | Enter the purchase details of the item. |
| Unit price | Enter the single unit purchasing price of the item. By default, the price rounded off for two decimals. |
| Cost of goods sold account | Select the goods sold account. |
| Tax | Select the applicable tax for the item. |
| Unit price | Enter the sale unit price of the item. |
| Account | Select the account category of the item. |
| Tax | Select the applicable tax for the item. |
Update an Item
Updates an item by ID.
| Connection | Establish a connection to your Xero account. |
| Item ID | Enter the Item ID you want to update. |
| Code | Enter the item code. |
| Account | Enter the account for which you are creating the item. |
| Name | Enter the name of the item. |
| Is sold | Select if the item is available for sales transactions. |
| Is purchased | Select if the item is available for purchase transactions. |
| Description | Enter sales details of the item. |
| Purchase description | Enter the purchase details of the item. |
| Unit price | Enter the single unit purchasing price of the item. By default, the price is rounded off to two decimals. |
| Cost of goods sold account | Select the goods sold account. |
| Tax | Select the applicable tax for the item. |
| Unit price | Enter the sale unit price of the item. |
| Account | Select the account category of the item. |
| Tax | Select the applicable tax for the item. |
Get an Item
Searches for an item by item ID or item code.
| Connection | Establish a connection to your Xero account. |
| Item ID | Enter the Item ID whose details you want to retrieve. |
Payments
Watch Payments
Triggers when a payment is created or updated.
| Connection | Establish a connection to your Xero account. |
| Filter | Enter the location where you want to watch the payments. For example, Type=="BANK" |
Get a Payment
Retrieves information about a payment with a specified ID.
| Connection | Establish a connection to your Xero account. |
| Payment ID | Enter the Payment ID whose details you want to retrieve. |
Create a Payment
Creates a new purchase order.
| Connection | Establish a connection to your Xero account. |
| Specify object by | Select the option for which you want to create the payment:
|
| Account | Select the account to be used for payment. |
| Amount | Enter the payment amount. |
| Date | Enter the date when the payment is being made. |
| Reference | Enter the details of the payment. |
| Is reconciled | Select Yes if the payment is reconciled:
|
Purchase Orders
Watch Purchase Orders
Triggers when an order is added or updated.
| Connection | Establish a connection to your Xero account. |
| Filter | Enter the location where you want to watch the purchase orders. For example, Type=="BANK" |
Get a Purchase Order
Returns information about a purchase order with a specified ID.
| Connection | Establish a connection to your Xero account. |
| Purchase Order ID | Enter the Purchase Order ID whose details you want to retrieve. |
Create a Purchase Order
Creates a new purchase order.
| Connection | Establish a connection to your Xero account. |
| Contact ID | Enter the Contact ID whose purchase order you are creating. |
| Line Items | Add the line items: Description Enter the details of the item. Quantity Enter the number of items. Unit amount Enter the number of items. Item Select the item. Account Code Select the category to which the item belongs to. Tax Code Select the tax code applicable for the item:
Tax Amount Enter the amount of tax for the item. Line Amount Enter the item amount after the discount. Discount Rate Enter the discount rate of the item. Discount Amount Enter the discount amount for the item. Tracking Add the tracking name of the item. |
| Date | Enter the purchase order issuing date. |
| Delivery Date | Enter the goods delivering date. |
| Line Amount Type | Select the line amount type:
|
| Purchase Order Number | Enter the purchasing order number. |
| Reference | Enter the additional reference number. |
| Branding Theme | Select the branding theme for the purchasing order. |
| Currency Code | Select the currency code applicable for the purchasing order. |
| Status | Select the status of the purchase order:
|
| Sent to Contact | Select Yes if you send the purchase order to a contact:
|
| Delivery Address | Enter the address where the goods should be delivered. |
| Attention to | Enter the person to whom you are delivering the goods. |
| Telephone | Enter the phone number. |
| Delivery Instructions | Enter the delivery instructions, if any. |
| Expected Arrival Date | Enter the date when the goods are expected to arrive at the address. |
Contact Groups
Get a Contact Group
Returns information about a contact group.
| Connection | Establish a connection to your Xero account. |
| Contact Group ID | Enter the Contact Group ID whose details you want to retrieve. |
Create a Contact Group
Creates a contact group.
| Connection | Establish a connection to your Xero account. |
| Contact Group ID | Enter the Contact Group ID you want to create. |
Delete a Contact Group
Deletes all contacts from a contact group.
| Connection | Establish a connection to your Xero account. |
| Contact Group ID | Enter the Contact Group ID you want to delete. |
Add a Contact to a Contact Group
Adds a contact to a specified contact group.
| Connection | Establish a connection to your Xero account. |
| Contact Group | Select the contact group to which you want to add a contact. |
| Contact ID | Enter the Contact ID to add to the contact group. |
Remove a Contact from a Contact Group
Removes a contact from a contact group.
| Connection | Establish a connection to your Xero account. |
| Contact Group | Select the contact group to which you want to remove a contact. |
| Contact ID | Enter the Contact ID that you want to remove from the contact group. |
Employees
Create an Employee
Creates a new employee.
| Connection | Establish a connection to your Xero account. |
| First name | Enter the first name of the employee. |
| Last name | Enter the last name of the employee. |
| External link | Enter any external link available about the employee. For example, a link to the employee record. |
Update an Employee
Updates an employee by ID.
| Connection | Establish a connection to your Xero account. |
| Employee ID | Enter the Employee ID whose details you want to update. |
| First name | Enter the first name of the employee. |
| Last name | Enter the last name of the employee. |
| External link | Enter any external link available about the employee. For example, a link to the employee record. |
Reports
Get a Bank Summary
Returns the balance and cash movements for each bank account.
| Connection | Establish a connection to your Xero account. |
| From Date | Enter the start date from which you want to get the bank summary. |
| To Date | Enter the last date until which you want to get the bank summary. |
Get a Bank Statements Report
Returns bank statements for a selected bank account.
| Connection | Establish a connection to your Xero account. |
| Bank account | Select the bank account whose statement summary report you want to retrieve. |
| From Date | Enter the start date from which you want to get the bank statement. |
| To Date | Enter the last date from which you want to get the bank statement. |
Reports
Search for Accounts
Finds an account by ID, name, or code.
| Connection | Establish a connection to your Xero account. |
| Search by | Select the option to search the tax rates:
|
| Maximum number of returned accounts | The maximum number of accounts Integromat should return during one scenario execution cycle. |
Get an Account
Returns information about an account with a specified ID.
| Connection | Establish a connection to your Xero account. |
| Account ID | Enter the Account ID whose details you want to retrieve. |
Files
Upload a File
Uploads a file to a selected object.
| Connection | Establish a connection to your Xero account. |
| Where to send the file | Select the option to send the file:
|
| Invoice ID | Enter the Invoice ID to which you want to send file. |
| Credit Note ID | Enter the Credit Note ID to which you want to send the file. |
| Bank Transaction ID | Enter the Bank Transaction ID to which you want to send the file. |
| Bank Transfer ID | Enter the Bank Transfer ID to which you want to send the file. |
| Contact ID | Enter the Contact ID to which you want to send the file. |
| Manual Journal ID | Enter the Manual Journal ID to which you want to send the file. |
| Purchase Order ID | Enter the Purchase Order ID to which you want to send the file. |
| File name | Enter the file name you are uploading. For example, sample.txt. |
| Data | Enter the path of the file to upload. |
Tax Rates
Search for Tax Rates
Finds a tax rate by name.
| Connection | Establish a connection to your Xero account. |
| Search By | Select the option to search the tax rates:
|
| Maximum number of returned accounts | The maximum number of tax rates Integromat should return during one scenario execution cycle. |
History of Changes
Get History of Changes
Retrieves the changes made to a given object.
| Connection | Establish a connection to your Xero account. |
| Object | Select the object whose change history you want to retrieve:
|
| Object ID | Enter the Object ID whose change history you want to retrieve. |
Create a History Note
Adds a note to a record.
| Connection | Establish a connection to your Xero account. |
| Object | Select the object whose note you want to create:
|
| Object ID | Enter the Object ID. |
| Details | Enter the note text. |
Other
Make an API Call
Performs an arbitrary authorized API call.
| Connection | Establish a connection to your Xero account. |
| Organization | Select the organization for which you are making the API call. |
| Base URL | Select the endpoint URL to connect to your Xero account. |
| URL | Enter a path relative to For the list of available endpoints, refer to the Xero API Documentation. |
| Method | Select the HTTP method you want to use: GET POST PUT PATCH DELETE |
| Headers | Enter the desired request headers. You don't have to add authorization headers; we already did that for you. |
| Query String | Enter the request query string. |
| Body | Enter the body content for your API call. |
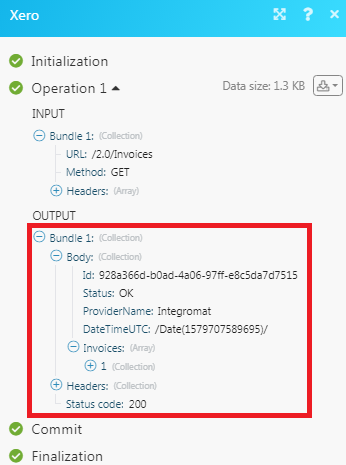
Example - List Invoices
Following API call returns all invoices:
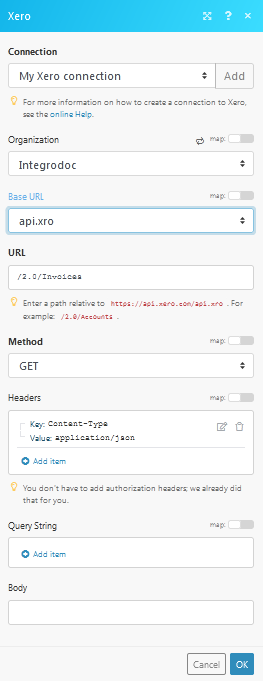
Matches of the search can be found in the module's Output under Bundle > Body > Invoices.
In our example, 1 invoice was returned:
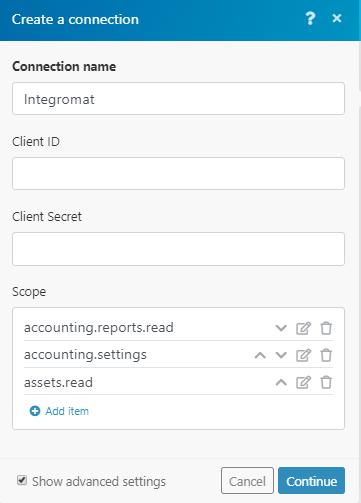
Adding Scopes
If you would like to be able to get access to certain documents such as the balance sheet you will need to add the necessary scopes listed here Xero scopes.
To be able to do so you will need to create a new connection and tick on the Show advanced settings:
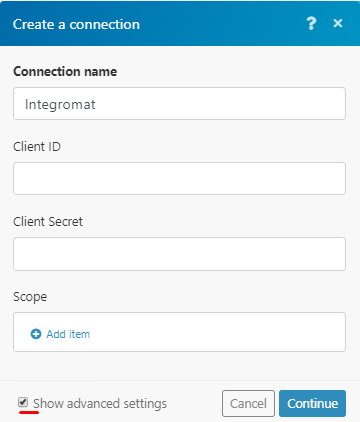
1. In the Scope section, click the Add item button.
2. Add the scopes that you require to work with.
3. Click the Continue button to connect to your Xero account.