Mapping
What Is Mapping?
Modules in a scenario are linked to each other by item mapping.
When you map an item, you use the data retrieved using a source module in the settings of another (target) module.
Values from the mapped items are then used by the module to perform the desired action.
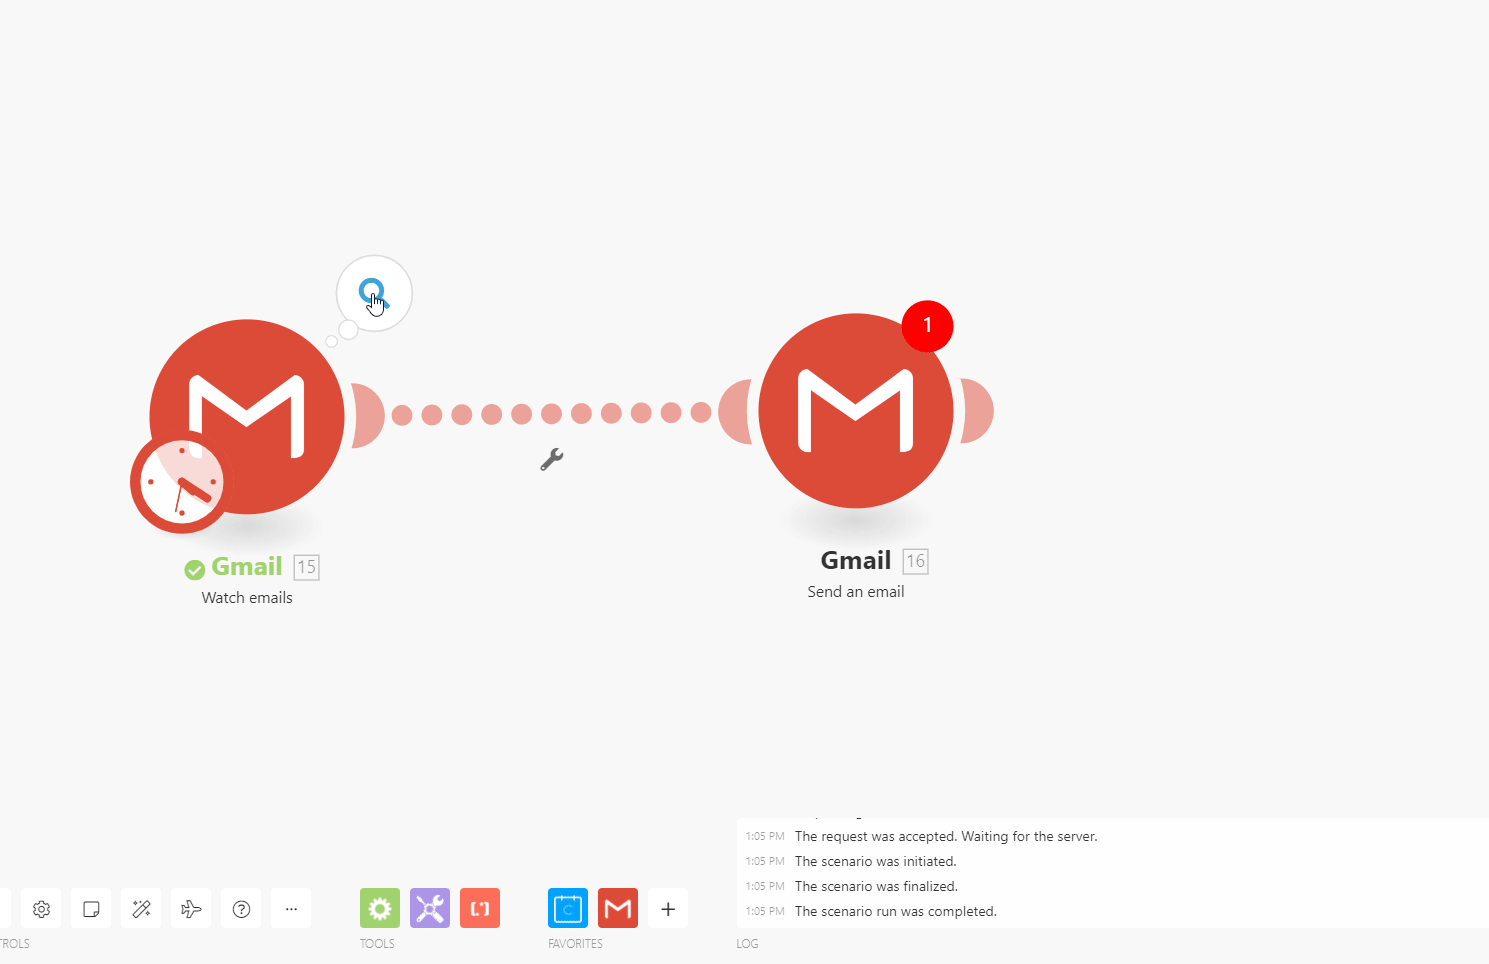
An example – Sender: Email address (a sender's email address) and Subject (an email subject) items retrieved by the Watch email module and then mapped in the settings of the Send an email module:
What Is Item?
The operation of a module produces bundles as its output. A bundle consists of items.
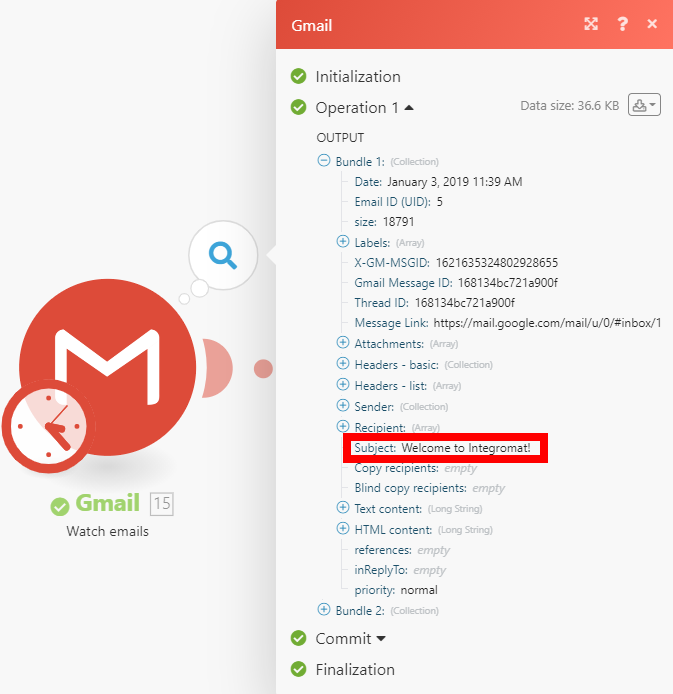
Generally, an item is a piece of information retrieved by a module. Item is displayed in the module's output as a label and value. Click the bubble above the module to display the module's output  .
.
In the following example of an item, the item's label is "Subject" and the item's value is "Welcome to Integromat!".
Mapping an Item
Follow these steps to map an item from one module to another:
1. Open settings of the target module (where you want to map items to).
2. Click the field where you want to map an item from a preceding module.
This will open a mapping panel offering all items from preceding modules in the scenario that are available for mapping. Also, sample values are usually displayed next to the item label.
3. To map an item to a field, click on the item or drag-and-drop the item to the module's input field.
When you're finished, click OK in the module's settings.
You can repeat the action (map from the module's output to another module's input fields) in other succeeding modules added to your scenario.
The number of linked modules in the scenario is not limited.
Collections and Arrays
Module's output items that contain more items are called collections (contain items of a different type) or arrays (contain items of the same type). Collections are expanded in the mapping panel in order to allow user to easily map items contained in the collection. A collection itself is usually not being mapped.
For more details about mapping arrays, see the Mapping Arrays section of this article.
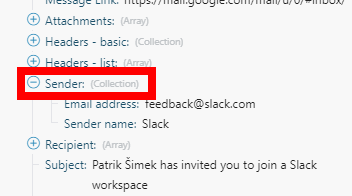
Example of a collection in the module's output:
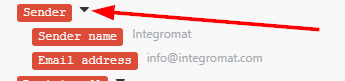
Example of a collection in the module's mapping panel:
Example of an array (containing collections of the same type) in the module's output:

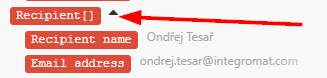
Example of an array (containing collections of the same type) in the module's mapping panel:
Mapping Arrays
An array is a special type of item. A simple array contains one or more text values. A complex array contains one or more collections of the same type.
An example of a complex array is the email attachment. The Watch emails module returns an array of attachments for every email. Every attachment represents a collection that may contain a name, content, size, etc.
Mapping an Array's First Element
If you map the array's Recipient name item, it will appear in the field like this:
The number in the square brackets is an index that determines which element of the array will be used. It is set to one by default.
Mapping an Array's N-th Element
If you wish to access another element, click on the square brackets and edit the index value: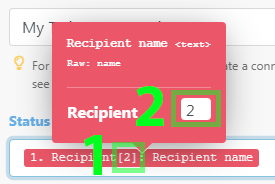
Mapping an Array's Element with a Given Key
Some arrays contain several collections with key and value items. These are typically various metadata, attributes, etc.
The following example shows the output of the WooCommerce > Get a product module that contains the item Meta data, which is an array of collections. Each collection contains the key item Meta data ID and the value item Value: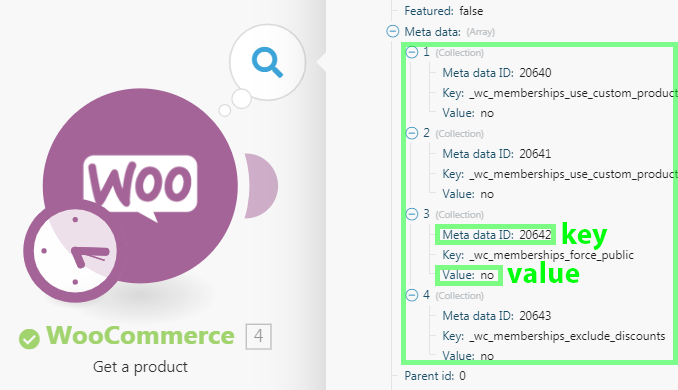
The typical requirement is to lookup an element by its given key value and to obtain the corresponding value from the value item. This can be achieved with a formula employing a combination of the map() and get() functions.
The following example shows how to obtain the value of the Value item of the element with key Meta data ID item value equal to 20642:
The result of the formula will be "no".
The detailed breakdown of the formula follows:
- The 1st parameter of the
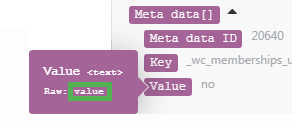
map()function is the whole array item. - The 2nd parameter is the raw name of the value item. To obtain the raw name, hover the mouse cursor over the item in the mapping panel:
 All parameters are case sensitive. Even though in this particular example the item's label differs from its raw name only in capitalization, it is necessary to use the raw name, which is all lowercase
valuein contrast to the labelValue. - The 3rd parameter is the raw name of the key item:
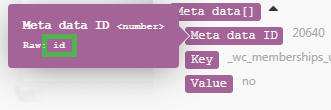
- The 4th parameter is the given key value.
Because the map() function returns an array (as there could be more elements with the given key value), it is necessary to apply the get() function to get its first element:
- The 1st parameter of the
get()function is the result of themap()function. - The 2nd parameter is the element's index - one.
See also our Extract an item and/or its value from an array of collections video tutorial.
Converting elements to a series of bundles
Arrays can be converted to a series of bundles using the Iterator module: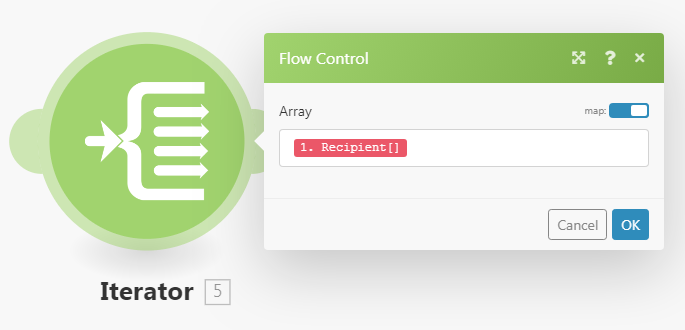
Troubleshooting
Missing items in the mapping panel
For each module, the mapping panel displays all output items listed by the author of the module. In some cases, this list might be incomplete for various reasons and some items might be missing. Nevertheless, Integromat can auto-discover the missing output items.
All you have to do is to execute the module in the scenario editor. The exact procedure differs slightly depending on the module's type:
Instant trigger
- Right-click the module.
- Choose "Run this module only" from the context menu.
- If there are no queued webhooks, the module will be waiting for a new webhook to process.
- Generate a webhook (e.g. if the module is Slack > Listen for new events, which is watching for new channel messages in a channel, then send a message to the channel).
- The module should finish running.
- Click the "bubble" above the module to explore its full output.
- The mapping panel will now contain all the items that were discovered in the module's output.
Polling trigger
- Right-click the module.
- Choose "Run this module only" from the context menu.
- If there is no output, click on the "Choose where to start" button and adjust the settings. If there is no event to be processed, create one (e.g. if the module is Gmail > Watch emails then send an email to the folder the module is watching) and go back to step 2.
- The module should finish running.
- Click the "bubble" above the module to explore its full output.
- The mapping panel will now contain all the items that were discovered in the module's output.
Other modules
You may choose to execute:
- The whole scenario (or just the part containing the module). If your scenario starts with a trigger, refer to the Instant/Polling trigger section above.
- Just the single module
If you choose to execute just the single module then:
- Right-click the module.
- Choose "Run this module only" from the context menu.
- Provide sample values for the input items and click on the "OK" button.
- The module should finish running.
- Click the "bubble" above the module to explore its full output.
- The mapping panel will now contain all the items that were discovered in the module's output.


