Mailgun
Version Latest
Here is the documentation for the legacy Mailgun (legacy) app.
Getting Started with Mailgun
The Mailgun modules allow you to monitor delivery messages, clicks, opens, temporary failure, permanent failure, spam complaints, and unsubscribe events, as well as send an email and add, delete, list and retrieve mailing lists in your Mailgun account.
Prerequisites
- A Mailgun account
In order to use Mailgun with Integromat, it is necessary to have a Mailgun account. If you do not have one, you can create a Mailgun account at mailgun.com.
Connecting Mailgun to Integromat
To connect your Mailgun account to Integromat you need to obtain the API Key from your Mailgun account.
1. Log in to your Mailgun account.
2. Open Settings > API Security.
3. Show and copy the Private API Key.
4. Go to Integromat, open the Create a connection dialog of your Mailgun module.
5. Enter the API Key you have copied in step 3 to the respective field.
Events
New Event: Delivery Messages
Triggers when the message is successfully delivered to the intended recipient.
| Webhook Name | Enter the name for the webhook. E.g. Message Delivered. |
| Connection | Establish a connection to your Mailgun account. |
| Domain | Select your Mailgun domain. |
New Event: Clicks
Triggers when a recipient clicks on links in your message.
| Webhook Name | Enter the name for the webhook. E.g. Message Clicked. |
| Connection | Establish a connection to your Mailgun account. |
| Domain | Select your Mailgun domain. |
New Event: Opens
Triggers when a recipient opens your message.
| Webhook Name | Enter the name for the webhook. E.g. Message Opened. |
| Connection | Establish a connection to your Mailgun account. |
| Domain | Select your Mailgun domain. |
New Event: Temporary Failure
Triggers when an email is not delivered because the mailbox is full or for other reasons. These addresses are not added to the “Bounces” table.
| Webhook Name | Enter the name for the webhook. E.g. Soft Bounce. |
| Connection | Establish a connection to your Mailgun account. |
| Domain | Select your Mailgun domain. |
New Event: Permanent Failure
Triggers when the recipient is not found and the recipient email server specifies that the recipient does not exist.
Mailgun stops attempting delivery to invalid recipients after one Hard Bounce. These addresses are added to the “Bounces” table.
| Webhook Name | Enter the name for the webhook. E.g. Hard Bounce. |
| Connection | Establish a connection to your Mailgun account. |
| Domain | Select your Mailgun domain. |
New Event: Spam Complaints
Triggers when a recipient complains that an email message is spam.
| Webhook Name | Enter the name for the webhook. E.g. Spam complaint received. |
| Connection | Establish a connection to your Mailgun account. |
| Domain | Select your Mailgun domain. |
New Event: Unsubscribed
Triggers when a recipient requests to be unsubscribed from your mailings.
| Webhook Name | Enter the name for the webhook. E.g. The recipient unsubscribed. |
| Connection | Establish a connection to your Mailgun account. |
| Domain | Select your Mailgun domain. |
Send an Email
Sends an email message to the specified email address or mailing list.
| Connection | Establish a connection to your Mailgun account |
| Domain | Select your Mailgun domain. |
| Template | Select the template you want to use. |
| Type of recipient | Select whether to send a message to the email address or the mailing list. To Mailing List |
| From | Enter the email address of the sender (for the From header). |
| Subject | Enter the subject for the message. |
| Format | Select whether you want to send the message in the HTML format or as a plaintext. When you select the HTML format, you can use HTML tags for formatting the message content. |
| Attachments | Add a file attachment. You can attach more files. You can you use, for example, the Dropbox > Get a file module to provide the file name and file data for the attachment.
|
| CC | Carbon Copy. Add the email address you want to send the copy to. |
| BCC | Blind Carbon Copy. Add the email address you want to send the blind copy to. |
| Tag | Enter a tag in order to tag the message. For detailed information about tags refer to the Tags Explained article. |
| Enable DKIM | Select the Yes option to enable DKIM signatures on per-message basis. |
| Delivery Time | Enter the time of delivery. The list of supported date formats. E.g. 2019/08/20Messages can be scheduled for a maximum of 3 days in the future. |
| Enable tracking | Select whether to enable tracking on a per-message basis. For more details please refer to the Mailgun API documentation. |
| Enable click tracking | Select whether to enable click tracking on a per-message basis. |
| This is a test message | If enabled the message is sent in the test mode. Mailgun will accept the message but will not send it. This is useful for testing purposes. |
| Custom Headers | h: prefix followed by an arbitrary value allows to append a custom MIME header to the message (X-My-Header in this case). For example, h:Reply-To to specify Reply-To address. |
Mailing Lists
Add a Mailing List Member
Adds or updates an emails address in the selected mailing list.
| Connection | Establish a connection to your Mailgun account |
| Mailing List | Select the mailing list you want to add a member to. |
| Email Address | Enter the email address of the member that you want to add to the mailing list selected above. |
| Name | Enter the member name. |
| Member is subscribed | Select the Yes option to add the member as subscribed, or No as unsubscribed. Default: Subscribed. |
| Update member if exist | Select the Yes option to update an existing member, or No to return an error if the member already exists. |
| Vars | Enter JSON-encoded dictionary string with arbitrary parameters, e.g. {"gender":"female","age":27} |
Delete a Mailing List Member
Removes an email address from the selected mailing list.
| Connection | Establish a connection to your Mailgun account |
| Mailing List | Select the mailing list you want to remove a member from. |
| Email Address | Enter the email address of the member that you want to remove from the mailing list selected above. |
Get a Mailing List Member
Retrieves information about a mailing list member.
| Connection | Establish a connection to your Mailgun account |
| Mailing List | Select the mailing list you want to retrieve a member's details from. |
| Email Address | Enter the email address of the member you want to retrieve information about. |
List Mailing List Members
Retrieves a list of a mailing list's members.
| Connection | Establish a connection to your Mailgun account |
| Mailing List | Select the mailing list you want to retrieve members from. |
| Limit | Set the maximum number of members Integromat will return during one execution cycle. |
Other
List Domains
Returns a list of domains in your account with details.
| Connection | Establish a connection to your Mailgun account |
| Limit | Set the maximum number of domains Integromat will return during one execution cycle. |
Validate an Email Address
Validates the email address based on Mailbox detection Syntax checks (RFC defined grammar), DNS validation, spell checks, Email Service Provider (ESP), specific local-part grammar (if available).
| Connection | Establish a connection to your Mailgun account |
| Email Address | Enter the email address you want to validate. |
Make an API Call
Allows you to perform a custom API call.
| Connection | Establish a connection to your Mailgun account. |
| URL | Enter a path relative to For the list of available endpoints, refer to the Mailgun API Documentation. |
| Method | Select the HTTP method you want to use: GET POST PUT PATCH DELETE |
| Headers | Enter the desired request headers. You don't have to add authorization headers; we already did that for you. |
| Query String | Enter the request query string. |
| Body | Enter the body content for your API call. |
Example of Use - List Mailing List Members
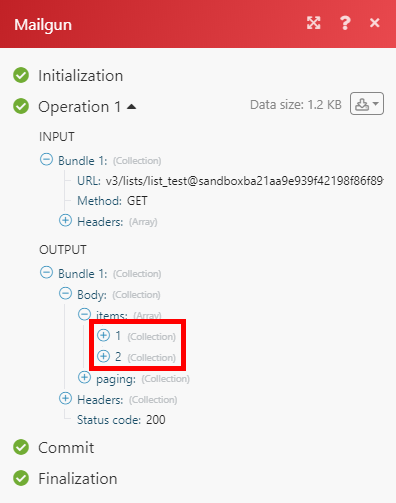
The following API call returns a list of all the members of the specified mailing list:
URL:/v3/lists/list_test@sandboxba21aa9e939f42198f86f89f76e101eb.mailgun.org/members/pages

Matches of the search can be found in the module's Output under Bundle > Body > items.
In our example, 2 members were returned:
Sending emails from sandbox
If you use sandbox (if you haven't set up any domain) and want to send emails, you need to verify the recipients' email addresses in your Mailgun account's settings first.
For more information, please read the Mailgun documentation.
Sender email address
If you send emails from a verified domain, the email address of the sender must include this domain. If you use, for example, a domain @example.com, you can set up example@example.com ( but not example@abc.com) as the sender email address.


