Microsoft 365 Email
Version Latest
The Microsoft 365 Email modules allow you to watch, create, update, send, move, and delete the messages and message attachments in your Microsoft 365 Email account.
Getting Started with Microsoft 365 Email
Prerequisites
- A Microsoft 365 Email account
In order to use Microsoft 365 Email with Integromat, it is necessary to have a Microsoft 365 Email account. If you do not have one, you can create a Microsoft 365 Email account at office.com.
Connecting Microsoft 365 Email to Integromat
1. Go to Integromat and open the Microsoft 365 Email module's Create a connection dialog.

2. In the Connection name field, enter a name for the connection and click Continue.
3. Enter your Microsoft 365 Email account login credentials and confirm the dialog by clicking Yes.
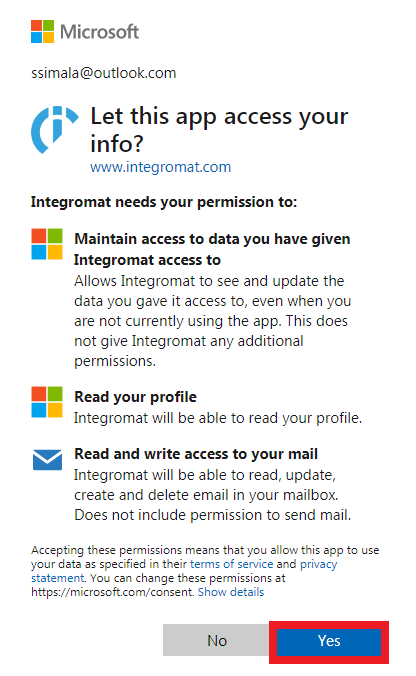
The connection has been established.
For more information about permission, see permission information for various user accounts.
Message
Watch Message
Triggers when a new message is sent or received.
| Connection | Establish a connection to your Microsoft 365 Email account. |
| Watch Messages | Select the option to watch the messages:
|
| Mail Folder ID | Select the Folder ID whose messages you want to watch. For example, Inbox, Archive. |
| Search | Enter a keyword or a phrase to search the messages based on the specified query. |
| Limit | Set the maximum number of messages Integromat should return during one scenario execution cycle. |
Search Message
Searches for the messages.
| Connection | Establish a connection to your Microsoft 365 Email account. |
| Mail Folder ID | Select the Folder ID whose messages you want to search. For example, Inbox, Archive. |
| Search | Enter a keyword or a phrase to search the messages based on the specified query. |
| Order By | Select the option to sort the messages:
|
| Limit | Set the maximum number of messages Integromat should return during one scenario execution cycle. |
Get a Message
Gets the metadata of a specified message.
| Connection | Establish a connection to your Microsoft 365 Email account. |
| Message ID | Select the Message-ID whose details you want to retrieve. |
| Get Mime Contents | Select the checkbox if you would like to receive the detail of the MIME content of the message whose details you want to retreive. |
Create and Send a Message
Creates and sends a new message immediately.
| Connection | Establish a connection to your Microsoft 365 Email account. |
| Subject | Enter the message subject line. |
| Body Content Type | Select the message content-type:
|
| Body Content | Enter the message text. |
| Importance | Select the message importance:
|
| To Recipients | Add the email address to which you want to send the messages: Email Address Enter the email address of the contact. Name Enter the name of the contact. |
| CC Recipients | Add the email addresses which you want to add in the CC field of the email: Email Address Enter the email address of the contact. Name Enter the name of the contact. |
| BCC Recipients | Add the email addresses which you want to add in BCC field of the email: Email Address Enter the email address of the contact. Name Enter the name of the contact. |
| Attachments | Add the attachments to the email: Filename Enter the file name. For example, Data Enter the file data to the field or map the source of the file. The maximum file size allowed is 3MB. |
| Internet Message Headers | Add the message headers to the email: Name Enter the header name. Value Enter the header value. |
Move a Message
Moves a message to a selected folder in the mailbox.
| Connection | Establish a connection to your Microsoft 365 Email account. |
| Message ID | Select the message you want to move to a selected folder. |
| Mail Folder | Select the folder to which you want to move the message. |
Delete a Message
Deletes a message.
| Connection | Establish a connection to your Microsoft 365 Email account. |
| Message ID | Select the message you want to delete. |
Draft Message
Create a Draft Message
Creates a new draft message.
| Connection | Establish a connection to your Microsoft 365 Email account. |
| Subject | Enter the message subject line. |
| Body Content Type | Select the message content-type:
|
| Body Content | Enter the message text. |
| Importance | Select the message importance:
|
| To Recipients | Add the email address to which you want to send the messages: Email Address Enter the email address of the contact. Name Enter the name of the contact. |
| CC Recipients | Add the email addresses which you want to add in the CC field of the email: Email Address Enter the email address of the contact. Name Enter the name of the contact. |
| BCC Recipients | Add the email addresses which you want to add in the BCC field of the email: Email Address Enter the email address of the contact. Name Enter the name of the contact. |
| Attachments | Add the attachments to the email: Filename Enter the file name. For example, Data Enter the file data to the field or map the source of the file. The maximum file size allowed is 3MB. |
| Internet Message Headers | Add the message headers to the email: Name Enter the header name. Value Enter the header value. |
Send a Draft Message
Sends a draft message.
| Connection | Establish a connection to your Microsoft 365 Email account. |
| Draft Message | Select the draft message you want to send. |
Update a Message
Updates an existing message.
| Connection | Establish a connection to your Microsoft 365 Email account. |
| Enter a Message ID | Select the option to choose the message:
|
| Folder ID | Select the Folder ID whose message you want to update. |
| Message ID | Select the Message ID whose details you want to update. |
| Subject | Enter the message subject line. |
| Body Content Type | Select the message content-type:
|
| Body Content | Enter the message text. |
| Importance | Select the message importance:
|
| To Recipients | Add the email address to which you want to send the messages: Email Address Enter the email address of the contact. Name Enter the name of the contact. |
| CC Recipients | Add the email addresses which you want to add in the CC field of the email: Email Address Enter the email address of the contact. Name Enter the name of the contact. |
| BCC Recipients | Add the email addresses which you want to add in the BCC field of the email: Email Address Enter the email address of the contact. Name Enter the name of the contact. |
| Attachments | Add the attachments to the email: Filename Enter the file name. For example, Data Enter the file data to the field or map the source of the file. The maximum file size allowed is 3MB. |
| Mark it as Read | Select whether you want to mark this message as read. |
Attachment
List Attachments
Retrieves a list of attachments to a message.
| Connection | Establish a connection to your Microsoft 365 Email account. |
| Message ID | Select the Message-ID whose attachments you want to list. |
| Limit | Set the maximum number of attachments Integromat should return during one scenario execution cycle. |
Download an Attachment
Downloads an attachment to a message.
| Connection | Establish a connection to your Microsoft 365 Email account. |
| Message ID | Select the Message-ID whose attachments you want to download. |
| Attachment ID | Enter the attachment ID you want to download. |
Other
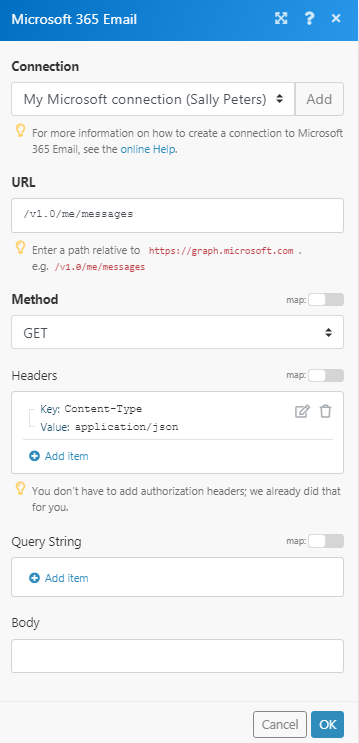
Make an API Call
Performs an arbitrary authorized API call.
| Connection | Establish a connection to your Microsoft 365 Email account. |
| URL | Enter a path relative to For the list of available endpoints, refer to the Microsoft 365 Email API Documentation. |
| Method | Select the HTTP method you want to use: GET POST PUT PATCH DELETE |
| Headers | Enter the desired request headers. You don't have to add authorization headers; we already did that for you. |
| Query String | Enter the request query string. |
| Body | Enter the body content for your API call. |
Example of Use - List Messages
The following API call returns all the messages from your Microsoft 36 Email account:
URL:/v1.0/me/messages
Method:GET
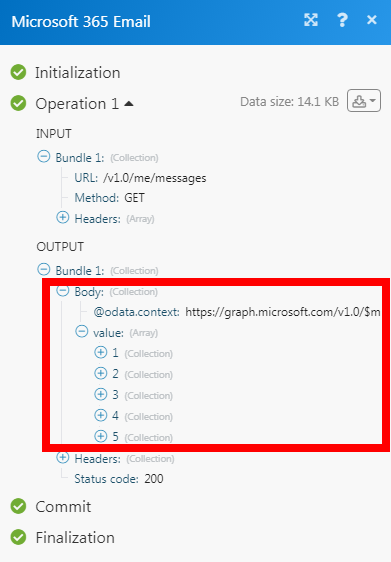
Matches of the search can be found in the module's Output under Bundle > Body > value.
In our example, 5 messages were returned:
Permissions Information or Microsoft 365 Email
- Add an Attachment - Mail.ReadWrite
- Create a Draft Message - Mail.ReadWrite
- Create and Send a Message - Mail.Send, Mail.ReadWrite
- Delete a Message - Mail.ReadWrite
- Download an Attachment - Mail.Read
- Get a Message - Mail.Read
- List Attachments - Mail.Read
- Move a Message - Mail.ReadWrite
- Search Messages - Mail.Read
- Send a Draft Message - Mail.ReadWrite
- Update a Message - Mail.ReadWrite
- Watch Messages - Mail.Read
Change log between Microsoft 365 Email [v2] and Microsoft 365 Email [v1]
- New modules - Search Messages, Get a Message, Update a Message, List Attachments, Download an Attachment, and Make an API Call


