Zoho CRM
Version Latest
Here is the documentation of the legacy Zoho CRM (legacy) app.
Getting Started with Zoho CRM
The Zoho CRM modules allow you to monitor, list, search, create, delete or update objects, and list fields and modules in your Zoho CRM account.
Prerequisites
- A Zoho CRM account
In order to use Zoho CRM with Integromat, it is necessary to have a Zoho CRM account. If you do not have one, you can create a Zoho CRM account on the Zoho CRM Sign-Up page.
Connecting Zoho CRM to Integromat
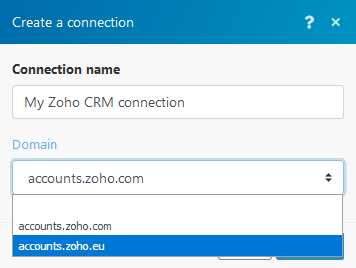
To connect your Zoho CRM account to Integromat follow the general instructions for Connecting to services.
Don't forget to select the domain you are using.
After you click the Continue button, Integromat will redirect you to the Zoho CRM website where you will be prompted to grant Integromat access to your account.
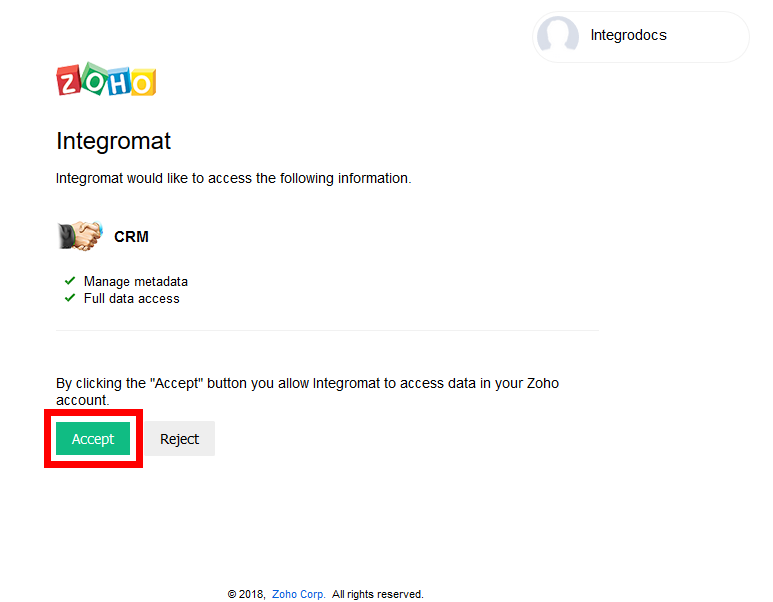
Confirm the dialog by clicking the Accept button.
Triggers
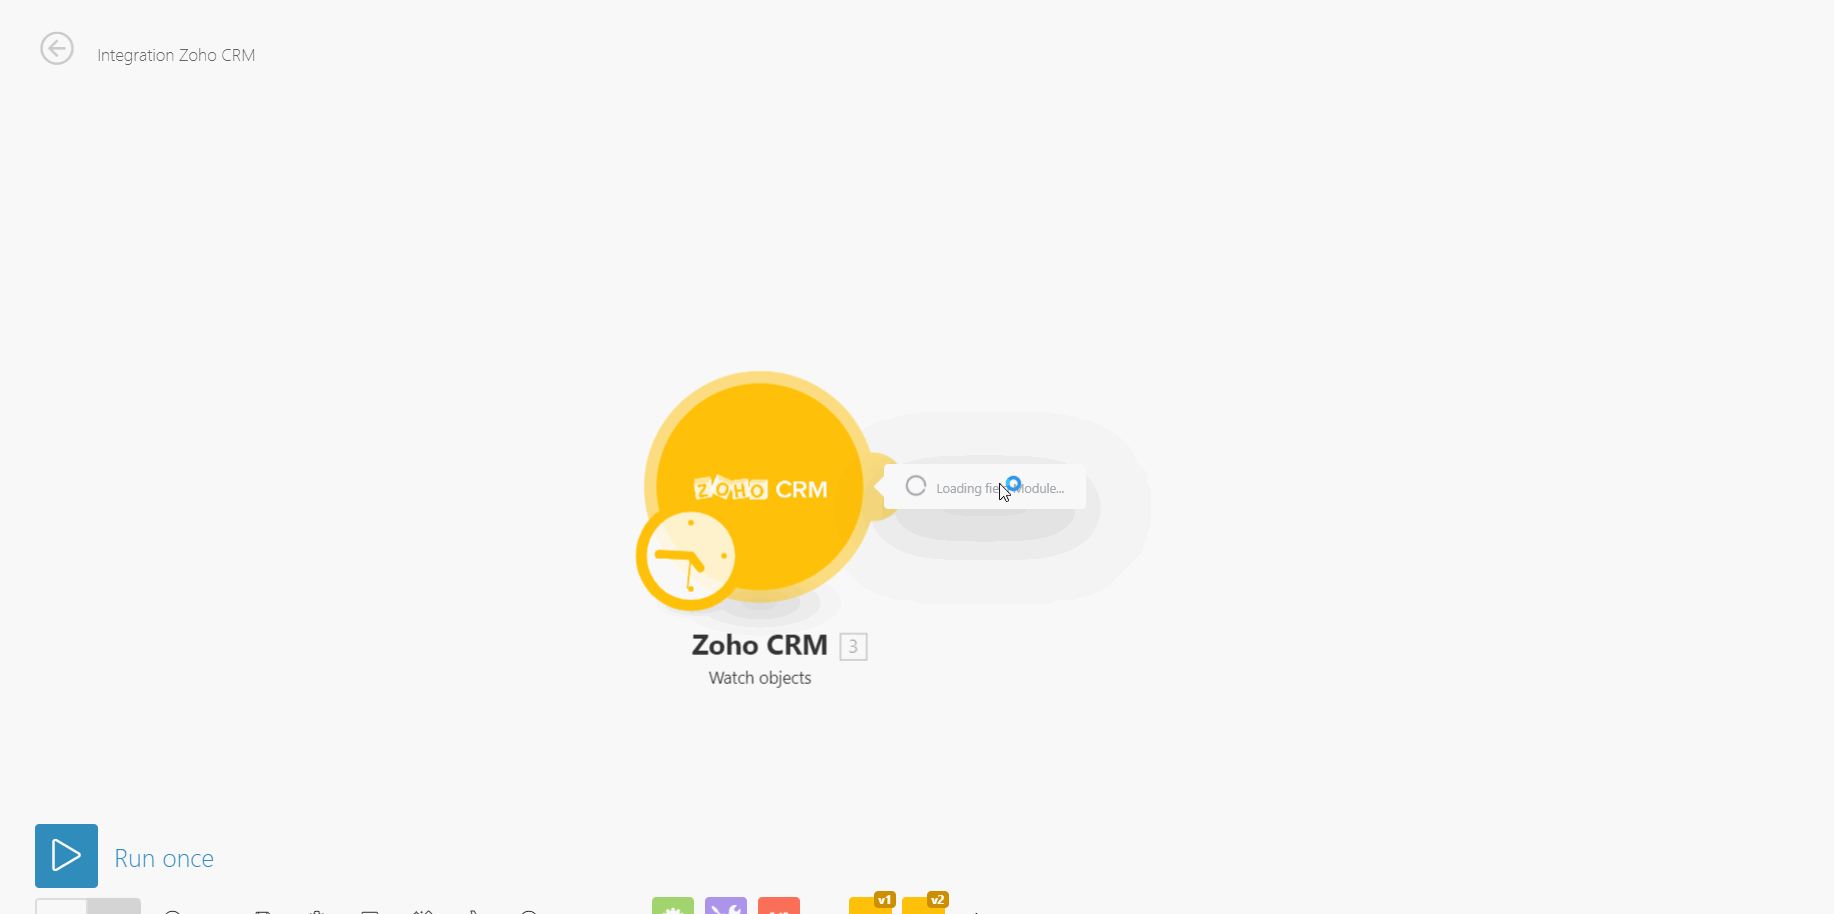
Watch Objects
Retrieves information about a newly created or updated object.
Cannot read property '__itemId' is returned, it means that the fields Created time and/or Updated time have been removed before. You must add them again to your modules. Go to Setup - Customization - Modules and Fields - //ModuleType// and Add a field Created_time and Updated_time.
| Connection | Establish a connection to your Zoho CRM account. |
| Module | Zoho CRM has standard modules such as, Leads, Accounts, Contacts, Deals, Forecasts, Activities, etc,. Select the type of module you want to watch for changes. |
| Sort by | Select whether you want to sort retrieved objects by the created time or the modified time. |
| Limit | Set the maximum number of objects Integromat will work with during one cycle. |
Create Object
Creates a selected object.
| Connection | Establish a connection to your Zoho CRM account. |
| Module | Select the type of module you want to create. |
Modules Fields (reference: help.zoho.com/portal/kb/articles/standard-modules-fields):
Leads
| Company | Enter the company name. |
| First name | Enter the first name of the lead. |
| Last name | Enter the last name of the lead. |
| Title | Enter the salutation for the lead. |
| Enter the email for the lead. | |
| Phone | Enter the phone number of the lead. |
| Fax | Enter the fax number of the lead. |
| Mobile | Enter the mobile number of the lead. |
| Website | Enter the website of the lead. |
| Lead source | Select or map the lead source. Valid values: Employee Referral, Trade Show, Seminar Partner, OnlineStore, Partner, External Referral, Web Download, Seminar-Internal, Advertisement, Web Research, Cold Call, -None-, Sales Mail Alias, Public Relations, Chat. |
| Lead status | Select or map the lead status. Valid values: Pre Qualified, Contacted, Contact in Future, Not Contacted, Attempted to Contact, Lost Lead, -None-, Junk Lead, Not Qualified. |
| Industry | Represents the industry to which the lead belongs. |
| No. of Employees | The number of employees in the lead's company. |
| Annual Revenue | The annual revenue of the lead's company. |
| Rating | Select the rating of the lead. Valid values: -None-, Acquired, Active, Market Failed, Project Cancelled, ShutDown. |
| Email Opt Out | Enable this option if the lead has opted out of email notifications from Zoho CRM. |
| Skype ID | Enter the Skype ID of the lead |
| Salutation | Select or map the salutation for the lead valid values: Prof., Ms., -None-, Dr., Mr., Mrs.. |
| Secondary email | Enter another email for the lead. |
| Enter the Twitter handle of the lead. | |
| Street | Enter the street address of the lead. |
| City | Enter the city of the lead. |
| State | Enter the state. |
| Country | Enter the country of the lead. |
| Description | Enter a description of the lead. |
| Trigger | Select which trigger should be executed when the new lead is created. |
Contacts
| Lead Source | Select the source from which the contact is created. |
| First name | Specify the first name of the contact. |
| Last name | Specify the last name of the contact. This field is mandatory. |
| Account Name | Select the account related to the contact. |
| Vendor Name | Select the vendor related to the contact. |
| Specify the primary email address of the contact. | |
| Title | Specify the job position of the contact. |
| Department | Specify the department of the contact. |
| Phone | Specify the office phone number of the contact. |
| Home Phone | Specify the home phone number of the contact. |
| Other Phone | Specify the other phone number of the contact (if any). |
| Fax | Specify the fax number of the contact. |
| Mobile | Specify the mobile number of the contact. |
| Date of Birth | Specify the birthday of the contact to send greetings for a better relationship. List of supported date formats. |
| Assistant | Specify the name of the contact’s assistant. |
| Asst Phone | Specify the phone number of the contact's assistant. |
| Email Opt out | Select the check-box to remove contacts from your mailing list so that they will not receive any emails from your Zoho CRM account. |
| Skype ID | Specify the Skype ID of the contact. Currently a Skype ID can be in the range of 6 to 32 characters. |
| Salutation | Select the salutation of the contact, such as Mr., Ms, Mrs., or others. |
| Secondary email | Enter another email for the contact. |
| Enter the Twitter handle of the contact. | |
| Reporting To | Select the person to whom the contact reports. |
Mailing Address
| Specify the primary address of the contact. |
Other Address
| Specify the other address of the contact (if any). |
| Description | Specify any other details about the contact. |
| Trigger | Select which trigger should be executed when the new contact is created. |
Accounts
| Account Owner | Enter the name of the user to whom the account is assigned. The ID can be retrieved, for example, using the List Objects module. |
| Rating | Select the rating of the account. |
| Account name | Enter the company name. This field is mandatory. |
| Phone | Specify the phone number of the account. |
| Account site | Specify the name of the account’s location, for example, Headquarters or London. Up to 80 characters are allowed in this field. |
| Fax | Specify the fax number of the account. |
| Parent account | Enter (map) the parent company name. |
| Website | Enter the URL of the company's website. |
| Account number | Specify the reference number for the account. Up to 40 characters are allowed in this field. |
| Ticker symbol | Enter the ticker symbol of the company. |
| Account type | Select the type of account from the drop-down list. |
| Ownership | Select the type of ownership of the company. |
| Industry | Select the type of industry from the drop-down list. |
| Employees | Specify the number of employees in the account's company. |
| Annual revenue | Specify the annual revenue of the account (numeric value). |
| SIC Code | Specify the Standard Industrial Classification code of the account. |
| Billing Street | Specify the billing address of the account to send the quotes, invoices, and other agreements. |
| Shipping Street | Specify the shipping address of the account to deliver the shipment. |
| Billing City | Specify the billing address of the account to send the quotes, invoices, and other agreements. |
| Shipping city | Specify the shipping address of the account to deliver the shipment. |
| Billing State | Specify the billing address of the account to send the quotes, invoices, and other agreements. |
| Shipping State | Specify the shipping address of the account to deliver the shipment. |
| Billing Code | Specify the billing address of the account to send the quotes, invoices, and other agreements. |
| Shipping Code | Specify the shipping address of the account to deliver the shipment. |
| Billing Country | Specify the billing address of the account to send the quotes, invoices, and other agreements. |
| Shipping Country | Specify the shipping address of the account to deliver the shipment. |
| Description | Specify any other details about the account. |
| Trigger | Select which trigger should be executed when the new lead is created. |
Deals
| Deal Owner | Enter the ID of the deal owner. The ID can be retrieved, for example, using the List Objects module. |
| Amount | Enter the amount that can be expected after closing the deal. |
| Deal name | Specify the name of the deal. This field is mandatory. |
| Closing Date | Specify or select the expected close date. This field is mandatory. E.g. 03/15/2019. List of supported date formats. |
| Account name | Enter or map the name of the account to which the deal has to be created. This field is mandatory. |
| Stage | Select the sales stage from the drop-down list. This field is mandatory. |
| Type | Select the type of deal (New Business or Existing Business) from the drop-down list. |
| Probability (%) | Enter the number to specify the probability of closing a deal. |
| Next step | Specify the next step of the sales process. |
| Lead Source | Select the lead source from the drop-down list. |
| Campaign source | Enter the campaign related to the contact. |
| Contact name | Enter the contact related to the deal. |
| Description | Specify any other details about the deal. |
| Trigger | Select which trigger should be executed when the new deal is created. |
Products
| Product Owner | Enter the name of the user to whom the product is assigned. |
| Product Name | Specify the name of the product. This field is mandatory. |
| Product Code | Specify the product identification. |
| Vendor Name | Enter the name of the vendor. |
| Product Active | Specify the status of the product. |
| Manufacturer | Select the name of the product manufacturer. |
| Product Category | Select the category of the product. |
| Sales Start Date | Specify the date on which the product sales starts. E.g. 03/15/2019. List of supported date formats. |
| Sales End Date | Specify the date on which the product sales ends. |
| Support Start Date | Select the date on which the product support starts. E.g. 03/15/2019. List of supported date formats. |
| Support End Date | Select the date on which the product support ends. E.g. 03/15/2019. List of supported date formats. |
| Unit Price | Enter the unit price of the product. |
| Specify the commission rate for selling the product. | |
| Tax | Specify the tax component of the products. |
| Taxable | Specify whether the product is a taxable product or not. |
| Usage Unit | Select the displayed unit price of the product. |
| Specify the number of units. | |
| Enter the stock quantity. | |
| Reorder Level | Set the reorder level of stock. |
| Handler | Enter the Zoho CRM user who is handling the product. |
| Enter the quantity demanded. | |
| Description | Specify any other details about the product. |
| Trigger | Select which trigger should be executed when the new product is created. |
Campaigns
| Campaign Owner | Enter the ID or name of the campaign owner. The ID can be retrieved, for example, using the List Objects module. |
| Type | Select the type of the campaign. |
| Campaign Name | Specify the name of the campaign. |
| Status | Select the status of the campaign from the drop-down menu. |
| Start Date | Specify the date on which the campaign starts. E.g. 03/15/2019. List of supported date formats. |
| End Date | Specify the date on which the campaign ends. E.g. 03/15/2019. List of supported date formats. |
| Expected revenue | Specify the revenue expected after launching the campaign. |
| Specify the planned amount to be spent on the campaign. | |
| Actual Cost | Specify the actual amount spent on the campaign. |
| Expected Response | Specify the campaign turnout percentage. |
| Specify the number of leads/contacts to whom the campaign details have been sent. | |
| Enter the name or ID of the parent campaign to create the association between records. | |
| Description | Specify additional details about the campaign. |
| Trigger | Select which trigger should be executed when the new campaign is created. |
Tasks
| Task Owner | Enter the ID or name of the task owner. The ID can be retrieved, for example, using the List Objects module. |
| Subject | Enter the name of the task. This field is mandatory. |
| Due date | Specify the due date for the task. E.g. 03/15/2019. List of supported date formats. |
| Contact Name | Enter or map the ID of the related contact. |
| Related to | Enter or map the ID of the related lead. |
| Status | Select the status of the task. |
| Priority | Select the priority of an event from the drop-down list. |
| Select whether to send the notification email to the task owner or not. | |
| Reminder | Enter the date to set the reminder for the task. E.g. 03/15/2019. List of supported date formats. |
| Description | Specify the details about the task. Max 32000 characters. |
| Trigger | Select which trigger should be executed when the new task is created. |
Events
| Title | Specify the name of the event. This field is mandatory. |
| Subject | Enter the name of the task. This field is mandatory. |
| Location | Enter the location for the event. |
| From | Specify the date and time when the event will start. This field is mandatory. List of supported date formats. |
| All Day | Enable this option when it is an all day event. |
| To | Specify the date and time when the event will be over. This field is mandatory. |
| Host | Enter the name of the user to whom the event is assigned. |
| Contact Name | Enter the name of the related contact. |
| Description | Enter the details about the event. Max 32000 characters. |
| Related To | Enter the name of the related lead. |
| Trigger | Select which trigger should be executed when the new event is created. |
Calls
| Contact Name | Enter the contact to which the call is related to. |
| Subject | Specify the subject of the call. This field is mandatory. |
| Call Type | Choose whether the call is inbound or outbound. |
| Call Start Time | Enter the call start date and time. List of supported date formats. This field is mandatory. |
| Call Duration | Specify the duration of the call. List of supported date formats. This field is mandatory. |
| Description | Specify the details about the call. |
| Call Result | Enter the call result. |
| Billable | Select whether the call was billable or not. |
| Reminder | If the call is scheduled, you can set the reminder before the call. |
| Trigger | Select which trigger should be executed when the new call is created. |
Cases
| Case Owner | Select the name of the user to whom the case is assigned. |
| Status | Select the status of the case from the drop-down list. |
| Product Name | Enter the product name related to the case. |
| Priority | Select the priority of the case from the drop-down list. |
| Type | Select the type of problem. It can be a general question, feature request, or real issue in your product/service. |
| Case Reason | Select the reason for the case. |
| Case Origin | Select the source from which the case has been generated. You can select email, phone, or website. If you select email, you must specify the Email ID of the customer. |
| Subject | Specify the title of the case. This field is mandatory. |
| Related to | Enter the module related to the case. |
| Account Name | Select the account related to the case. |
| Reported By | Displays the name of the contact. |
| Deal Name | Specify the name of the deal. |
| Specify the Email ID of the contact. | |
| Phone | Specify the phone number of the customer. |
| Description | Specify complete details about the case. |
| Internal comments | Specify any follow-up notes about the case. |
| Solution | Specify the solution provided. |
| Trigger | Select which trigger should be executed when the new case is created. |
Notes
| Note Owner | Enter the note owner. |
| Note Title | Enter a title for the note. |
| Note Content | Enter content for the note. |
| Parent ID | Enter the ID of the object you want to add the note to. |
| Trigger | Select which trigger should be executed when the new note is created. |
Solutions
| Solution Owner | Enter the name of the user to whom the solution is assigned. |
| Solution Title | Specify the subject of the solution. This field is mandatory. |
| Status | Specify the status of the solution. |
| Product Name | Enter the product related to the solution. |
| Question | Enter your question. This field is mandatory. |
| Answer | Specify solution details. This field is mandatory. |
| Trigger | Select which trigger should be executed when the new note is created. |
Vendors
| Vendor Owner | Enter the name of the user to whom the Vendor details are assigned. |
| Vendor Name | Specify the name of the vendor. This field is mandatory. |
| Phone | Specify the phone number of the vendor. |
| Specify the Email ID of the vendor. | |
| Website | Specify the website URL of the vendor. |
| GL Account | Select the general ledger account. |
| Category | Specify the category of the vendor. |
Vendor Address
| Specify the address of the vendor. |
| Description | Specify any other details about the vendor. |
| Trigger | Select which trigger should be executed when the new solution is created. |
Price Books
| Price Book Owner | Enter the name of the user to whom the price book is assigned. |
| Active | Select the Yes option to set the status of the price book as active. |
| Pricing Model | Select the model of the price book |
| Description | Specify any other details about the price book. |
| Pricing Details | Specify the pricing details. |
| Trigger | Select which trigger should be executed when the new vendor is created. |
Quotes
| Quote Owner | Enter the name of the user to whom the quote is assigned. |
| Subject | Specify the name of the quote. This field is mandatory. |
| Deal Name | Specify the deal to which the quote is related. |
| Quote Stage | Select the status of the quote. |
| Valid Until | Specify the date that the quote is valid til after sending to the prospective customer. List of supported date formats. |
| Contact Name | Specify the contact to which the quote has to be created. |
| Carrier | Select the name of the carrier manufacturer. |
| Account Name | Specify the account to which the quote has to be created. |
Billing Address
| Specify the primary address of the contact. |
Shipping Address | Specify the shipping address of the contact (if any). |
Product Details | Product ID Quantity Discount List Price |
Sub Total | Enter the quote subtotal. |
Discount | Enter the discount (as a percentage). |
Adjustments | Specify if there are any adjustments, such as discounts, or extra charges etc. |
Grand Total | The total amount of the quote. |
Terms and Conditions | Specify the terms and conditions that are associated with the quote. |
Description | Specify any other details about the quote. |
| Trigger | Select which trigger should be executed when the new quote is created. |
Sales Orders
| Sales Order Owner | Select the name of the user to whom the sales order is assigned. |
| Subject | Specify the name of the sales order. This field is mandatory. |
| Deal Name | Select the potential for which the sales order has to be generated. |
| Customer No. | Specify the customer identification number (if any). |
| Purchase Order | Enter the reference purchase order. |
| Quote Name | Enter the reference quote. |
| Due Date | Specify the due date for the sales order. E.g. 03/15/2019. List of supported date formats. |
| Pending | |
| Contact Name | Select the contact for which the sales order has to be generated. |
| Carrier | Select the carrier’s name that ships the products from your warehouse to the customer site. |
Excise Duty | Specify the excise duty for the shipment. |
Sales Commission | Specify the commission to the sales person upon closing the deal.
|
Status | Select the status of the sales order. |
Account Name | Specify the account name to which the sales order has to be created. This field is mandatory. |
Billing Address
| Specify the primary address of the contact. |
Shipping Address
| Specify the shipping address of the contact (if any). |
Product Details | Product ID Quantity Discount List Price |
Tax | Specify the tax component of the products. |
| Adjustment | Specify if there are any adjustments, such as discounts, or extra charges etc. |
| Grand Total | Displays the amount of the selected line item. |
| Terms and Conditions | Specify the terms and conditions that are associated with the sales order. |
| Description | Specify any other details about the sales order. |
| Trigger | Select which trigger should be executed when the new sales order is created. |
Purchase Orders
| Select the name of the user to whom the purchase order is assigned. | |
| PO Number | Display the Sales Order ID after creating a case. |
| Subject | Enter the name of the purchase order. This field is mandatory. |
| Vendor Name | Enter the name of the vendor. |
| Requisition Number | Enter the number in which the purchase order is requested. |
| Tracking Number | Enter the number to track the purchase order. |
| Contact Name | Enter the contact name to which the invoice has to be created. |
| Purchase Order Date | Enter the date on which the purchase order is created. E.g. 03/15/2019. List of supported date formats. |
| Due Date | Specify the due date for the sales order. E.g. 03/15/2019. List of supported date formats. |
| Carrier | Select the carrier’s name that ships the products from your warehouse to customer site. |
Excise Duty | Specify the excise duty for the shipment. |
Sales Commission | Specify the commission to the sales person upon closing the deal.
|
Status | Specify the status of the purchase order. |
Billing Address
| Specify the primary address of the contact. |
Shipping Address
| Specify the shipping address of the contact (if any). |
Product Details | Product ID Quantity Discount List Price |
Tax | Specify the tax component of the products. |
| Adjustment | Specify if there are any adjustments, such as discounts, or extra charges etc. |
| Grand Total | Displays the amount of the selected line item. |
| Terms and Conditions | Specify the terms and conditions that are associated with the purchase order. |
| Description | Specify any other details about the purchase order. |
| Trigger | Select which trigger should be executed when the new purchase order is created. |
Invoices
| Invoice Owner | Select the name of the user to whom the invoice is assigned. |
| Subject | Enter the name of the purchase order. This field is mandatory. |
| Sales Order | Enter the reference sales order (if any). |
| Invoice Date | Specify the date on which the invoice was created. E.g. 03/15/2019. List of supported date formats. |
| Purchase Order | Enter the reference purchase order. |
| Due Date | Specify the due date for the invoice. E.g. 03/15/2019. List of supported date formats. |
| Excise Duty | Specify the excise duty for the shipment. |
| Sales Commission | Specify the commission to the sales person upon closing the deal. |
| Status | Select the status of the invoice. |
Account Name | Specify the account name to which the invoice has to be created. This field is mandatory. |
Contact Name | Specify the contact's name to which the invoice has to be created. |
Billing Address
| Specify the primary address of the contact. |
Shipping Address
| Specify the shipping address of the contact (if any). |
Product Details | Product ID Quantity Discount List Price |
Tax | Specify the tax component of the products. |
| Adjustment | Specify if there are any adjustments, such as discounts, or extra charges etc. |
| Grand Total | Displays the amount of the selected products. |
| Terms and Conditions | Specify the terms and conditions that are associated with the purchase order. |
| Description | Specify any other details about the invoice. |
| Trigger | Select which trigger should be executed when the new invoice is created. |
Delete Object
Deletes a selected object.
| Connection | Establish a connection to your Zoho CRM account. |
| Module | Select the type of module you want to delete. |
| Object ID | Enter or map the ID of the object you want to delete. The ID can be retrieved, for example, using the List Objects module. |
Get Object
Retrieves details on selected object.
| Connection | Establish a connection to your Zoho CRM account. |
| Module | Select the type of module you want to retrieve information about. |
| Object ID | Enter or map the ID of the object you want to retrieve information about. The ID can be retrieved, for example, using the List Objects module. |
Update Object
| Connection | Establish a connection to your Zoho CRM account. |
| Module | Select the type of module you want to retrieve information about. |
| Object ID | Enter or map the ID of the object you want to update. The ID can be retrieved, for example, using the List Objects module. |
Please find the fields' descriptions in the Create Object section above.
Make an API Call
Allows you to perform a custom API call.
| Connection | Establish a connection to your Zoho CRM account. |
| URL | Enter a path relative to https://{API_URL}/crm/v2/. E.g. Leads/2063212000000134765 |
| Method | Select the HTTP method you want to use: GET POST PUT PATCH DELETE |
| Headers | Enter the desired request headers. You don't have to add authorization headers; we already did that for you. |
| Query String | Enter the request query string. |
| Body | Enter the body content for your API call. |
Example
Search leads by a phone API call:

Step by step guide
- Insert the Zoho CRM > Make an API call module in your scenario.
- Find the API endpoint you would like to call in the Zoho CRM API documentation, section "REST API" in the left side menu - e.g. Get users.
- Check out the endpoint's required scopes in the Scope section:

If the endpoint requires different scope(s) from these two:ZohoCRM.settings.ALLZohoCRM.modules.ALL
then create a new connection and add all the required scope(s) in the Scope field: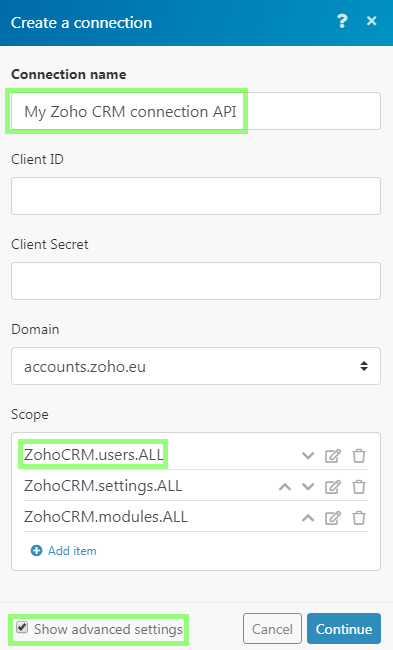
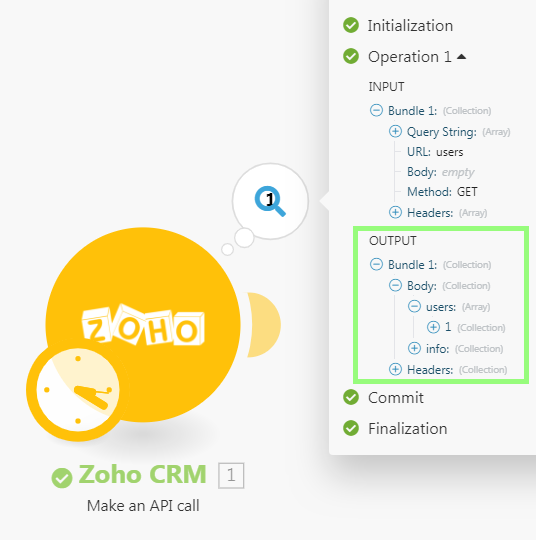
- Configure the module's configuration to call the Get Users endpoint:
URL users Method GET 
- Execute the scenario.
- Click the bubble above the module to verify the module's output:
Upload an Attachment
Uploads an attachment to a record.
| Connection | Establish a connection to your Zoho CRM account. |
| Module | Select the module you want to upload the attachment to. |
| Object ID | Enter or map the ID of the object. Object ID can be retrieved, for example, using the Search Objects module. |
| Source file | Enter or map the file name and file data. For more details refer to the Working with files article. |
List Fields
Retrieves the field details of a selected module.
| Connection | Establish a connection to your Zoho CRM account. |
| Module | Select the module whose fields you want to retrieve. |
List Modules
Retrieves a list of all the modules from your ZOHO CRM account.
| Connection | Establish a connection to your Zoho CRM account. |
List Objects
| Connection | Establish a connection to your Zoho CRM account. |
| Module | Select the module whose objects you want to retrieve. |
| Limit | Maximum number of objects Integromat will work with during one execution cycle. |
Search Objects
Searches for records using a specified filter.
| Connection | Establish a connection to your Zoho CRM account. |
| Module | Select the module you want to search for records. |
| Filter | Set the filter for the search. Set filter values. You can also use the logical operator AND in order to narrow your search. |
Enter the email you want to search the record by. | |
| Approved records | Select the approval status of the searched records. |
| Limit | Maximum number of records Integromat will work with during one execution cycle. |
Troubleshooting
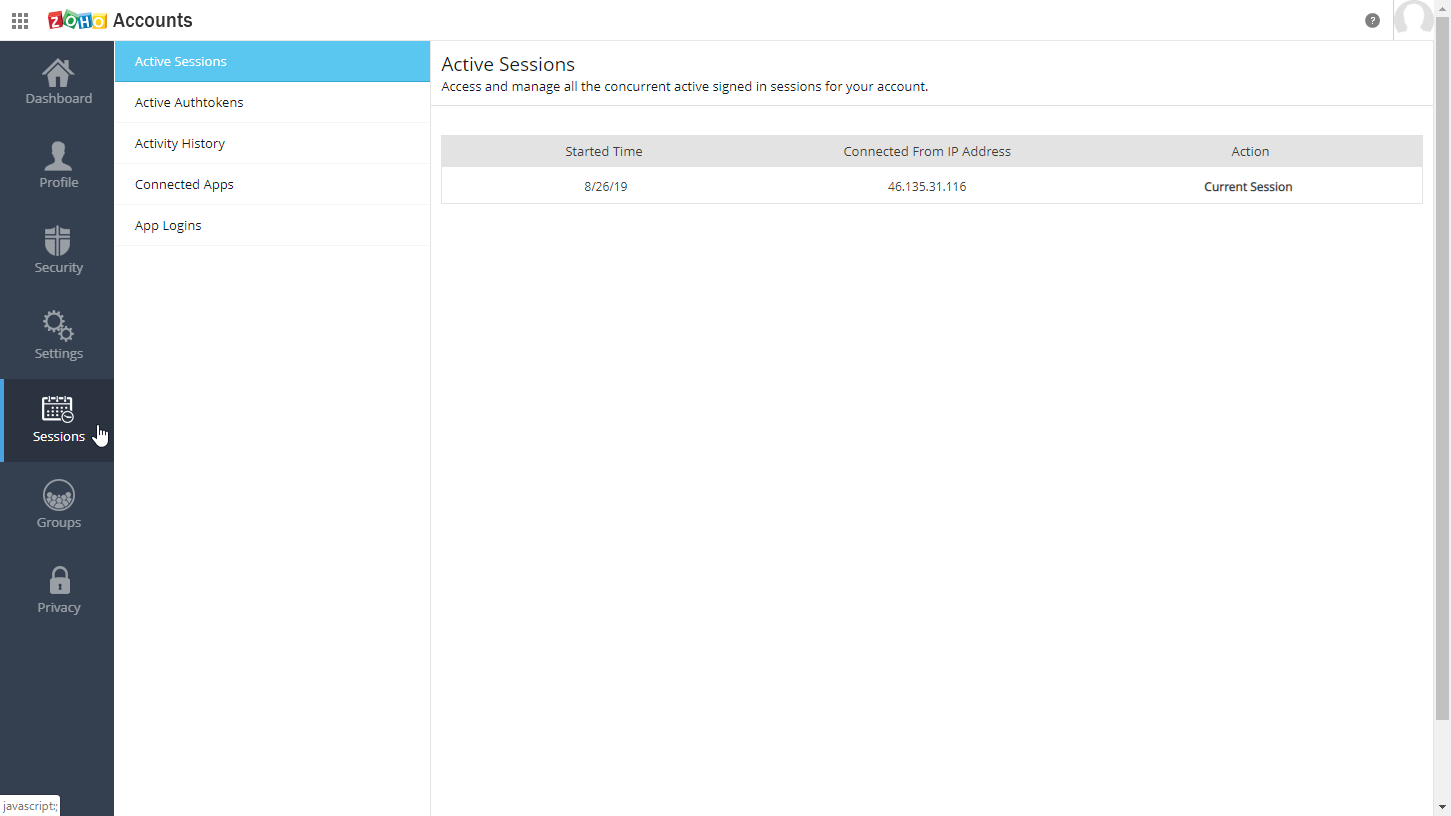
How To Remove the Integromat App Token from the Zoho Account
1. Log into your Zoho account.
2. Click on your user icon in the top-right corner and open the My Account settings.
2. Click on the Active Sessions tile.
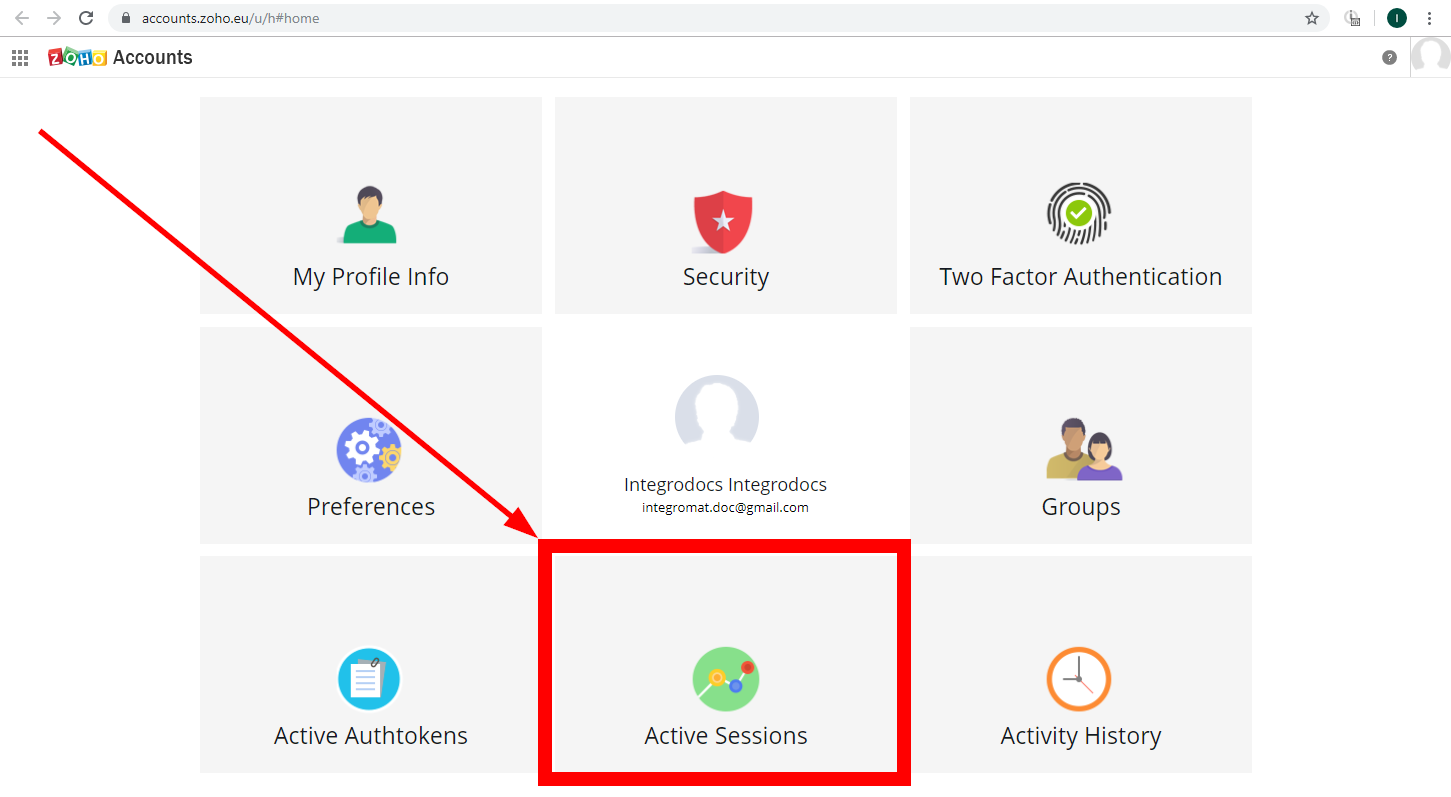
3. Open the Connected Apps list.
4. Remove the desired app by clicking the trash bin icon in the Action column.
Error AUTHENTICATION_FAILURE
Zoho CRM doesn't allow for creating more accounts in the “offline" mode. If you get the AUTHENTICATION_FAILURE error when creating accounts, you have to delete old accounts.
Open Zoho Accounts -> Sessions -> Connected Apps and delete the Integromat app.
Create your Custom Zoho CRM Connection ( If you're having an issue connecting with your Zoho origin follow the mentioned workarounds )
Step 1 - Navigate to Zoho API Console Page here and Create your Zoho Developer Account
On the top right side click Add Client. If you've already created the client, select the existing one.
Step 2 -After you've clicked on it, you will see an option to fill out the name, URL, and redirect URL. Fill them out as follows.
You may rename it in any way you like.
Name - IntegromatHome Page - https://integromat.comRedirect URL - https://www.integromat.com/oauth/cb/zohocrm2
Step 3 - Navigate to the Settings Page and configure the country that you will work on.
Please note, you do not need to configure this option for your country of origin. For example, if you've opened this account from India, you will see .com/.au/.eu options by default. .in will be enabled and you won't have any option to select the country.
Step 4 - Now Navigate to Client Secret Page where you'll find the Client ID and Client Secret.
Create a new Integromat scenario with the Zoho CRM module. Create a new connection, click Show advanced options, and paste the client ID and secret to their respective fields. Choose your account origin and click the Add a connection button.
Here is a small clip of the process -