Scenario Editor
Our visual scenario editor enables you to create and edit scenarios. The scenario editor opens when you click the Create a new scenario button in your Dashboard. To edit an existing scenario, click the Edit button, or click on the diagram of the scenario you wish to edit in the scenario detail. This will open the scenario editor.
Here is a list of all of the elements you will see in the scenario editor:
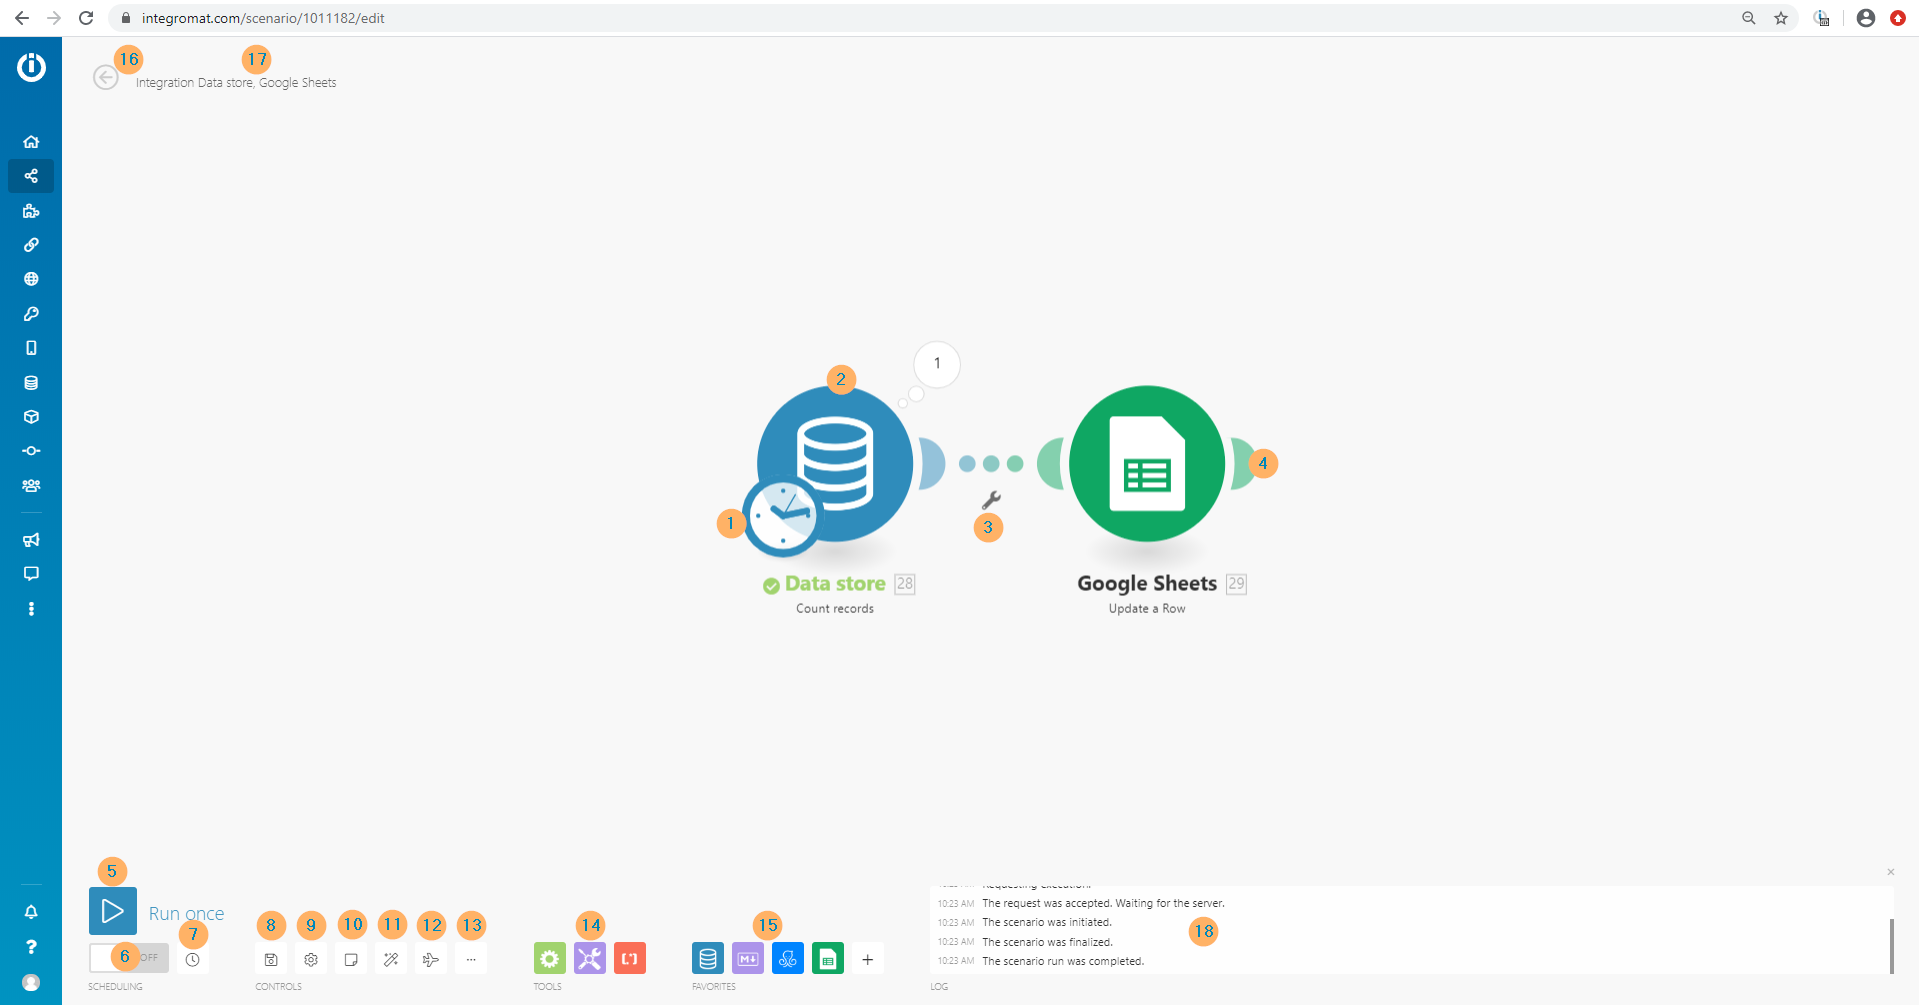
(click to enlarge the image)
1 - Scenario Schedule
The scenario schedule is represented by the clock icon (![]() ). Click the clock icon to open a dialog where you can schedule a scenario. Here, you can set when and how often your activated scenario is to be executed.
). Click the clock icon to open a dialog where you can schedule a scenario. Here, you can set when and how often your activated scenario is to be executed.
2 - Module
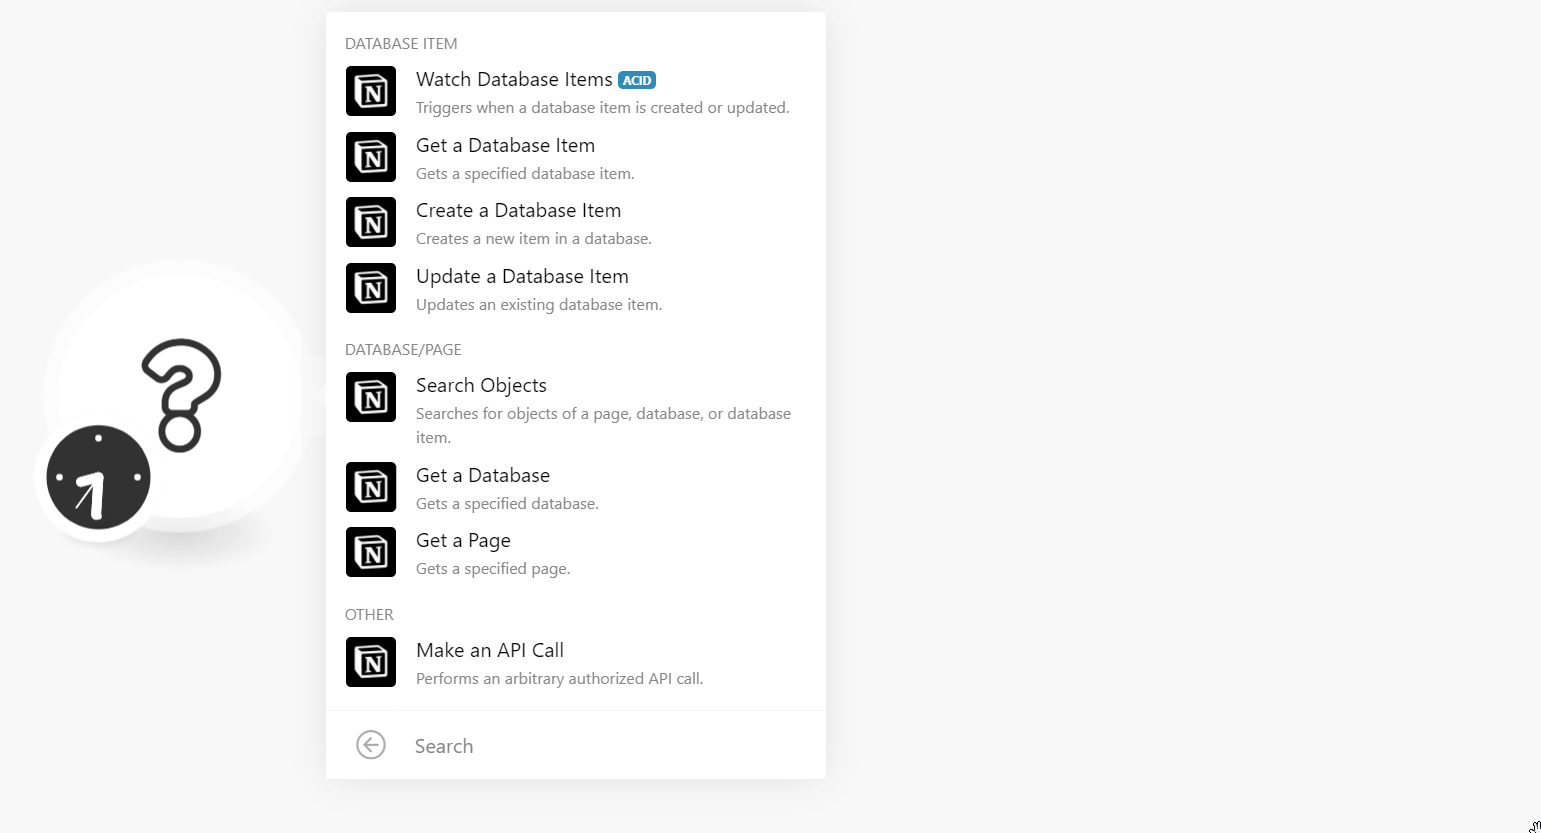
If you have not yet selected the first module for your scenario, an empty module - a circle with a question mark (![]() )is displayed in the scenario editor.
)is displayed in the scenario editor.
Clicking the empty module will open up a panel where you can search for apps/services. After you select the desired app, search through the app's modules to add a module to your scenario.
Depending on where you want to add a module in your scenario, different modules will be available. Some modules can only be placed in between other modules, and others can only be placed at the beginning of the scenario.
When you add a module and left-click on it, a panel where you can set its parameters will be displayed. Depending on the module you have selected, right-clicking the module will offer you some or all the following options:
- Settings
- Choose where to start
- Run this module only
- Add error handler
- Rename
- Clone
- Add note
- Delete module
3 - Setting Up a Route
Clicking on the wrench icon (![]() ) below the line connecting two modules will open a menu with the following options:
) below the line connecting two modules will open a menu with the following options:
- Set up a filter
- Unlink - removes a route
- Add a router - adds a router between modules
- Add a module - adds a new module between modules
- Add a note - adds a note to the route
4 - Adding/Removing a Module
To add a module, click the right handle of a module. It will create an empty module and open a menu that allows you to add another module to your scenario.
To remove a module, right-click the module you would like to delete and select the Delete module option.
5 - Run Once
Once a scenario is configured, you can run it by clicking the play icon (![]() ). This way, you can verify that the scenario runs as you expect.
). This way, you can verify that the scenario runs as you expect.
If everything is working properly, you can activate the scenario. Once activated, the scenario will be executed according to its schedule.
If everything does not run as expected, you can visit our error handling section to learn how to handle errors.
6 - Activate/Deactivate
Switch the button ON to activate your scenario or OFF to deactivate the scenario. Please read this article to understand the difference between active and inactive scenarios.
7 - Schedule Settings
Click the Schedule settings icon ( ) to schedule the activated scenario. For more details, please refer to the Scheduling a scenario article.
8 - Autosave
The Autosave ( ) option allows you to save the entered data in the scenario fields without executing the scenario. If you forget to click OK and close a dialog box by mistake, our auto-save system will preserve all your previous changes and display an asterisk icon on top of the module to show that the changes are saved.
The Autosave option does not prevent you from testing new configurations. It preserves only your changes and does not apply them. When you click OK, the autosaved changes will apply. You can still click Cancel to delete your last changes and get back to your original configuration.
9 - Save
When you finish editing a scenario, click the floppy disk icon (![]() ) to save the current scenario settings. You may also save your scenario continuously during editing.
) to save the current scenario settings. You may also save your scenario continuously during editing.
10 - Scenario Settings
The Scenario settings panel is represented by the gear icon (![]() ). Click this icon to open the Scenario settings dialog. This dialog is primarily intended for advanced users. Here you can adjust the advanced scenario settings.
). Click this icon to open the Scenario settings dialog. This dialog is primarily intended for advanced users. Here you can adjust the advanced scenario settings.
11 - Notes
Click the page icon (![]() ) to display/hide notes that have been added to modules in the scenario.
) to display/hide notes that have been added to modules in the scenario.
To add a new note to the module or link (the connection between two modules), right-click the module or link you want to add a note to. You can add as many notes as you want.
12 - Auto-align
Integromat gives you the possibility to create highly sophisticated scenarios with many modules. Click the magic wand icon (![]() ) to adjust the overall layout of the modules in the scenario so you can see its content more clearly.
) to adjust the overall layout of the modules in the scenario so you can see its content more clearly.
13 - Explain Flow
Before running your scenario, see how the data will flow through your scenario by clicking the airplane icon (![]() ).
).
14 - More
Click on the three dots icon (![]() ) to open the menu with the following options:
) to open the menu with the following options:
| Export Blueprint | Allows you to save the scenario blueprint in the JSON format to your computer. This feature is available for paid plans only! Please see our pricing or upgrade your plan if necessary. |
| Import Blueprint | Allows you to load the scenario blueprint in the JSON format from your computer. This feature is available for paid plans only! Please see our pricing or upgrade your plan if necessary. |
| Previous Versions | Allows you to restore a previous version of the scenario. For detailed information, please see the How to restore a previous scenario version article. |
15 - Tools
The Tools section allows you to further customize your scenario by providing more advanced features. The Tools section includes three subsections:
16 - Favorites
The Favorites section is the list of your most commonly used apps that are made available for easy access.
The list grows as you add more apps to your scenario. You can also add apps directly to the list by clicking the plus button (![]() ).
).
17 - Exit Editing
Click the left arrow (![]() ) in the top-left corner (next to the scenario name) to close the scenario editor and return the Scenario Detail page, where you can activate your scenario.
) in the top-left corner (next to the scenario name) to close the scenario editor and return the Scenario Detail page, where you can activate your scenario.
18 - Scenario Name
Click the scenario name to change the name of the scenario.
19 - Log
A log records every event that occurs during a single run of a scenario and records it for the scenario execution history. The log contains information about the difficulty of each phase and any errors encountered during the execution of the scenario.


