How to connect Email, Text Parser and Google Sheets
Scenario: Capture an email body in two separate tables in a spreadsheet using Regular Expressions (Regex) as search patterns. In this tutorial, the first pattern will search for a phrase and the second will search for the same phrase and an email address.
Level of difficulty: Medium (requires basic knowledge of Regular Expressions). To learn more about Regex, visit https://regexone.com
Implementation Time: Approximately 20 Minutes
----
I hear people saying email is dead and what not but if you are even remotely involved with a digital business, you very well understand the importance of email not only for business development and sales, but also for customer communication. While I’m a great proponent of conversational marketing and the oncoming dominance of chatbots for customer support, I cannot stress enough on making a place in your customer’s inbox while maintaining good email etiquette.
So why all this talk about email and what exactly can you achieve by implementing this nifty scenario on Integromat?
The simple answer is that every business must listen to and refer to email conversations to improve communication with all stakeholders. While there are a plethora of apps that help you create a log of all messages and tag them for further action, you also need to invest significant resources to implement and maintain sophisticated solutions. But with Integromat, you can hook up this scenario in 20 minutes using your email account and a spreadsheet. Let’s dive in!
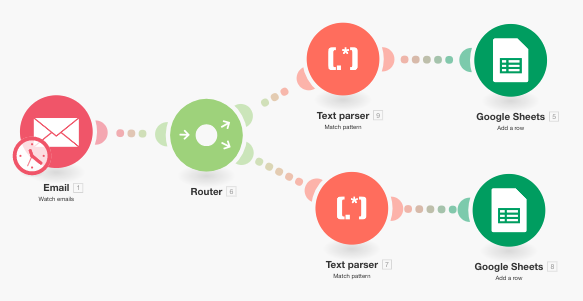
The scenario that we will create in this tutorial will look like the one in the snapshot above.
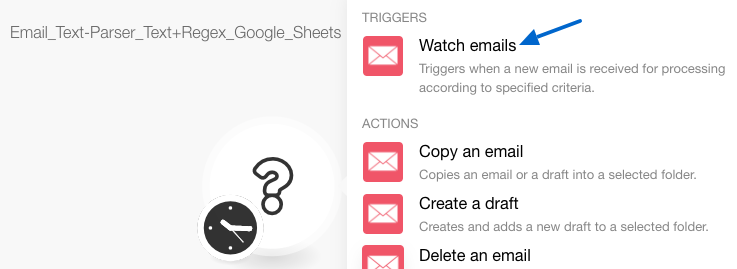
Step 1: Add the first module and configure it
- Search for Email and choose Watch emails as the Trigger.
Note: While you can connect a Google account using the Email module, you can also use the inbuilt Gmail module instead.
- Next, you’d need to connect either a Google account or any other IMAP based email client (Hotmail, Outlook, Zoho etc). We will use a Google account simply due to its ubiquity.
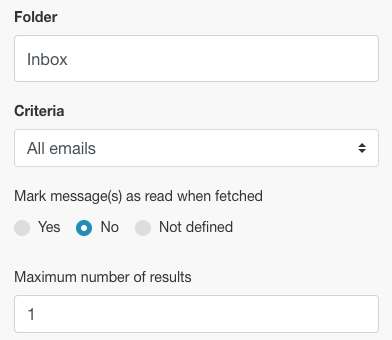
- Once connected, you need to select a Folder whose incoming emails you wish to watch. I’ve selected Inbox but you can select any specific folder too.
- Under Criteria, I’ve chosen all email but you can also narrow it down to read or unread emails.
- You can also choose to mark fetched emails as read or unread.
- I have set the Maximum number of results to 1 but you can change it based on the volume of messages you receive. However, it’s recommended to set a low value and run the scenario more often.
- Now click on Show advanced settings at the bottom to see more filters as below:

- Here you can filter emails by the Sender address, Subject and Phrase,giving you the ability to watch only relevant emails. I have only added a Subject filter while leaving the other 2 blank.
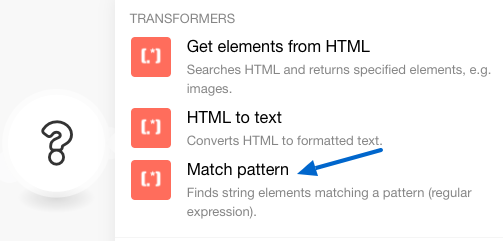
- Note: We will add a router to look for phrases in an email using the Match Pattern iterator and a Regular Expression (Regex) as a search pattern. This also enables us to build a multi-utility scenario as I like to call it!
- Once the configuration is done, you will be asked to choose where to start watching your emails. This step is self-explanatory. I have chosen From now on:

Step 2: Search for Flow Control and add a Router
- A router can be added after any module to split or duplicate the data before sending it to the next module. Here, we have used a Router to send the Email body text to 2 separate tables in a Google Sheet. More on that in the next step.
Step 3: This is the part that creates the magic using the Text Parser Module. We will break this down into two parts
- Remember, the Pattern is a Regular Expression and has to be written as below:
- text\sparser\smodule
- I will leave the other options unchecked but feel free to use them as you deem fit.
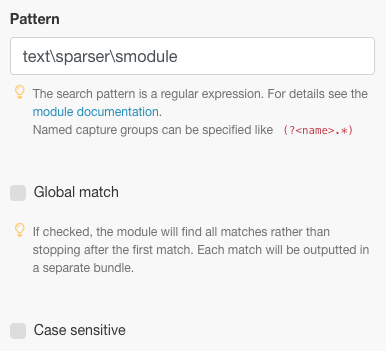
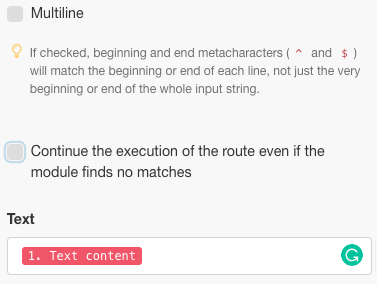
- Multiline is useful if your text contains several lines and you need to search for the pattern in each line. For this tutorial we need to search for the pattern in the entire email body text, hence we will leave it unchecked.
- In the Text field, select the attribute ‘Text content’ from the list. This is the attribute that stores the text from the email body in which we will search for the pattern.
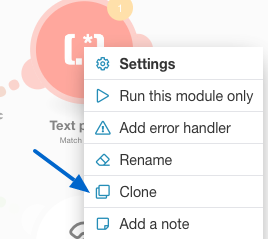
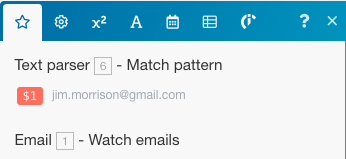
3.2: Next, we will add another Match Pattern that searches for the same phrase and an email address. This is particularly useful if you have customer accounts with multiple users. To save time, simply clone the Text Parser module you just created and link it to the Router.
Now edit the pattern as below:
text\sparser\smodule.+\s([\w.-]+@[\w.-]+)
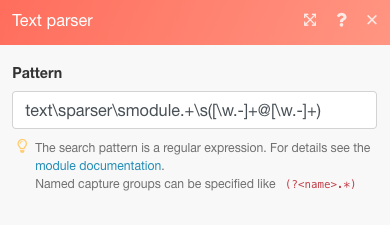
This pattern searches for the phrase “text parser module” and an email address like jim.morrison@gmail.com and returns only the email address.
Please note that while it’s important to write your regex in accordance with the specification of the email addresses you accept, the one above takes care of most standard email addresses.
- If you’d like to search only for email address, you can use the regex below
([\w.-]+@[\w.-]+)
- You may also search only for phone numbers using the regex below:
^[+]?\(?(\d{1,3})\)?[\s-]?\(?(\d{3})\)?[\s-]?\d{3}[\s-]?\d{3,4}
The above pattern takes care of most common formats in which a phone number is written.
To test your patterns, we recommend using https://regex101.com with javascript as the Flavor.
The rest of the configuration remains the same as the one before.
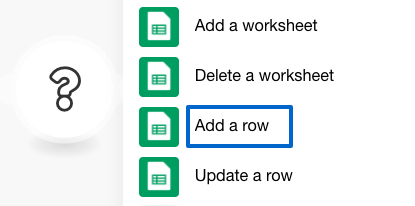
Step 4: Add the Google Sheets Modules.
Like the previous step, this one also has two parts. Let’s start with the first.
Note: Instead of Google Sheets, you may use another app like Airtable or a CRM such as InfusionSoft. For Sheets, we need to first create a spreadsheet with the requisite headers.
4.1: Create a spreadsheet with the columns under which you’d like to capture the user data. (Feel free to use an existing file too).
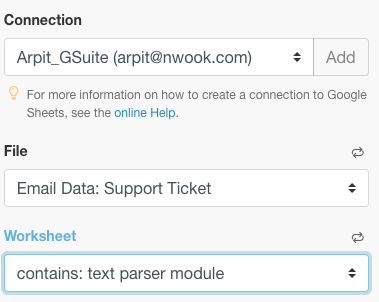
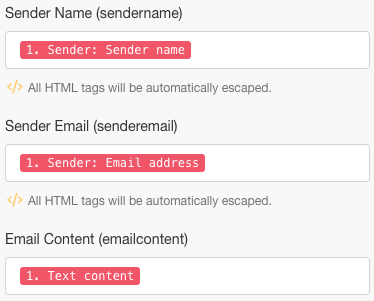
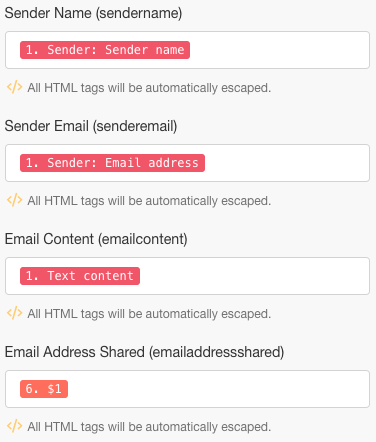
I have created one called “Email Data: Support Ticket” with Sender Name, Sender Email and Email Content as columns. I have named the worksheet ‘contains: text parser module’.
- Next, add the Google Sheets module with Add a row as the Action.
- Connect your Google account (if you haven’t already), choose the File you created earlier, followed by choosing the Worksheet in which you’re capturing the data. My setup looks like this:
- Map the attributes in the relevant fields (columns) to finish the module setup.
3.2: Clone the module you just created and link it to the second Text Parser module.
- Now go to your Spreadsheet, duplicate the worksheet you created earlier and give it a name. I have named mine ‘contains: text parser module and email’.
- Add another column to store the email address that the email body contains. I’ve called it Email Address Shared.
- Click on the cloned Google Sheets module to configure the setup.
- Now change the worksheet to the new one you just created.
- Lastly, map the output from the Match Pattern module ($1) to the column where you wish to store the email address (Email Address Shared).
- Hit OK, save the scenario and take it for a test run.
You will need to send two separate emails to the connected email address as follows:
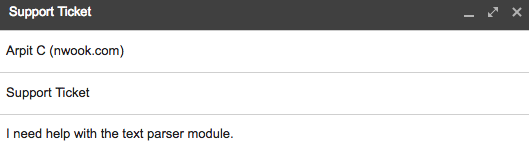
1. Containing the phrase “text parser module” (and no email address)
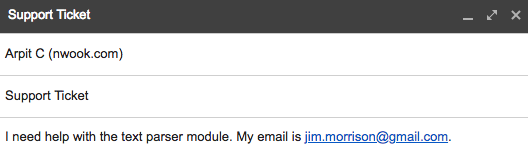
2. Containing the above phrase and an email address
If there are no errors in your setup, you will see that the first worksheet captures all emails containing the phrase “text parser module” while the second worksheet captures only those that contain the phrase “text parser module” and an email address. You may refer to the screenshots below.
Worksheet 1:

Worksheet 2:

That’s it. Thank you very much for going through the entire article. Please drop your questions in the comments and leave a clap or two if you found it helpful.
Resources:
Free exercises to learn about Regular Expressions
Learn about Phone Number Matching using Regex
Learn about Email Matching using Regex


